Cheesecake Deviled Strawberries
The Ultimate Guide to Cheesecake Deviled Strawberries: A No-Bake Sensation
If there is one dessert that perfectly bridges the gap between healthy fresh fruit and indulgent creamy sweetness, it is the Cheesecake Deviled Strawberry. Imagine the bright, acidic burst of a ripe, red strawberry paired immediately with the smooth, rich velvet of a sweetened cream cheese filling, all finished with the satisfying crunch of graham cracker crumbs. It is a bite-sized cheesecake that requires absolutely no baking, no water baths, and no stress.
This dish has taken social media by storm, often labeled as “deviled” strawberries not because they are spicy, but because they borrow the preparation method of deviled eggs—hollowed out and stuffed with a delicious filling. Whether you are prepping for a summer barbecue, a romantic Valentine’s Day evening, or simply need a quick sweet fix on a Tuesday night, this recipe is your new best friend.
In this comprehensive guide, we will walk through everything you need to know to master this treat. We will cover the best ingredients to buy, how to prep your fruit so it sits flat, variations for dietary restrictions (yes, these can be Keto!), and tips for ensuring your filling is silky smooth and lump-free.
Why You Will Fall in Love With This Recipe
There are countless reasons why this specific recipe deserves a permanent spot in your recipe box. Here is why home cooks everywhere are obsessed with it:
- Speed and Simplicity: With only a handful of ingredients and about 20 minutes of active work time, you can have a platter of elegant desserts ready to serve.
- Visual Appeal: The contrast between the deep red strawberries, the snow-white filling, and the golden crumbs makes for a stunning presentation on any table.
- Portion Control: Unlike a slice of heavy cake, these are bite-sized. You can have one or two to satisfy a craving without feeling weighed down.
- Versatility: The base filling is a blank canvas. You can flavor it with lemon zest, cocoa powder, or almond extract to suit your mood.
Ingredients: What You Need
The beauty of this recipe lies in its simplicity. However, because there are so few ingredients, quality matters. Here is your shopping list:
- 18-24 Large Strawberries: Look for firm, bright red berries. Avoid ones with large white shoulders or bruises. The larger the berry, the easier it is to stuff.
- 1 (8 ounce) Package Cream Cheese: Full fat works best for the creamiest texture, but you can use Neufchâtel for a lighter version. Crucial: It must be softened to room temperature.
- 1 Cup Heavy Whipping Cream: This lightens the mixture, turning a heavy cheesecake spread into a fluffy mousse-like filling.
- 1/2 Cup Powdered Sugar (Confectioners’ Sugar): Adjust to taste. Powdered sugar dissolves instantly, ensuring no grainy texture.
- 1 Teaspoon Vanilla Extract: Use high-quality pure vanilla extract for the best flavor profile.
- 1/2 Cup Graham Cracker Crumbs: This mimics the “crust” of a cheesecake. You can buy them pre-crushed or crush your own sheets.
Step-by-Step Instructions
Follow these steps to ensure your strawberries look professional and taste divine.
1. Prepare the Strawberries
Wash your strawberries thoroughly in cold water and pat them completely dry with paper towels. If they are wet, the filling won’t stick, and they will slide around the plate. Using a paring knife, slice off the green stem (the hull). Then, cut the strawberry in half lengthwise (from top to bottom). If you want them to stand upright instead of laying flat, you can slice a tiny bit off the bottom tip of each strawberry half to create a flat base.
2. Hollow the Fruit
Using a small melon baller or a metal measuring spoon (the 1/2 teaspoon size works well), gently scoop out a small hollow in the center of each strawberry half. You want to remove a bit of the red flesh to create a “bowl” for the filling, but be careful not to pierce through the outer wall of the berry. Set the hollowed strawberries on a serving platter lined with paper towels (to catch any juices) while you make the filling.
3. Whip the Cream
In a medium chilled bowl, pour in the heavy whipping cream. Using a hand mixer or stand mixer with a whisk attachment, beat the cream on high speed until stiff peaks form. This means when you lift the beater, the cream stands up straight without drooping. Be careful not to overbeat, or you will make butter! Set this whipped cream aside in the fridge.
4. Beat the Cream Cheese
In a separate large bowl, place the softened cream cheese, powdered sugar, and vanilla extract. Beat this mixture on medium-high speed until it is completely smooth and creamy. Scrape down the sides of the bowl to ensure no lumps of plain cream cheese remain. This usually takes about 2-3 minutes.
5. Fold and Combine
Gently fold the whipped cream into the cream cheese mixture. Use a silicone spatula and use a “cut and fold” motion—cut down the middle, scrape the bottom, and fold over the top. Do this gently to keep the air in the whipped cream. Continue until the mixture is uniform in color.
6. Fill the Strawberries
You can spoon the mixture into the strawberries, but for the most professional “deviled” look, transfer the filling to a piping bag fitted with a star tip (like a Wilton 1M). Pipe a generous swirl of the cheesecake mousse into the hollow of each strawberry half. If you have extra filling, place it in a small bowl in the center of the platter for dipping.
7. Add the Topping
Immediately sprinkle the graham cracker crumbs over the top of the filling. The moisture from the cream will help them adhere. For an extra touch, you can lightly press them in to ensure they stick.
8. Chill and Serve
These are best eaten fresh, but they benefit from 30 minutes in the refrigerator to let the filling firm up slightly. Serve chilled.
Expert Tips for Success
Room Temperature is Key:
If your cream cheese is cold, it will be lumpy. No amount of mixing will fix lumpy cream cheese once the other ingredients are added. Leave your cream cheese block on the counter for at least an hour before starting. If you are in a rush, you can microwave it in 10-second intervals, but be careful not to melt it.
Drying the Berries:
Water is the enemy of this dessert. After washing, ensure the berries are bone dry. Any residual water will cause the creamy filling to slide right off the fruit, making for a messy presentation.
The “Stiff Peak” Test:
When whipping your heavy cream, stop the mixer frequently to check the consistency. You want it stiff enough to hold its shape. If it is too soft, your filling will be runny and won’t hold that beautiful piped swirl shape.
Variations to Try
Once you have mastered the basic recipe, try these fun twists to keep things exciting:
1. Chocolate Covered Strawberry Style
Before filling, dip the bottom of the strawberry in melted dark chocolate and let it set. Or, drizzle melted chocolate over the finished filled strawberries. You can also mix cocoa powder into the cream cheese filling for a chocolate cheesecake mousse.
2. The Keto/Low-Carb Version
This recipe is naturally close to being Keto-friendly. To make it fully low-carb:
– Swap the powdered sugar for a powdered erythritol or monk fruit sweetener.
– Skip the graham crackers. Instead, top with crushed pecans, almonds, or even crushed keto-friendly cookies.
3. Lemon Zest Freshness
Add 1 tablespoon of fresh lemon zest and 1 teaspoon of lemon juice to the cream cheese mixture. This adds a bright, citrusy note that pairs beautifully with the berries, making it taste like a lighter summer tart.
4. Oreo Cheesecake
Swap the graham cracker crumbs for crushed Oreo cookies (remove the cream centers before crushing). This turns the dish into a “Cookies and Cream” stuffed strawberry that kids absolutely adore.
Storage and Make-Ahead Instructions
Can I make these ahead of time?
Yes, but only up to a point. Strawberries tend to “weep” (release water) once they are cut and sugar is introduced. You can prep the strawberries and make the filling up to 24 hours in advance. Store the hollowed strawberries in an airtight container lined with paper towels, and store the filling in the piping bag in the fridge. Pipe them just 1-2 hours before serving for the best results.
How long do leftovers last?
Leftovers should be stored in the refrigerator in an airtight container. They are best consumed within 24 hours. After that, the strawberries will start to get mushy and the graham crackers will become soggy. They will still taste good, but the texture won’t be as perfect.
Can I freeze them?
It is not recommended to freeze the assembled strawberries. Thawed strawberries become very soft and release a lot of liquid, which will ruin the texture of the creamy filling. However, you can freeze dollops of the filling separately on a baking sheet for frozen cheesecake bites!
Serving Suggestions
These Cheesecake Deviled Strawberries are incredibly versatile. Here are a few ways to plate them for specific events:
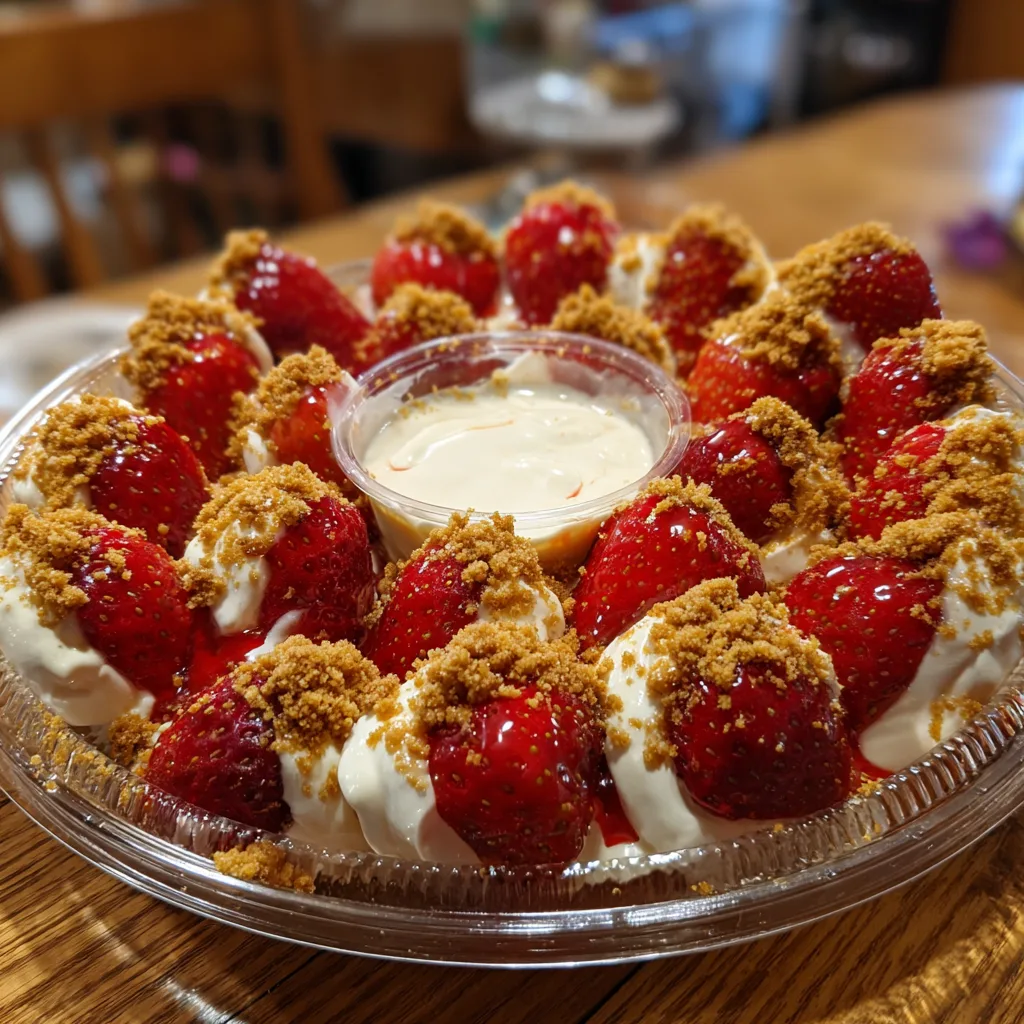
The Party Platter:
Arrange them in concentric circles on a round platter as shown in the photo. Place a small bowl of extra filling or chocolate ganache in the center for dipping.
The Elegant Dinner:
Serve three halves on a long rectangular dessert plate. Garnish with a sprig of fresh mint and a dusting of cocoa powder for a restaurant-quality look.
The Picnic Box:
Place them in cupcake liners inside a Tupperware container. This keeps them from rolling around during transport and makes them easy to grab without getting sticky fingers.
Nutritional Bonus
While this is a dessert, it carries the benefits of fresh strawberries. Strawberries are excellent sources of Vitamin C and manganese and contain decent amounts of folate (vitamin B9) and potassium. They are rich in antioxidants and plant compounds, which may have benefits for heart health and blood sugar control. By using fresh fruit as the “vehicle” for your dessert, you are automatically reducing the processed carb count compared to a traditional slice of cheesecake with a thick crust.
Frequently Asked Questions
Why is my filling runny?
This usually happens if the whipped cream wasn’t whipped to stiff peaks, or if the cream cheese was melted rather than just softened. Another culprit could be adding liquid sweeteners (like honey or maple syrup) instead of powdered sugar.
Can I use whipped topping (Cool Whip) instead of heavy cream?
Yes, you can! If you want to save a step, you can fold in an 8oz tub of thawed whipped topping instead of whipping your own heavy cream. The texture will be slightly sweeter and less rich, but it works perfectly well as a shortcut.
How do I transport these without them falling over?
If you didn’t slice the bottoms flat, transport is tricky. A great hack is to put a small dab of the cheesecake filling on the platter where you want to place the strawberry. It acts as edible glue to hold the berry in place.
Conclusion
Cheesecake Deviled Strawberries are the definition of “high reward, low effort.” They look impressive, taste like a slice of gourmet cheesecake, yet require zero baking skills. Whether you are a seasoned baker looking for a quick fix or a complete novice in the kitchen, this recipe is foolproof. The combination of juicy fruit, tangy cream cheese, and sweet crumbs is a timeless classic that appeals to everyone.
So, grab a carton of strawberries and get stuffing. Your next favorite dessert is just 20 minutes away!
Cheesecake Deviled Strawberries
Ingredients
Equipment
Method
- Wash strawberries and pat them completely dry. Hull the stems and slice them in half lengthwise. Optional: slice a small sliver off the bottom so they sit flat.
- Using a small spoon or melon baller, hollow out the center of each strawberry half to create a small bowl for the filling.
- In a mixing bowl, beat the heavy whipping cream until stiff peaks form. Set aside.
- In a separate bowl, beat the softened cream cheese, powdered sugar, and vanilla extract until smooth and creamy with no lumps.
- Gently fold the whipped cream into the cream cheese mixture until combined and fluffy.
- Transfer the filling to a piping bag (or a plastic bag with the corner cut off) and pipe the mixture into the hollowed strawberries.
- Sprinkle graham cracker crumbs over the top of the filling immediately.
- Serve immediately or refrigerate for up to 2 hours before serving for best texture.


