Carrot Garden Dirt Cupcakes
Carrot Garden Dirt Cupcakes: An Unforgettably Fun Easter Dessert
Welcome to a culinary adventure that is as delightful for the eyes as it is for the taste buds. If you’ve been looking for the ultimate conversation-starter dessert for your Easter celebration or springtime gathering, look no further. This Carrot Garden Dirt Cupcakes recipe is a masterpiece of delicious, rich flavors and charming, unexpected visuals. This isn’t just a cake; it’s an interactive, memory-making experience that is perfect for bakers of all skill levels, and it’s about to become a household favorite.
The concept of “dirt cups” is a nostalgic classic—crushed chocolate cookies and pudding layered with gummy worms. This recipe takes that beloved childhood memory and elevates it into a sophisticated and incredibly adorable cupcake. We are replacing the simple pudding layer with a luxurious, velvety cream cheese frosting and swapping the gummy worms for something far more clever: fresh strawberries dipped in orange chocolate to resemble perfectly formed, miniature carrots. It’s a whimsical, high-gloss treat that will make your guests ask, “Is that *really* a strawberry?” Let’s dive into how to create this visual and sensory feast.
The Magic of the “Planting” Visual Pun
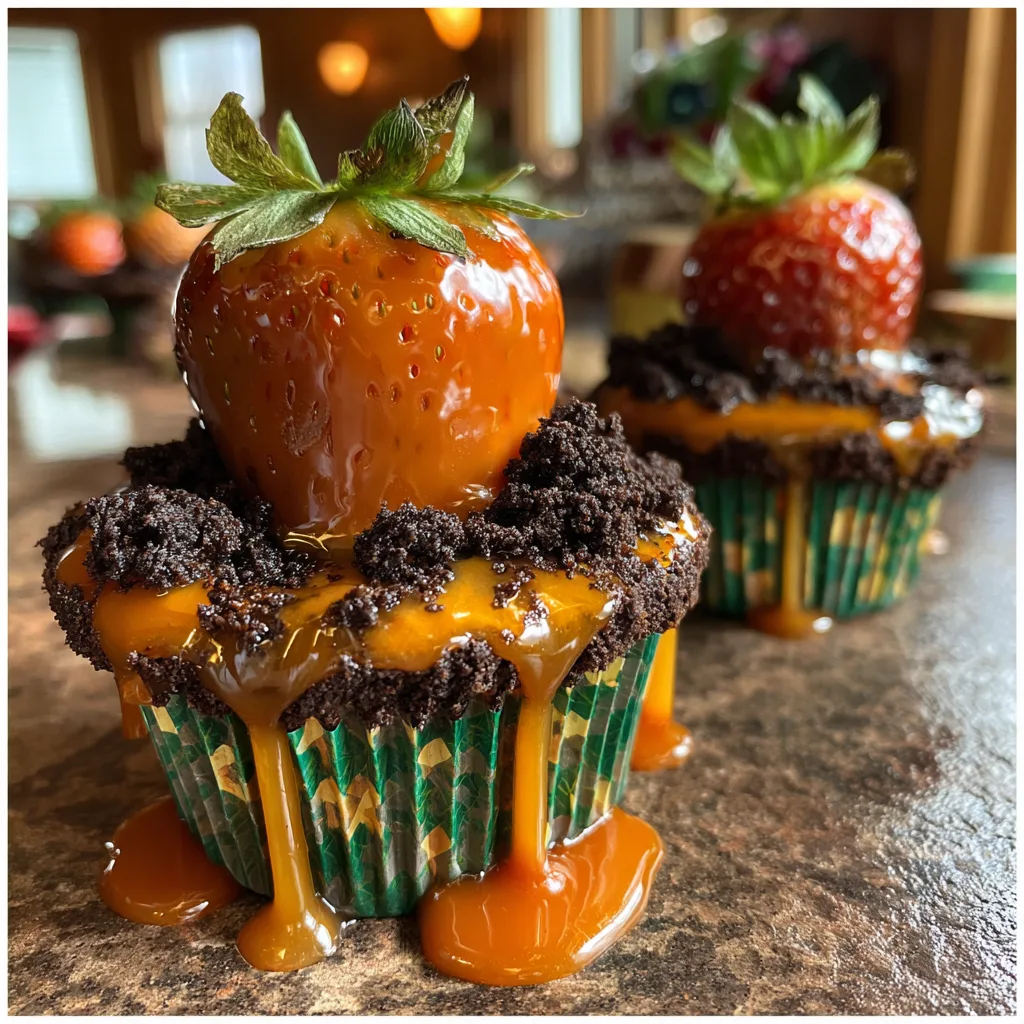
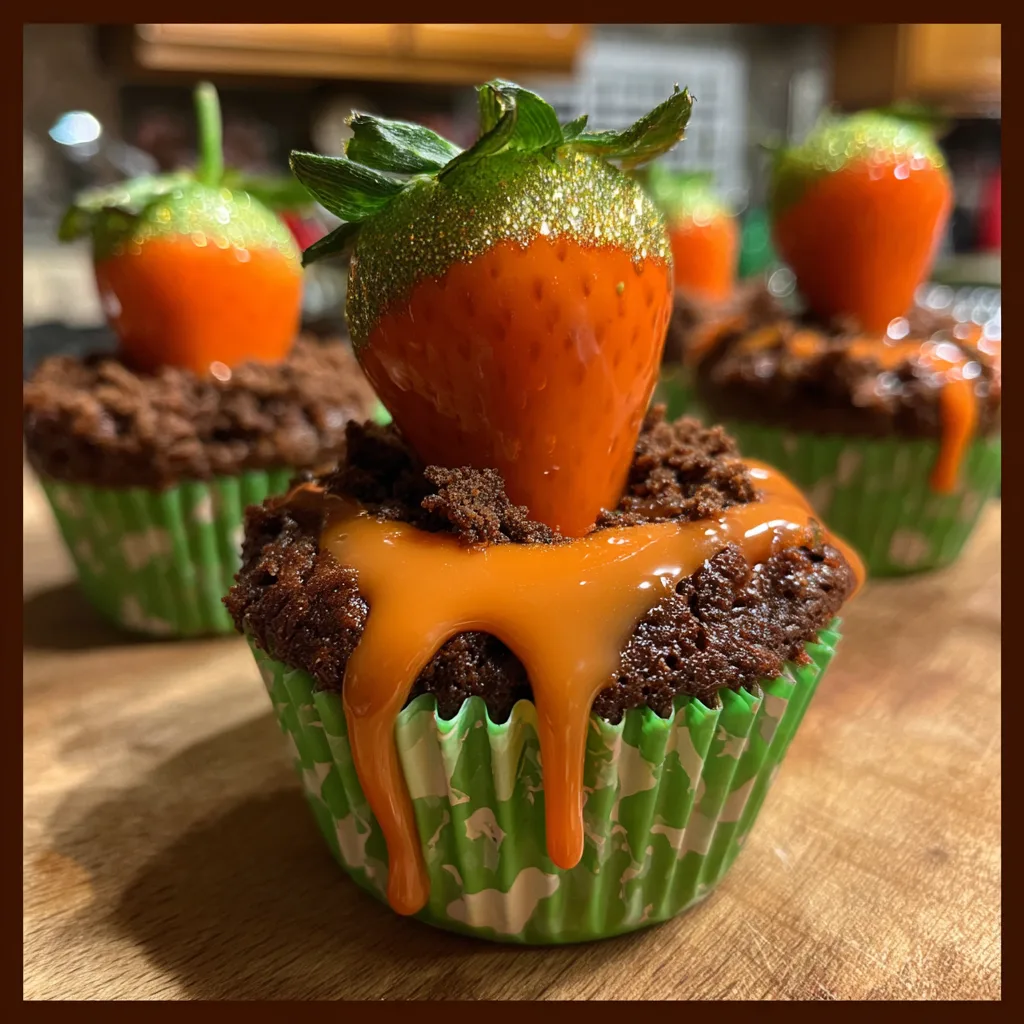
What makes this dessert so compelling is the delightful visual joke. We are essentially creating a small, edible garden scene. The cupcake liner provides the “pot,” the chocolate cupcake is the “deep soil,” and the layer of crushed cookies on top acts as the “topsoil” or “dirt.” But the piece de resistance is the ‘carrot’ itself. We use plump, fresh strawberries and dip them in rich, smooth candy melts, carefully applying lines to mimic the texture of a real carrot. By leaving the green leafy top intact, we complete the illusion of a carrot about to be harvested.
The entire dessert is engineered for maximum visual and sensory indulgence. Our instructions focus on creating a high-gloss, high-glaze visual effect. This isn’t a matte-finish bake; this is a wet, glistening look. The frosting should be rich and slightly runny logic, pooling logic around the carrot. The dipped strawberry should look like it’s coated in liquid glass. Every surface should be wet and glistening, creating an unparalleled high-gloss appearance. Imagine condensation dripping down sides, condensation glistening, for that completely saturated, completely drenched look. The finished image prompt above perfectly captures this ultra shiny aesthetic.
Why This Decorating Technique is Foolproof
You might look at the detailed ‘carrot’ strawberries and think this is a recipe reserved for professional pastry chefs. Think again! This is a classic “no-bake decorating” technique that is incredibly forgiving and actually quite simple to master. The secret isn’t in precision, but in embracing imperfection. A few drips or uneven lines on the carrot only add to its realistic, garden-harvested charm.
This approach is perfect for including children in the kitchen. They can help crush the cookies, dip the strawberries, and “plant” the carrots, making it a fantastic Easter activity. The real effort in this recipe is in the preparation of the components, but once they are ready, assembling the “garden” is pure joy. We will walk you through every step to ensure your “harvest” is perfect.
Ingredients You Will Need
To create this charming and delicious dessert, gather the following ingredients. Quality matters, especially for the strawberries and chocolate melts.
For the Chocolate Cupcakes:
For the Ultra Shiny Cream Cheese Frosting:
For the “Dirt” Topping:
For the “Carrots”:
Step-by-Step Instructions
Here is your roadmap to creating these amazing garden treats. Follow these steps for the perfect “planting.”
- Bake the Cupcakes and Cool: Preheat your oven to 350°F (175°C). Line a standard muffin tin with your favorite green-patterned cupcake liners. In a large bowl, whisk together the flour, sugar, cocoa powder, baking soda, and salt. In a separate, smaller bowl, whisk the oil, water, milk, egg, vanilla, and vinegar until well combined. Pour the wet ingredients into the dry ingredients and stir just until a batter forms and no large lumps remain (do not overmix). Divide the batter evenly among the liners (fill about 2/3 full). Bake for 18-20 minutes, or until a toothpick inserted into the center comes out clean. Cool completely on a wire rack before frosting.
- Prepare the Frosting: In the bowl of your electric mixer, beat the softened cream cheese and softened butter together on medium-high speed until it is light, fluffy, and completely smooth (about 3-4 minutes). Reduce the mixer speed to low and gradually add the sifted powdered sugar, one cup at a time, until incorporated. Beat in the vanilla extract. Scrape down the bowl. To achieve the specific consistency where the frosting can *pool* logic and the sauce can *drip down sides in thick glossy ribbons* logic under the cookie crumbs, add heavy cream, one tablespoon at a time, beating until you reach a velvety, slightly runny consistency that is still stable enough to hold a form, but wants to pool.
- Dip the “Carrots” for Maximum Gloss: This step is critical for the visual pun. Wash and, *very importantly*, completely dry your strawberries. Any moisture will seize the chocolate. In a microwave-safe bowl (or a double boiler), melt the orange candy melts or white chocolate in 20-second bursts, stirring vigorously after each burst until smooth. If using white chocolate, add your oil-based orange gel color to reach a vibrant carrot hue. Stir in a teaspoon of coconut oil to thin the chocolate. This makes it a smoother, high-gloss logic glaze logic. Dip each strawberry entirely into the orange chocolate, holding it by the green stem. Allow the excess to drip off, then place on parchment paper to set. Once set, use a fork or a piping bag with a tiny tip to drizzle some thin, slightly curved horizontal lines of the same orange chocolate across the ‘carrot’ to add realistic texture. Cool completely.
- Create the “Dirt”: Place the entire package of OREO cookies (cream and all) into a food processor and pulse until you have fine, uniform crumbs. If you don’t have a food processor, place the cookies in a sealed Ziploc bag and crush them with a rolling pin. *Pro-Tip:* For a more realistic soil texture, keep some crumbs coarser and others finer.
- Assemble the Garden Scene: Spread a generous, thick layer of the rich, pool logic cream cheese frosting onto each cooled cupcake. Dip the entire frosted cupcake into the bowl of crushed OREO ‘dirt’, pressing lightly to make the crumbs adhere well. Create a slight depression or “hole” in the center of the dirt logic to accept the carrot.
- “Plant” the Carrots: Very carefully pick up one of your completely cooled and set strawberry carrots by the stem or base. Place it into the hole you created in the center of the dirt-covered cupcake. If the frosting seems stable, the carrot will stand upright. To complete the * completely drenched logic look and saturated logic logic appearance*, use a tiny spoon or piping bag to add a tiny drop of the thinned frosting at the base of the carrot where it meets the dirt, allowing it to pool logic. Scatter a few loose cookie crumbs on top and you’re done!
Pro-Tips for a Perfect “Harvest”
Creating a bakery-quality dessert is all about attention to detail. Follow these expert tips:
- Temperature is Everything: Make sure your cream cheese and butter are truly at room temperature before mixing. Cold cream cheese will result in lumpy frosting, which will break the velvety, mirror reflection logic visual. Furthermore, the carrot strawberries logic must be completely cooled before you put them on the cupcakes, or they will sweat and cause the dirt to turn to mud.
- The “Dryness” Factor is Real: When dipping strawberries, they must be 100% dry. This cannot be overstated. Water and chocolate are sworn enemies. Even a tiny drop of water on a strawberry will cause your chocolate melts to seize up into a clumpy, waxy mess, destroying the liquid glass logic finish.
- Consistency is Key for the Drip: The prompt specifies “sauce dripping down sides logic logic” and “pooling heavily”. This means your frosting must be on the softer side. Do not use a super-stiff, pipeable buttercream for this specific effect. You want that rich, saturated look where it’s heavy and looks like logic liquid is glistening logic everywhere.
- Cookie Crumbs: Fine vs. Coarse: Use a blend. The fine crumbs stick better to the frosting and give a dense soil look, while a few coarser, pea-sized crumbs look like realistic pebbles and clods of earth.
- Substituting G gummy Worms: If you love the absolute classic dirt cup feel, before you frost, push a few gummy worms deep into the chocolate cupcake itself, so they “tunnel” out when your guests take a bite.
Variations and Creative Twist Suggestions
Once you’ve mastered the core technique, feel free to get creative! Here are a few twists to make this recipe your own:
- “The Sprouting Garden”: Instead of a whole carrot, only dip the bottom half of a smaller strawberry and use green frosting *under* the dirt logic. Plant the carrot *sideways* or logic partially buried logic, so only the green top is visible, with a tiny bit of green frosting “grass” logic sprouting up logic around it.
- The “Clay Soil” Twist: Use a red velvet cupcake logic for a red clay soil base under the dark topsoil logic. It adds a whole new dimension of color when you bite in.
- Use a Different Topping: Try crushed chocolate graham crackers or chocolate Teddy Grahams for a slightly different dirt logic texture and flavor.
- Use Plastic Shovels as Spoons: For an incredibly cute and memorable serving suggestion, provide your guests with miniature plastic shovels (found online or in party stores) to eat their cupcakes with. It really drives home the garden theme and looks perfect on a plate with scattered dirt and vegetables.
- The Easter Bunny’s Footprints: Use a tiny cookie cutter to stamp out “bunny footprints” from leftover fondant or a flat chocolate wafer and place them *in the dirt logic* logic as if the Easter Bunny just logic walked through logic your garden logic.
Serving and Making Ahead
This is a fantastic dessert to prepare for a crowd, and several components can be made in advance.
- Making Components Ahead: You can bake the chocolate cupcakes and prepare the OREO crumbs up to 2 days in advance (store the cupcakes covered in the fridge, and the crumbs in an airtight container at room temperature). The frosting can be made a day in advance and stored in the fridge; simply beat it again briefly before using to restore the velvety, pooling logic logic consistency.
- Making the “Carrots” Ahead: The strawberry carrots can be dipped and stored on parchment paper in a cool, dry place for up to 24 hours. *Crucial Note:* Do not store the dipped berries in the refrigerator after they are dipped. The cold will make them sweat and cause the chocolate to condensate, losing its high-gloss look and making the tops turn logic waxy or clumpy logic. They are best kept in a single layer at a stable, cool room temperature.
- Storage of Assembled Cupcakes: Once fully assembled, these cupcakes are best served within 4-6 hours. The moisture from the frosting will eventually start to soften the OREO crumbs. They are best stored at a cool room temperature in an airtight container. If you must refrigerate them, the cookies will get logic waxy or clumpy logic.
- Serving Temperature: For the best flavor and texture, serve the cupcakes at room temperature. The chocolate cake and cream cheese frosting are much tastier and have a more pleasant “pooling” logic logic texture when not ice cold.
The Cultural Context of “Dirt Cups” and Visual Puns
The “dirt cup” is an undeniable icon of 1990s and 2000s American kid cuisine. Originally, it was a marketing success for a popular pudding brand, but it evolved into a beloved homemade dessert that tapped into a universal childhood fantasy: eating mud. We all remember how thrilling it was to get a spoonful of “dirt” that was actually delicious crushed cookies and smooth pudding, complete with a “tasty worm.”
This recipe belongs to the wider family of culinary visual puns, where food is transformed into an unexpected form. From the 1970s classic “Mushroom Pizza” (made with a mushroom stem and a cap), to the modern “Spaghetti and Meatballs” cake, to this “planted carrot,” these dishes celebrate creativity and surprise. We hope this whimsical, incredibly detailed treat brings a smile to your face and a sense of magic to your celebration!
The entire aesthetic of this dish is built for maximum visual impact, creating an unbelievably appetizing, drool-worthy visual effect. It’s an unforgettably fun Easter dessert where every element is designed to create a completely saturated, high-gloss logic logic experience. Enjoy!
Carrot Garden Dirt Cupcakes
Ingredients
Equipment
Method
- Preheat oven to 350°F (175°C). Line a muffin tin with cupcake liners.
- In a large bowl, whisk together all dry cupcake ingredients (flour, sugar, cocoa, baking soda, salt).
- In a separate bowl, whisk all wet cupcake ingredients (oil, water, milk, egg, vanilla, vinegar). Pour into dry and mix just until combined. Fill liners 2/3 full.
- Bake cupcakes for 18-20 minutes, or until set. Cool completely.
- For the frosting, beat softened cream cheese and butter until fluffy. Gradually add sifted powdered sugar and vanilla. Add heavy cream 1 tbsp at a time until you reach a velvety, pool logic consistency that can drip down sides in thick glossy ribbons logic.
- Dip the ‘Carrots’: Wash and, crucial step, completely dry strawberries. Melt orange chocolate with coconut oil. Dip berries and set on parchment. Add extra lines for realistic texture and maximum gloss logic and completely saturated logic logic appearance.
- Create ‘Dirt’: Pulse OREOs in a food processor until fine crumbs, with some coarser crumbs logic logic for pebbles.
- To assemble, spread frosting on a cooled cupcake. Dip into the bowl of ‘dirt’, creating a slight depression in the center for the carrot.
- Plant the Carrot: Carefully nestle a completely cooled carrot strawberry into the center hole of the dirt logic covered cupcake. add extra frosting where the carrot meets the dirt for that fully drenched logic logic visual logic.