Bulbasaur Ice Cream Cone
The Ultimate Kawaii Bulbasaur Melon Matcha Ice Cream Cone Recipe
Welcome to the magical world of culinary imagination! If you have ever scrolled through social media and marvelled at the incredibly cute, vibrant, and nostalgic character foods found in Japanese theme parks, you are in for an absolute treat today. We are going straight into the heart of kawaii (cute) culture with this comprehensive guide on how to make your very own Kawaii Bulbasaur Melon Matcha Ice Cream Cones right in the comfort of your home kitchen.
This recipe is not just a dessert; it is an edible piece of art, a nostalgic trip down memory lane, and a surprisingly delicious flavor combination that will tantalize your taste buds. We are combining the refreshing, fruity sweetness of Japanese melon with the earthy, rich tones of premium matcha green tea, all sculpted into the shape of everyone’s favorite grass-type starter monster. Whether you are hosting a themed birthday party, celebrating a weekend with fellow gaming enthusiasts, or simply looking for a creative culinary project to challenge your dessert-making skills, this guide will provide you with every single detail you need to succeed.
The Magic of Character Food and Theme Park Nostalgia
Before we dive into the bowls and spatulas, let us talk about why character foods hold such a special place in our hearts. In Japan, the concept of “kyaraben” (character bento boxes) and character-themed cafes has elevated food presentation to an astonishing art form. It is about more than just sustenance; it is about sparking joy, eliciting a smile, and bringing beloved fictional worlds into our physical, everyday reality.
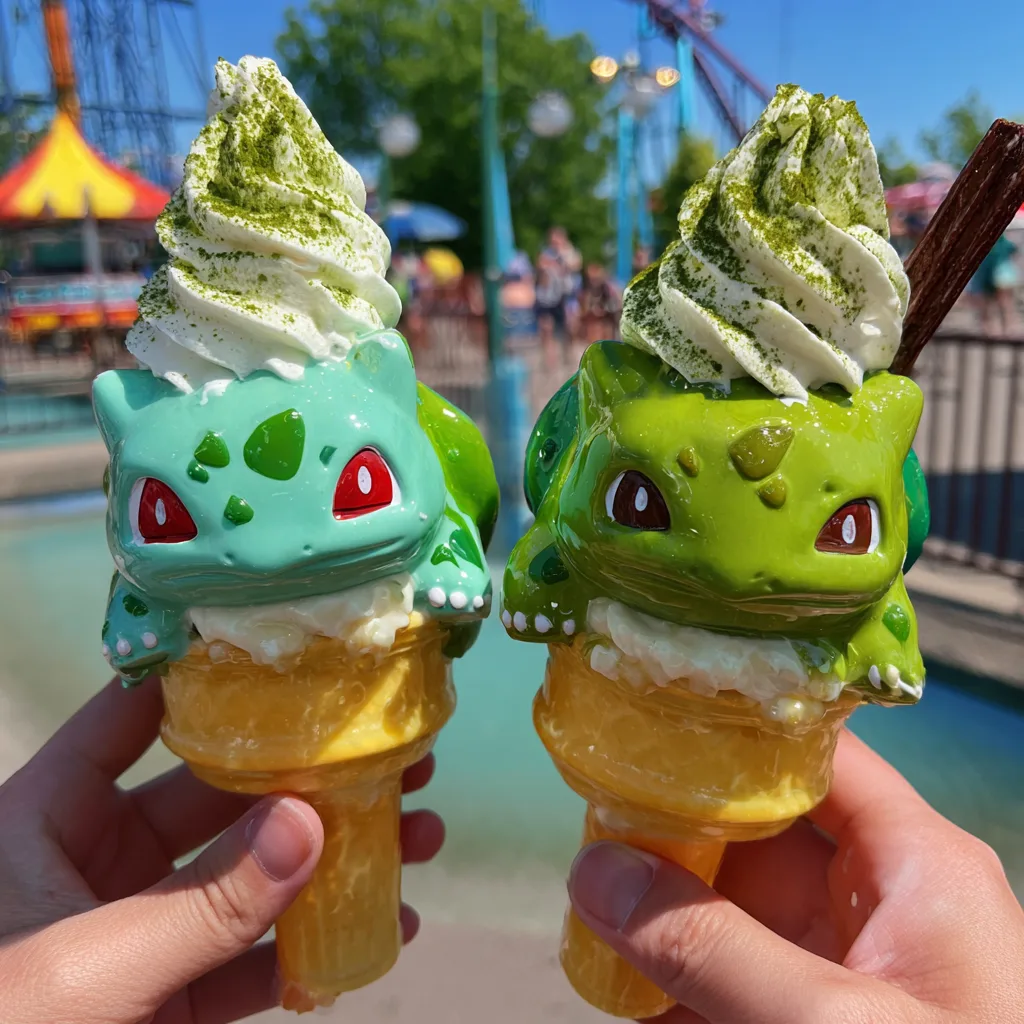
When you walk through the gates of a major amusement park, the themed snacks are often as highly anticipated as the roller coasters themselves. Taking a bite out of a snack that perfectly mimics a beloved character is a multi-sensory experience. With this recipe, we are capturing that exact theme park magic. You do not need an expensive plane ticket or a park admission pass to experience the joy of holding a perfectly sculpted, beautifully colored, and utterly delicious character ice cream cone. By taking the time to craft the iconic wide grin, the determined red eyes, and the iconic leafy bulb on the back, you are recreating a moment of pure, unadulterated childhood wonder.
Flavor Profile: The Perfect Marriage of Melon and Matcha
You might be wondering, what does a green, plant-inspired monster actually taste like? For this recipe, we have selected a flavor profile that is deeply rooted in Japanese dessert culture: Melon and Matcha.
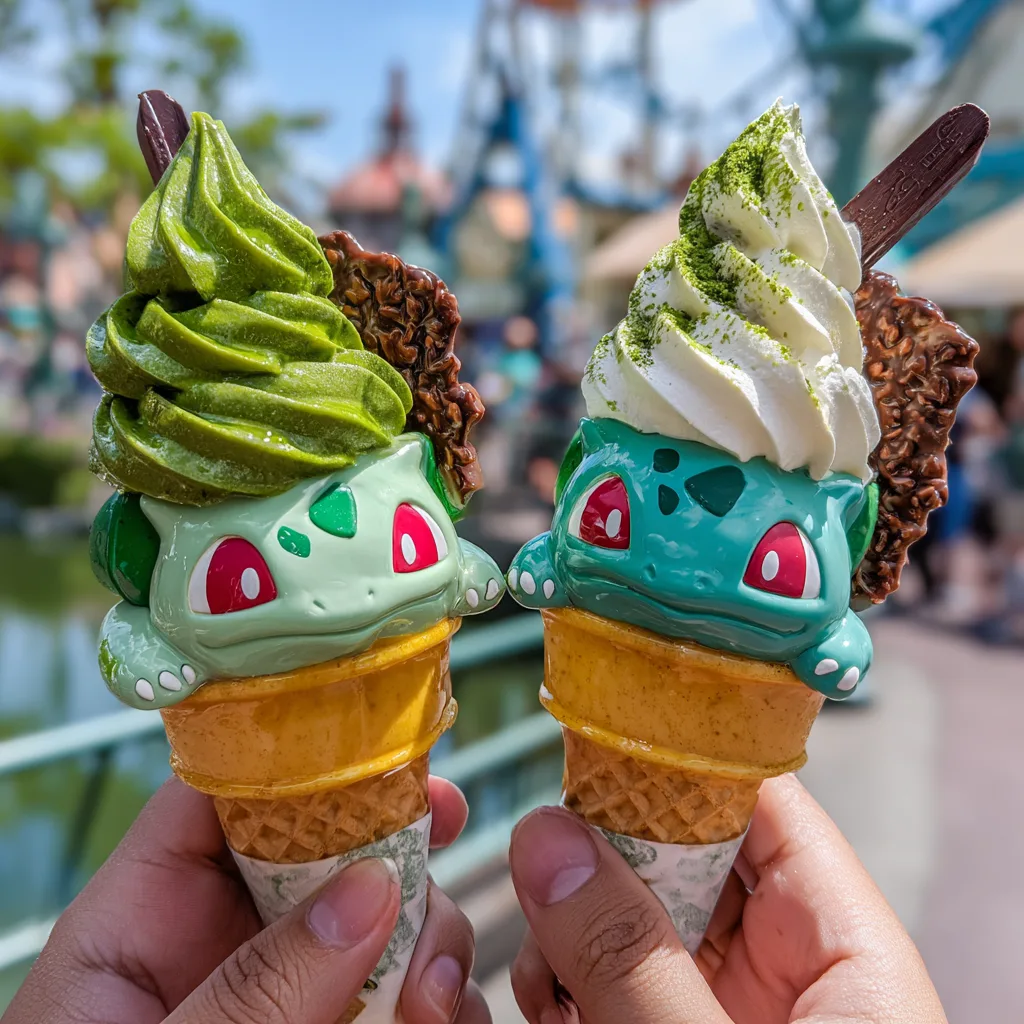
Japanese melon flavoring is distinct. It is vibrant, exceptionally fruity, and slightly floral, reminiscent of the famous Japanese melon soda that is a staple in cafes and vending machines across Tokyo. It provides a sweet, refreshing, and incredibly aromatic base for our ice cream. We tint this base a beautiful, vibrant teal-green to perfectly match the character’s skin tone.
To balance the fruity sweetness of the melon, we introduce matcha (finely ground green tea powder) in the toppings. Matcha brings a sophisticated, slightly bitter, and deeply earthy flavor that cuts through the richness of the ice cream and whipped cream. The bulb on the back of the character is represented by a generous swirl of whipped cream, dusted heavily with this beautiful green powder, bringing both visual authenticity and a complex flavor dynamic to the dessert. The combination is cooling, creamy, sweet, and perfectly balanced.
Essential Tools for Ice Cream Sculpting
Creating shaped ice cream requires a bit more than just a standard scoop. To achieve that perfect character look, you will need a few specialized but easy-to-find tools:
- A medium-sized cookie scoop for portioning the base ice cream.
- Food-safe silicone sculpting tools or a small offset spatula for smoothing out the facial features.
- Parchment paper and a baking sheet to create a cold working surface in your freezer.
- A piping bag with a large star tip for the perfect whipped cream “bulb” on the back.
- Small fondant shaping tools or toothpicks for placing the delicate eye and claw details.
Ingredients
Gather your ingredients! This recipe is broken down into the ice cream base, the decorative elements, and the cone assembly.
For the Melon Ice Cream Base:
- – 2 cups heavy whipping cream (cold)
- – 1 can (14 oz) sweetened condensed milk
- – 1 tablespoon high-quality Japanese melon flavor extract (or honeydew extract)
- – 1 teaspoon vanilla extract
- – Teal and light green gel food coloring
For the Matcha Whipped Cream “Bulb”:
- – 1 cup heavy whipping cream (very cold)
- – 3 tablespoons powdered sugar
- – 1 tablespoon premium culinary grade matcha powder (plus extra for dusting)
- – 1/2 teaspoon vanilla extract
For the Character Details and Assembly:
- – 6 large, high-quality flat-bottomed wafer cones (or standard sugar cones)
- – 2 ounces red rolling fondant (for the eyes)
- – 1 ounce white rolling fondant (for the eye highlights and claws)
- – 1 ounce dark green fondant or green candy melts (for the leaf garnish)
- – Chocolate Pocky sticks or thin chocolate pretzel sticks (for the stem)
- – A tiny amount of black edible food marker or black food paint
Instructions
Follow these steps carefully. Remember, patience is key when working with ice cream!
- Whip the Cream: In a large, chilled mixing bowl, use a hand mixer or stand mixer to beat the 2 cups of heavy whipping cream until stiff peaks form. Be careful not to over-beat, or it will turn into butter.
- Mix the Base: In a separate bowl, whisk together the sweetened condensed milk, melon flavor extract, and vanilla extract. Gradually add small drops of teal and light green gel food coloring until you achieve the perfect vibrant, monster-green hue.
- Fold and Freeze: Gently fold the colored condensed milk mixture into the whipped cream until completely combined and smooth, with no white streaks remaining. Pour this mixture into a freezer-safe container, cover tightly, and freeze for at least 6 to 8 hours, or preferably overnight until completely firm.
- Prepare the Details: While the ice cream freezes, prepare your fondant details. Roll out the red fondant thinly and cut out small, sharp triangular/oval shapes for the eyes. Roll tiny dots of white fondant for the eye reflections. Shape small, triangular white fondant pieces for the claws. If making the leaf garnish, shape the dark green fondant into leaves and score veins into them using a toothpick. Set all fondant pieces aside to harden slightly.
- Sculpt the Bodies: Line a baking sheet with parchment paper and place it in the freezer to chill for 15 minutes. Remove your frozen melon ice cream. Using an ice cream scoop, place a large, slightly elongated scoop of ice cream onto the chilled parchment paper. Using a chilled spoon or small spatula, gently shape the front to look like a wide face/snout. Place back in the freezer immediately. Repeat for as many cones as you are making. Let them set in the freezer for 30 minutes.
- Make the Matcha Cream: In a chilled bowl, whip the 1 cup of heavy cream, powdered sugar, matcha powder, and vanilla extract until stiff peaks form. Transfer this green-tinted whipped cream to a piping bag fitted with a large star tip.
- Assemble the Face: Remove the sculpted ice cream bodies from the freezer one at a time. Gently press the red fondant eyes into the face, adding the tiny white highlight dots. Press the white fondant claws into the bottom edges of the ice cream to look like feet resting on the cone. Use the black edible marker to draw a wide, cute mouth and two tiny dots for a nose. Place the decorated head on top of a wafer cone.
- Add the Bulb: On the back of the ice cream head, pipe a generous, swirling mound of the matcha whipped cream to represent the plant bulb.
- Final Touches: Generously dust the top of the whipped cream bulb with extra dry matcha powder. Insert the green fondant leaf and a piece of the chocolate Pocky stick into the cream to look like a sprouting plant. Serve immediately before it melts!
Pro Tips for Melting and Sculpting
Working with ice cream as a sculpting medium can be tricky because, well, it melts! Here are some crucial tips to ensure your kawaii creations look perfect:
First, always ensure your kitchen is as cool as possible. If you are baking something else, wait until the oven is off and the room has cooled down. Second, keep your hands cold. You can briefly hold an ice pack or wash your hands in cold water before handling the tools. Third, do not be afraid to use the freezer as your best friend. If at any point the ice cream is getting too soft or losing its shape, immediately put it back in the freezer for 10-15 minutes before continuing. It is better to work in short bursts than to end up with a melted, unrecognizable puddle.
Fun Variations to Try
Once you have mastered this recipe, the possibilities are endless. If melon is not your favorite flavor, you can easily substitute the extract for mint to create a refreshing mint chocolate chip monster (just mix mini chocolate chips into the base!). You could also use pistachio paste for a nutty, naturally green alternative.
If you want to create different characters, simply change the food coloring and the fondant shapes. Yellow ice cream with a lightning bolt tail makes for a fantastic electric mouse character, while pink strawberry ice cream can easily be sculpted into a round, singing puffball. The base recipe of condensed milk and whipped cream is incredibly versatile and acts as a blank canvas for your culinary imagination.
Serving Suggestions
These majestic ice cream cones demand an audience! If you are serving them at a party, consider setting up an assembly station. You can pre-sculpt the ice cream heads and keep them deep-frozen on a tray. When it is time for dessert, guests can grab a cone, plop a pre-made head on top, and use the piping bag to add their own matcha bulb and garnishes. This interactive element makes the dessert even more memorable.
Pair these sweet treats with cold Japanese barley tea (mugicha) or a refreshing, sparkling yuzu lemonade to cut through the richness of the heavy cream.
Fun Facts About Kawaii Desserts
Did you know that the “kawaii” aesthetic in Japanese food actually originated as a way to encourage children to eat their lunches? Mothers would spend extra time cutting sausages into octopuses and shaping rice into panda bears. This domestic act of love eventually spilled over into commercial cafes and high-end patisseries.
Furthermore, the use of matcha in sweet desserts is a relatively modern invention. Historically, premium matcha was reserved strictly for traditional tea ceremonies, prized for its umami flavor and health benefits. It wasn’t until the late 20th century that confectioners began widely incorporating the powder into ice creams, chocolates, and cakes, creating the global matcha-dessert phenomenon we know and love today.
Conclusion
Creating these Kawaii Bulbasaur Melon Matcha Ice Cream Cones is a labor of love, but the final result is absolutely worth the effort. You are not just following a recipe; you are crafting an experience, a memory, and a visually stunning dessert that bridges the gap between pop culture and gourmet home cooking. Take your time, enjoy the creative process, and do not forget to snap a dozen pictures before taking that magical first bite. Happy sculpting and happy eating!
Kawaii Bulbasaur Melon Matcha Ice Cream Cone
Ingredients
Equipment
Method
- Whip 2 cups of heavy cream until stiff peaks form.
- Whisk condensed milk, melon extract, vanilla, and food coloring until vibrant green.
- Fold the green milk mixture into the whipped cream. Freeze for 6-8 hours.
- Shape red fondant into eyes, white fondant into highlights and claws, and green fondant into leaves.
- Scoop frozen melon ice cream onto parchment paper and shape into wide faces. Freeze for 30 mins.
- Whip 1 cup heavy cream with powdered sugar, matcha powder, and vanilla for the bulb.
- Press fondant eyes and claws into the frozen ice cream faces. Draw mouth with edible marker. Place on cones.
- Pipe matcha whipped cream onto the back to form the bulb.
- Dust with dry matcha powder, insert green fondant leaf and chocolate stick. Serve immediately.