Bloomin’ Apples
The Ultimate Guide to Making Perfect Bloomin’ Apples
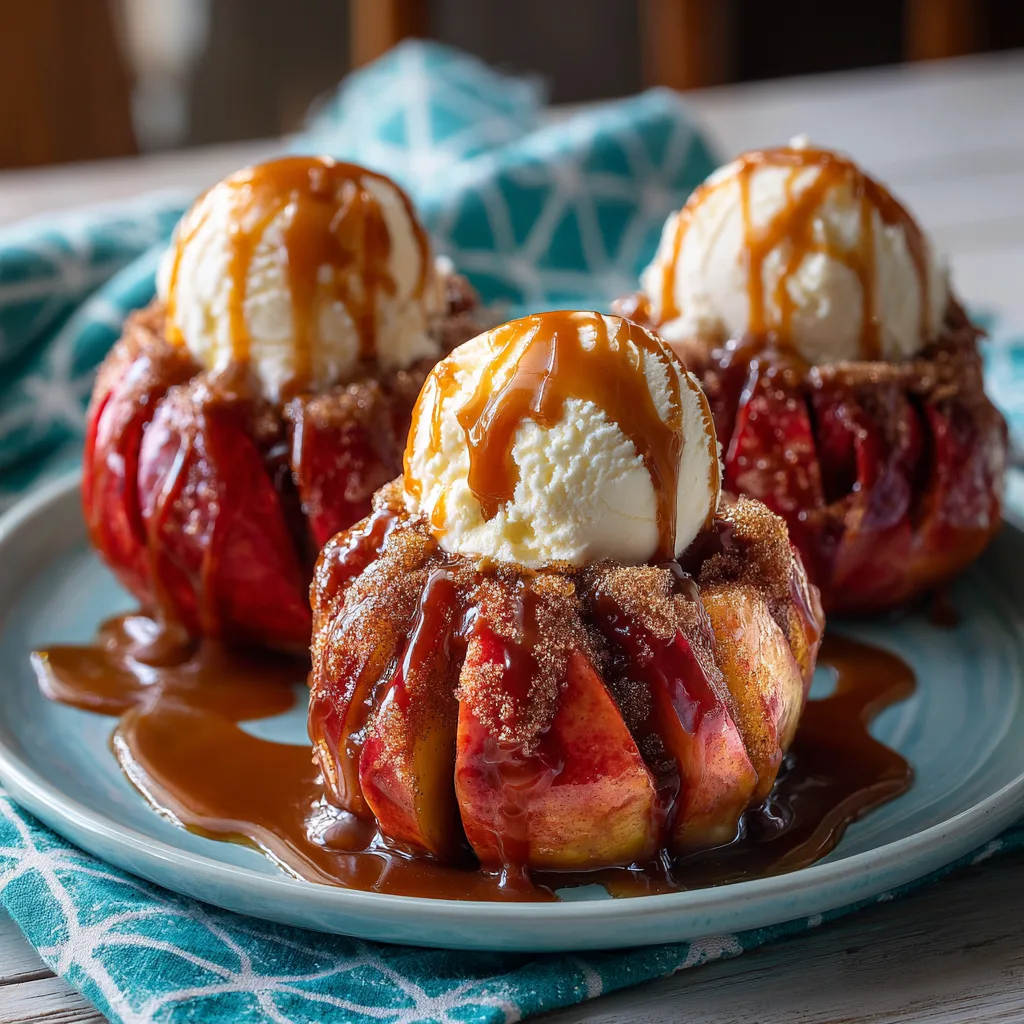
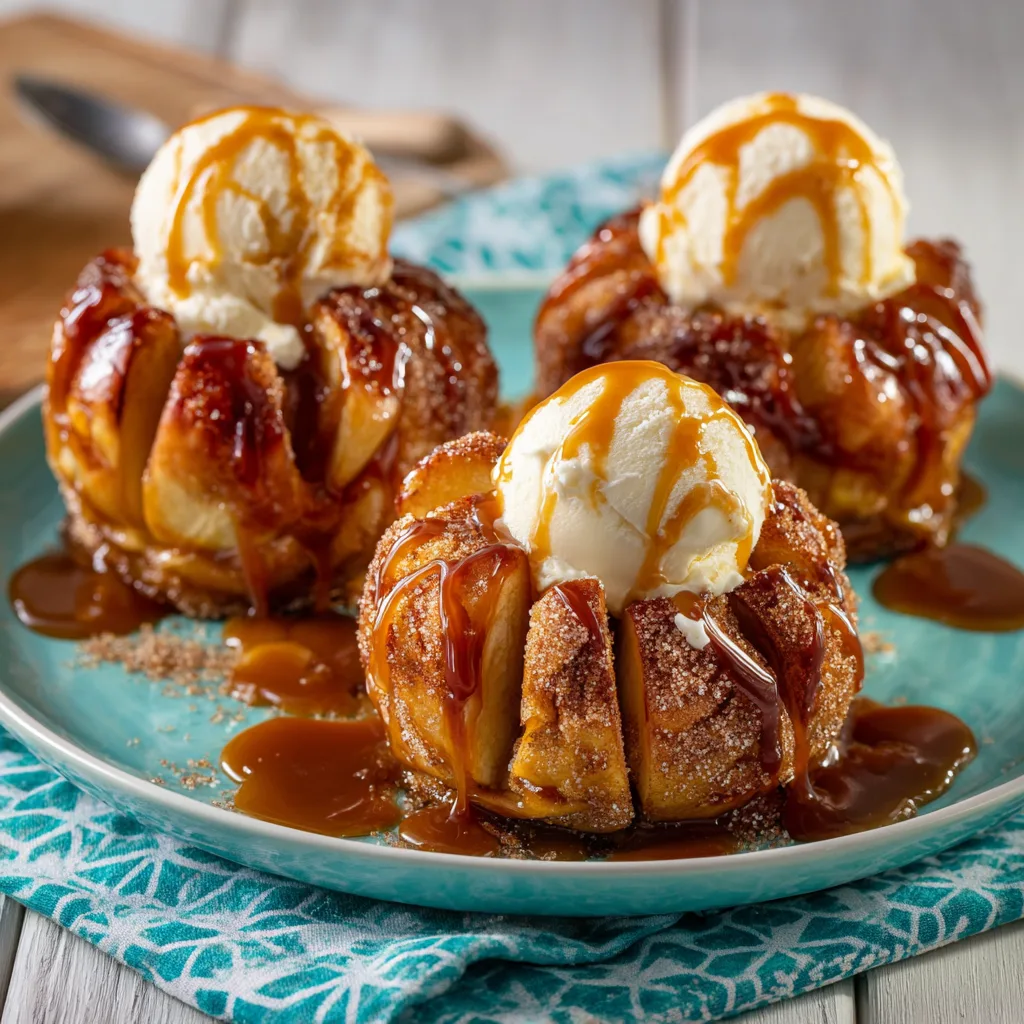
When the air turns crisp and the leaves begin to change, kitchens everywhere fill with the intoxicating aroma of cinnamon, nutmeg, and baking fruit. While traditional apple pie, apple crisps, and simple baked apples are beloved staples of the season, there is a visually spectacular, incredibly delicious, and surprisingly simple dessert that deserves the spotlight: the Bloomin’ Apple. Inspired by the famous deep-fried “blooming onion” appetizer found in steakhouses, this sweet adaptation takes a whole, fresh apple and transforms it into a stunning, fanned-out masterpiece of caramelized edges, tender fruit, and warm spices.
The true magic of the Bloomin’ Apple lies not just in its breathtaking presentation, but in the way the unique cutting technique enhances the flavor and texture of the dessert. By slicing the apple into concentric circles and radial petals, you expose an enormous amount of surface area. This allows the glorious mixture of melted butter, dark brown sugar, and warm autumnal spices to seep deep into every single crevice of the fruit. When baked, these edges caramelize and crisp up slightly, while the interior of the petals remains soft, tender, and intensely flavorful. Crowned with a generous scoop of cold vanilla ice cream and a heavy drizzle of rich caramel sauce, the resulting contrast of hot and cold, crisp and tender, sweet and spiced is nothing short of extraordinary.
The Magic of the Bloomin’ Technique
To truly master this recipe, one must understand the brilliance of the “bloomin” cut. Traditional baked apples are typically hollowed out and stuffed, meaning the flavor is concentrated solely in the center while the surrounding apple flesh remains relatively plain. The bloomin’ technique flips this dynamic entirely. By cutting the top off the apple, scooping out the tough core, and making a series of strategic cuts, the apple opens up—or “blooms”—like a flower as it bakes.
The heat of the oven causes the moisture inside the apple to expand, pushing the intricately sliced petals outward. Because every single petal has been brushed or drizzled with a buttery, sugary glaze, the entire apple becomes a flavor delivery system. You get the perfect ratio of sweet topping to tart apple in every single bite. Furthermore, the structural integrity of the bottom of the apple remains intact, creating a natural bowl that catches the melting ice cream and caramel sauce as you eat it, creating a decadent pool of sweet syrup at the bottom of the plate.
Choosing the Perfect Apple Variety
The foundation of any great apple dessert is, unsurprisingly, the apple itself. Not all apples are created equal when it comes to baking. For a Bloomin’ Apple, you need a variety that possesses a firm, dense structure capable of holding its shape when exposed to high heat. Apples that are too soft or mealy will turn into applesauce in the oven, completely ruining the beautiful blooming effect.
Honeycrisp: This is arguably the best overall choice. Honeycrisp apples have a sturdy, crisp texture that holds up beautifully in the oven. They offer a brilliant balance of natural sweetness and bright acidity, which pairs perfectly with the rich caramel and vanilla ice cream. Plus, their vibrant red-and-yellow skin looks beautiful when fanned out.
Granny Smith: If you prefer a dessert that isn’t overly sweet, the Granny Smith is your best friend. Its intense tartness cuts through the heavy sweetness of the brown sugar and caramel sauce, providing a wonderfully balanced bite. They are also incredibly firm and hold their shape flawlessly.
Fuji or Gala: These are great alternatives if Honeycrisp or Granny Smith are unavailable. They are naturally very sweet and have a pleasant texture, though they may soften slightly more than the firmer varieties. If using these, keep a close eye on your baking time.
Pink Lady (Cripps Pink): Another fantastic option that provides a tart-sweet flavor profile and excellent structural integrity during baking.
Why You Will Love This Recipe
There are countless reasons why Bloomin’ Apples will quickly become your go-to autumn dessert. First is the sheer “wow” factor. Setting a plate down in front of a guest with a perfectly fanned apple, topped with melting ice cream, never fails to elicit gasps of delight. It looks like a dessert you spent hours agonizing over in a professional pastry kitchen.
Secondly, it provides all the comforting, nostalgic flavors of an intricate double-crust apple pie with a fraction of the effort. There is no dough to chill, roll out, or crimp. There is no worrying about a soggy bottom crust or a filling that hasn’t set. It is an incredibly accessible recipe for bakers of all skill levels.
Finally, these are built-in individual portions. Nobody has to fight over who gets the biggest slice, and serving is as simple as transferring one apple to a plate. It is the ultimate fuss-free dinner party dessert.
Key Ingredients You Need
The ingredient list for this spectacular dessert is wonderfully short, relying on pantry staples you likely already have on hand. Here is what you need:
- – 4 large, firm baking apples (Honeycrisp, Granny Smith, or Fuji)
- – 1/4 cup unsalted butter, melted
- – 1/3 cup dark brown sugar, packed
- – 1 teaspoon ground cinnamon
- – 1/4 teaspoon ground nutmeg
- – A pinch of kosher salt
- – 4 scoops of high-quality vanilla bean ice cream
- – 1/2 cup caramel sauce (store-bought or homemade), warmed
The dark brown sugar is essential here, as the extra molasses content provides a deeper, richer caramelization than light brown sugar. Unsalted butter allows you to control the sodium level, while a tiny pinch of kosher salt actually enhances the sweetness and complexity of the spices. For the ice cream, don’t skimp—a rich, real vanilla bean ice cream provides the perfect creamy contrast to the warm, spiced fruit.
Step-by-Step Instructions
Follow these detailed steps to achieve the perfect bloom and flavor every single time:
- Preheat and Prepare: Preheat your oven to 375°F (190°C). Lightly grease a rimmed baking dish or line it with parchment paper for easier cleanup.
- Prepare the Apples: Wash and thoroughly dry the apples. Slice off the top 1/3 to 1/2 inch of each apple, removing the stem. Use a melon baller or a sharp paring knife to scoop out the tough core and seeds, being very careful not to puncture the bottom of the apple. You want to leave about a 1/2-inch thick base at the bottom.
- Execute the Bloomin’ Cuts: Place the apple cut-side down on your cutting board. Use a sharp paring knife to make two deep concentric circular cuts around the hollowed-out center. Again, do not cut through the bottom. Next, flip the apple over (cut side up). Make radial slices from the center hole outward toward the skin, spacing them about 1/4-inch apart all the way around the apple. It should look like the spokes of a wheel. (Pro tip: to ensure you don’t cut through the bottom, place two chopsticks on either side of the apple as a knife-stop).
- Make the Glaze: In a small bowl, whisk together the melted unsalted butter, packed dark brown sugar, ground cinnamon, ground nutmeg, and a pinch of salt until it forms a thick, wet sand-like paste.
- Stuff and Coat the Apples: Place the cut apples into your prepared baking dish. Spoon the butter and sugar mixture generously over the top of each apple. Use your clean fingers or a small pastry brush to gently separate the petals and push the sweet mixture deep down into the cuts you made.
- Bake to Perfection: Cover the baking dish tightly with aluminum foil. Bake in the preheated oven for 25 minutes. Carefully remove the foil and continue baking for another 10 to 15 minutes, or until the apples are tender when pierced with a fork and the petals have opened up (“bloomed”).
- Serve Immediately: Remove the apples from the oven. While they are still piping hot, use a large spatula to transfer them to individual serving plates. Immediately place a large scoop of vanilla ice cream right in the center well of each apple. Drizzle heavily with warmed caramel sauce and serve right away.
Pro Tips for the Best Bloomin’ Apples
Achieving the perfect Bloomin’ Apple is easy if you keep a few key tips in mind. The most critical step is the cutting. If you accidentally cut all the way through the bottom of the apple, it will fall apart in the oven and all your delicious butter and sugar will leak out into the pan. The chopstick trick mentioned in the instructions is a lifesaver for beginners. Place chopsticks flat on the cutting board flanking the apple; your knife blade will hit the chopsticks before it can slice completely through the fruit’s base.
Baking time can vary wildly depending on the exact size and variety of apple you use, as well as your specific oven. The foil-covering step is crucial; it traps the steam, ensuring the dense interior of the apple cooks through and softens. Removing the foil for the last 15 minutes allows the excess moisture to evaporate and helps the edges of the petals caramelize and firm up slightly.
Exciting Variations and Add-Ins
Once you have mastered the basic technique, the Bloomin’ Apple is a blank canvas for your culinary creativity. Here are a few ways to elevate or alter the flavor profile:
The Pecan Crunch: After pushing the butter and sugar mixture into the apple slices, press finely chopped, toasted pecans or walnuts into the crevices as well. The nuts will toast beautifully in the oven, providing a fantastic crunchy contrast to the soft apple.
Oatmeal Cookie Bloom: Create a quick streusel topping by mixing equal parts flour, brown sugar, and quick oats with a little cold butter. Crumble this mixture over the top of the apple before baking for a dessert that tastes exactly like an apple crisp.
Maple Bourbon Glaze: Swap out half of the brown sugar for real maple syrup, and add a splash of bourbon or high-quality vanilla extract to the melted butter mixture. This adds an incredible depth of flavor and an intoxicating aroma.
Serving Suggestions and Pairings
A Bloomin’ Apple is a rich, intense dessert that demands a beverage pairing that can stand up to its bold flavors. A freshly brewed cup of dark roast coffee or a shot of espresso is fantastic, as the bitterness of the coffee beautifully offsets the sweet caramel and ice cream. For a truly autumnal experience, serve these alongside mugs of hot, spiced apple cider or even a warm mulled wine.
While vanilla ice cream is the classic choice, do not be afraid to experiment with other ice cream flavors. Butter pecan, cinnamon bean, dulce de leche, or even a sharp cheddar cheese ice cream (for those who love the classic apple-and-cheese combination) can take this dessert to entirely new heights.
Storing and Reheating Leftovers
While Bloomin’ Apples are undeniably best served fresh and hot straight from the oven, leftovers can be saved. If you anticipate having leftovers, do not top all the apples with ice cream and caramel—only dress the ones you plan to eat immediately.
Store un-topped baked apples in an airtight container in the refrigerator for up to 3 days. To reheat, the microwave is your best bet to prevent drying them out. Microwave on medium power for 45 to 60 seconds until warmed through. Alternatively, you can place them back in a baking dish, cover with foil, and warm in a 350°F oven for about 10-15 minutes. Once heated, top with fresh ice cream and caramel.
The History of Baked Apples
The concept of baking whole apples dates back centuries. In early European and American history, apples were a crucial winter survival food because they stored so well in root cellars. Baking them over an open hearth or in a wood-fired oven softened tougher, older apples and concentrated their natural sugars, turning a simple staple into a prized sweet treat.
The “bloomin” technique, however, is a distinctly modern, American innovation. It directly borrows its visual aesthetic from the “Blooming Onion,” a wildly popular deep-fried appetizer popularized by the Outback Steakhouse chain in the late 1980s. Home cooks and food bloggers adapted the intricate cutting technique to fruit, realizing that the fanned petals solved the age-old problem of unevenly flavored baked apples.
Frequently Asked Questions (FAQs)
Can I make these ahead of time? Yes, you can prep the apples ahead of time. You can slice the apples and stuff them with the butter/sugar mixture up to 8 hours in advance. Keep them tightly covered in the refrigerator until you are ready to bake. You may need to add 5 extra minutes to the baking time if going straight from the fridge to the oven.
Why didn’t my apples “bloom”? This usually happens for two reasons. Either the cuts were not deep enough (they need to go almost to the bottom to allow the petals to spread), or the apple variety used was too soft and collapsed into mush rather than holding its shape.
Is it necessary to peel the apples? Absolutely not! In fact, peeling the apples is highly discouraged. The skin is essential for holding the structure of the petals together as they bake. Plus, the vibrant red or green skins add beautiful visual contrast to the finished dessert.
Conclusion
Bloomin’ Apples are the ultimate testament to the idea that you eat with your eyes first. They transform a humble piece of fruit into a dramatic, restaurant-quality dessert that requires surprisingly little effort. With their caramelized edges, tender spiced interiors, and the luxurious pairing of melting vanilla ice cream and warm caramel, they capture the very essence of fall in every single bite. Grab your knife, choose your favorite apples, and get ready to impress everyone at your table with this spectacular sweet treat.
Bloomin’ Apples
Ingredients
Equipment
Method
- Preheat oven to 375°F (190°C). Grease a rimmed baking dish.
- Slice off the top 1/3 inch of each apple to remove the stem. Use a melon baller to scoop out the core and seeds, leaving the bottom intact.
- Use a paring knife to make two deep concentric circles inside the apple. Then, make radial slices from the center outward, stopping just before slicing through the bottom.
- In a bowl, mix melted butter, brown sugar, cinnamon, nutmeg, and salt.
- Place apples in the baking dish. Spoon the butter mixture over the apples, pushing it deep into the sliced crevices.
- Cover the dish tightly with foil and bake for 25 minutes. Remove foil and bake an additional 10-15 minutes until tender and opened up.
- Transfer hot apples to plates. Top immediately with a scoop of vanilla ice cream and a heavy drizzle of caramel sauce.