Beach Sea Turtle Macarons
The Ultimate Guide to Beach and Sea Turtle Macarons: A Summer Baking Masterpiece
When the warm summer months arrive, bringing with them the promise of beach days, tropical vacations, and sun-soaked afternoons, our culinary cravings often shift toward bright, playful, and thematic treats. Enter the mesmerizing world of Beach and Sea Turtle Macarons. These delicate, visually stunning French pastries are not merely a dessert; they are an edible work of art that captures the serene beauty of the ocean and the charming appeal of marine life. Whether you are planning a spectacular summer pool party, a mermaid-themed birthday celebration, a baby shower, or you simply want to challenge your baking skills with a highly rewarding project, these intricately decorated macarons are guaranteed to be the undisputed showstopper of any dessert table.
There is a certain mystique surrounding the French macaron. Known for their notoriously finicky nature, achieving the perfect macaron—characterized by a smooth dome, an iconic ruffled “foot,” and a chewy, melt-in-your-mouth interior—is a rite of passage for many home bakers. However, when you combine this technical baking challenge with the artistic endeavor of piping custom shapes like sea turtles and painting miniature oceanic landscapes, you elevate the process from simple baking to genuine sugar artistry. In this comprehensive, deep-dive guide, we will demystify the entire process. We will walk you through the science of the perfect meringue, the crucial technique of macaronage, the precise piping methods required for shaped macarons, and the creative decorating steps to bring your sandy beaches and little green turtles to life.
Why You Will Fall Completely in Love with These Themed Macarons
At first glance, attempting to bake and decorate these Beach and Sea Turtle Macarons might seem incredibly daunting. The internet is flooded with tales of cracked shells, hollow interiors, and spreading batter. However, the immense satisfaction that comes from pulling a perfectly baked tray of adorable turtles out of the oven is unmatched. These macarons offer a unique opportunity to channel your creativity. You are not just following a recipe; you are sculpting and painting with sugar.
Furthermore, the flavor profile is infinitely customizable. While the shells themselves boast the delicate, nutty flavor of finely ground almonds and the sweet, marshmallow-like texture of a good meringue, the filling is where you can truly let your imagination run wild. You can pair these summery designs with equally summery flavors: a zesty lemon buttercream, a rich toasted coconut ganache, a tangy passionfruit curd, or a classic, reliable vanilla bean buttercream. The contrast between the crisp exterior shell and the soft, flavorful filling provides a textural experience that is simply luxurious.
Finally, these macarons are the ultimate gifting item. Imagine presenting a beautiful bakery box filled with alternating sea turtles and sparkling beach scenes to a friend or loved one. They look like they were purchased from a high-end Parisian boutique, yet they carry the heartfelt, personal touch of a homemade creation. They are conversational pieces that will have your guests marveling at your skills and begging for the recipe.
The Foundation: Mastering the Macaron Shell
Before we can sculpt turtles or paint waves, we must build a solid foundation. The macaron shell is composed of three primary ingredients: almond flour, powdered sugar, and a meringue made from egg whites and granulated sugar. For this recipe, we will be utilizing the French method, which involves whipping raw egg whites with sugar until stiff peaks form, before folding in the dry ingredients.
The Dry Ingredients: Sifting is Non-Negotiable
The hallmark of a perfect macaron is a completely smooth, flawless top. To achieve this, your dry ingredients must be incredibly fine. You must use blanched, super-fine almond flour. Even with high-quality almond flour, sifting it together with the powdered sugar is an absolute necessity. In fact, many professional bakers recommend sifting the mixture two or even three times. Any large pieces of almond left behind will cause your macarons to look bumpy and rustic rather than sleek and professional. Discard any stubborn, large almond bits that refuse to pass through your fine-mesh sieve.
The Meringue: The Science of Stiff Peaks
The meringue is the structural backbone of the macaron. Start with room-temperature egg whites, as they whip up to a greater volume than cold eggs. Ensure that your mixing bowl and whisk attachment are impeccably clean and free of any residual grease, as fat is the enemy of a strong meringue. Whip the egg whites until they become frothy, then slowly stream in your granulated sugar. Continue to whip until you reach “stiff peaks.” This means that when you remove the whisk from the bowl and hold it upside down, the peak of the meringue stands straight up without drooping whatsoever. It should be glossy, thick, and marshmallow-like.
The Macaronage: The Make-or-Break Moment
Macaronage is the French term for folding the dry ingredients into the meringue. This is where most macaron recipes succeed or fail. You want to gently fold the almond mixture into the egg whites, scraping the sides and bottom of the bowl, and occasionally pressing the batter against the sides to deflate some of the air bubbles. You are looking for a very specific consistency: the “lava” stage. When you lift your spatula, the batter should flow off it in a thick, continuous ribbon. You should be able to draw a figure-eight in the bowl with the flowing batter without the ribbon breaking. If it falls off in clumps, it is under-mixed. If it runs like water, it is over-mixed, and unfortunately, over-mixed batter cannot be saved.
Coloring and Piping: Bringing the Theme to Life
Because we are making two distinct designs—green turtles and blue/white beaches—you will need to divide your perfectly mixed batter.
Creating the Colors
Always use gel food coloring for macarons. Liquid food coloring adds unnecessary moisture to the batter, which can alter the delicate chemical balance and cause your shells to crack or spread excessively. Divide your batter into two bowls just before the macaronage process is fully complete (while it is still slightly under-mixed). Tint one bowl a soft, ocean blue and the other a vibrant seafoam green.
Piping the Beach Rounds
The ocean-themed macarons begin as standard round shells. Fit a piping bag with a medium round tip (like a Wilton 12) and fill it with the blue batter. Hold the piping bag completely vertical, about half an inch above your parchment-lined baking sheet. Squeeze gently, keeping the tip stationary, until the circle reaches about 1.5 inches in diameter. Stop squeezing, and quickly pull the bag away with a small circular motion to avoid leaving a “tail.”
Piping the Sea Turtles
The turtles require a bit more finesse. Using the green batter, pipe a standard round circle to serve as the turtle’s main shell. Then, using a smaller piping tip (or simply cutting a smaller hole in a piping bag), carefully pipe four small dollops around the shell to act as the flippers, and one slightly larger dollop at the top for the head. The batter should flow together slightly to create a cohesive shape. Be mindful of spacing, as these will spread a little bit.
The Crucial Resting Period
Once piped, you must aggressively tap the baking sheets flat against your kitchen counter several times. This forces any trapped air bubbles to the surface, which you can then pop with a toothpick. After tapping, the macarons must rest at room temperature until a “skin” forms on top. You should be able to gently touch the surface of the macaron without any batter sticking to your finger. This resting phase is what forces the macaron to rise upward during baking, creating the signature ruffled feet, rather than spreading outward into a puddle.
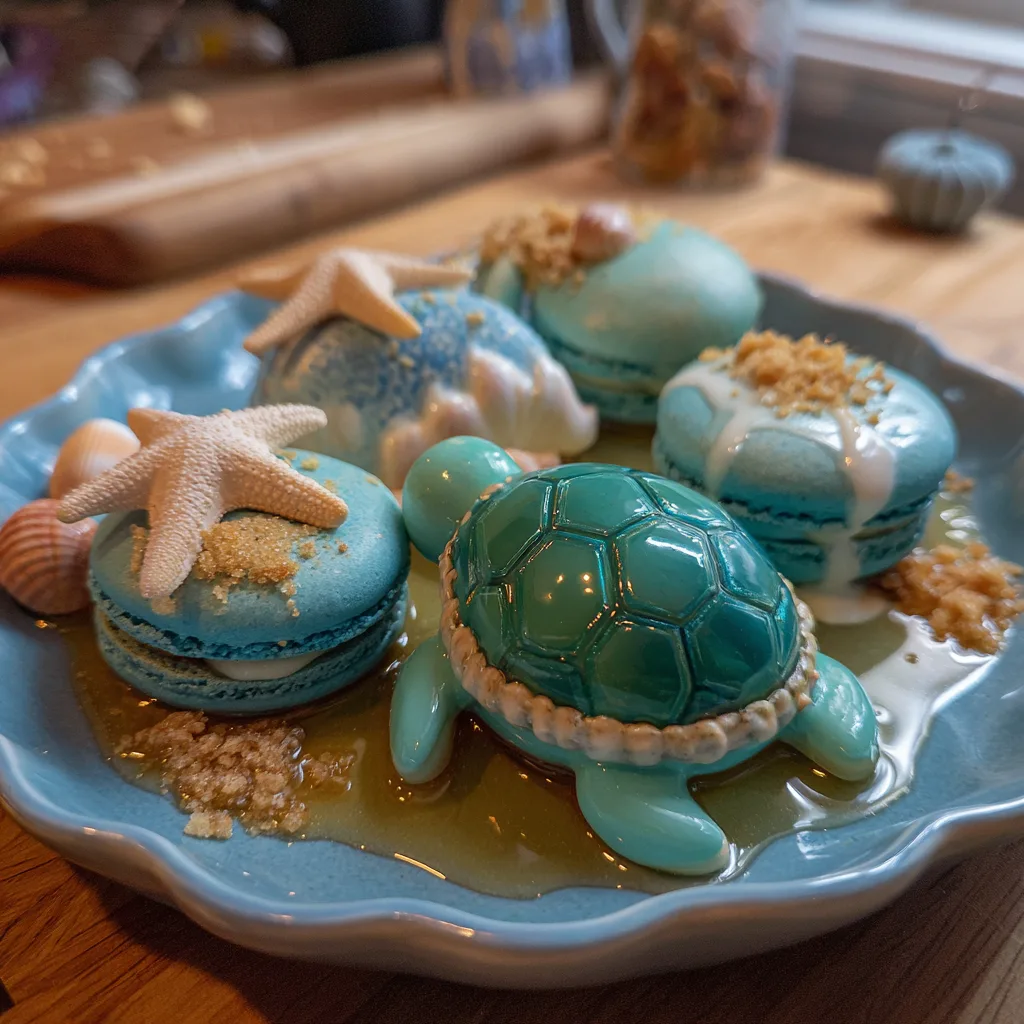
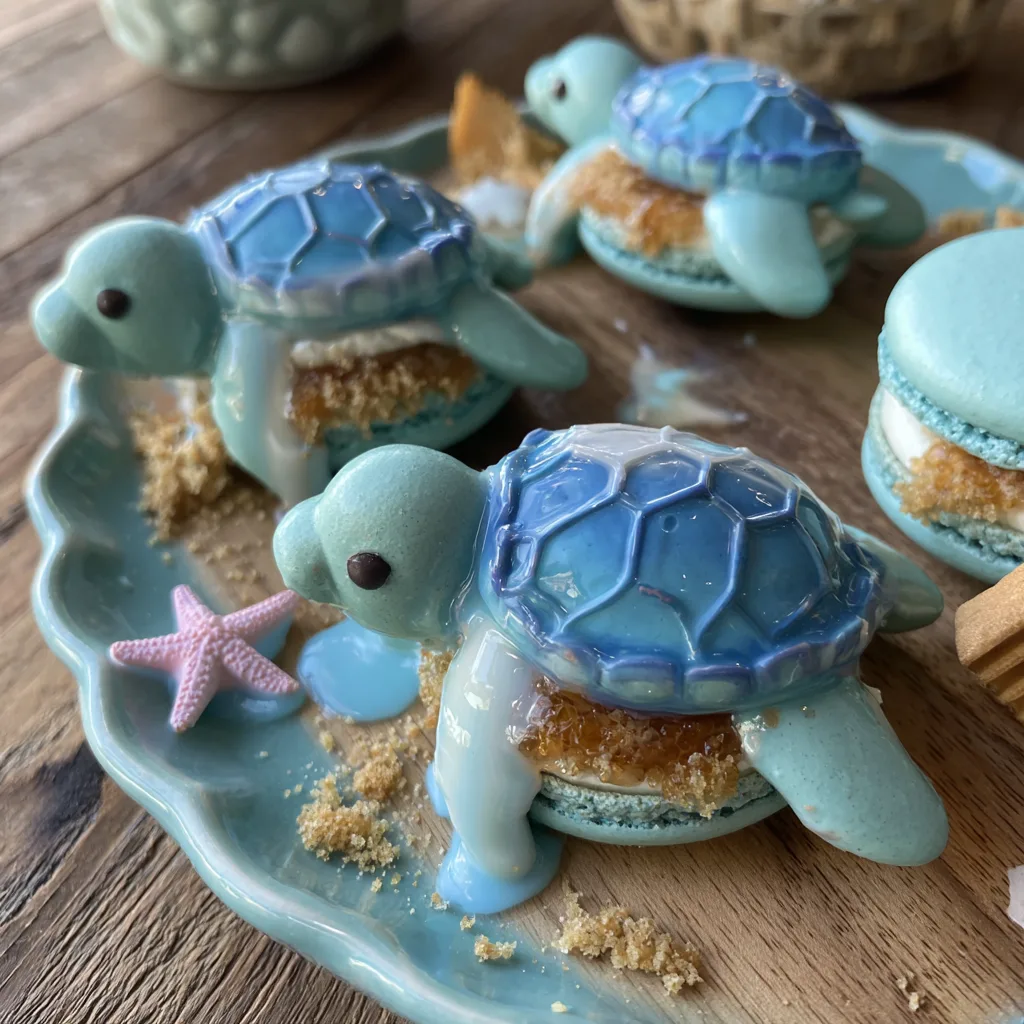
The Art of Decoration: Sand, Surf, and Shells
After your beautifully baked shells have cooled completely, the real artistic fun begins.
Crafting the Beach Scene
To create the sandy shore, take your baked blue round macarons. You will need a small amount of stiff white royal icing and crushed graham crackers (or brown sugar) to act as the sand. Spread a thin layer of clear syrup or a tiny bit of royal icing on one half of the blue shell, and carefully dip it into the crushed graham crackers to create the “beach.” Next, pipe a jagged, irregular line of white royal icing along the border where the blue “water” meets the “sand.” Use a small, damp paintbrush or a toothpick to pull and swirl the white icing slightly over the blue to mimic the look of crashing sea foam and rolling ocean waves. While the icing is still wet, carefully attach tiny, pre-made sugar seashells or starfish onto the sandy portion.
Detailing the Sea Turtles
For the turtles, you want to accentuate their shells. Mix a small batch of royal icing and tint it a darker shade of green than your baked turtle shells. Place it in a piping bag with an ultra-fine tip (like a Wilton 1 or 2). Delicately pipe the geometric, hexagonal patterns characteristic of a turtle shell onto the back of the macaron. Finally, use a tiny dot of black edible marker or black royal icing to give the turtle two little eyes on its head.
Filling and Maturing: The Final Test of Patience
Once your top shells are completely decorated and the icing has dried, it is time to assemble. Match your decorated top shells with similarly sized plain bottom shells. Pipe a generous ring of your chosen filling—such as a sturdy, creamy vanilla buttercream—onto the bottom shell, and gently press the decorated top shell onto it until the filling reaches the edges.
The hardest part of making macarons is what comes next: the maturation process. While it is tempting to eat them immediately, macarons are best enjoyed after they have matured in the refrigerator for 24 hours. This resting period allows the moisture from the filling to slightly soften the crisp interior of the shells, resulting in that iconic, chewy, harmonious texture that makes the French macaron so universally beloved. When you are ready to serve, pull them from the fridge and let them come to room temperature for about 20 minutes for the ultimate flavor experience.
Ingredients
- – 1 3/4 cups powdered sugar
- – 1 cup super-fine blanched almond flour
- – 3 large egg whites (at room temperature)
- – 1/4 teaspoon cream of tartar
- – 1/4 cup granulated sugar
- – Green and Blue gel food coloring
- – 1 cup unsalted butter (softened, for filling)
- – 2 cups powdered sugar (for filling)
- – 1 teaspoon pure vanilla extract (for filling)
- – 1/2 cup graham cracker crumbs (for sand decoration)
- – 1/4 cup white royal icing (for waves and details)
- – Dark green gel coloring (for turtle shell piping)
- – Edible sugar seashells and starfish
- – Black edible marker (for turtle eyes)
Step-by-Step Instructions
- Prep and Sift: Line two large, heavy-duty baking sheets with parchment paper or silicone macaron mats. In a large bowl, sift together the 1 3/4 cups powdered sugar and the almond flour. Sift a second time to ensure absolute fineness. Discard any large almond pieces.
- Whip the Meringue: In the impeccably clean bowl of a stand mixer fitted with a whisk attachment, beat the room-temperature egg whites and cream of tartar on medium speed until frothy. Gradually add the granulated sugar, one tablespoon at a time. Increase speed to high and whip until stiff, glossy peaks form.
- The Macaronage: Gently fold the sifted dry ingredients into the meringue using a silicone spatula. When the mixture is halfway combined, divide it evenly into two separate bowls.
- Coloring and Folding: Add blue gel color to one bowl and green gel color to the other. Continue folding each bowl separately until you reach the “lava” stage—the batter should flow off the spatula in a continuous, unbroken ribbon that forms a figure-eight. Do not over-mix.
- Piping: Transfer the batters to separate piping bags. For the beach rounds, pipe 1.5-inch circles with the blue batter. For the turtles, use the green batter to pipe a central circle, then immediately pipe four small dots for flippers and one dot for the head connected to the main shell.
- Tap and Rest: Firmly bang the baking sheets against the counter 4-5 times to release trapped air bubbles. Pop any visible bubbles with a toothpick. Let the macarons sit at room temperature for 30-60 minutes until a dry skin forms on the surface and they are no longer tacky to the touch.
- Bake: Preheat oven to 300°F (150°C). Bake one sheet at a time for 14-16 minutes. The macarons are done when they do not wiggle off their “feet” when gently nudged. Allow to cool completely on the baking sheet before attempting to remove them.
- Decorate the Beach: Brush a little clear syrup on half of the blue shells and dip in graham cracker crumbs. Pipe a jagged line of white royal icing where the crumbs meet the blue, swirling it slightly to look like waves. Attach sugar seashells.
- Decorate the Turtles: Tint a small amount of royal icing dark green. Use a fine piping tip to draw shell patterns on the green turtle backs. Add two small dots for eyes using a black edible marker or black icing.
- Make the Filling: Beat the softened butter until creamy. Gradually add the 2 cups of powdered sugar and vanilla extract, beating until light and fluffy.
- Assemble and Mature: Pair the decorated shells with plain bottom shells. Pipe buttercream onto the bottom shell and gently sandwich them together. Place in an airtight container in the refrigerator for 24 hours to mature before serving.
Troubleshooting Common Macaron Issues
Baking macarons is a learning process, and even seasoned bakers encounter issues. If your macarons crack on top, it usually means your oven temperature was too high or you did not let the shells rest long enough to form a proper skin. If your macarons lack the signature ruffled “feet,” the batter was likely over-mixed or the oven temperature was too low. If they are hollow inside, it often points to over-whipped meringue or removing them from the oven slightly too early. Remember to use an internal oven thermometer, as many home ovens run hotter or cooler than the display indicates.
Beach and Sea Turtle Macarons
Ingredients
Equipment
Method
- Sift together powdered sugar and almond flour twice. Discard large pieces.
- Whip egg whites and cream of tartar until frothy, slowly add granulated sugar, and whip until stiff, glossy peaks form.
- Fold dry ingredients into meringue. Divide batter and tint half blue and half green. Fold until batter reaches lava-like consistency.
- Pipe blue circles for beach macarons. Pipe a green circle with attached dots for flippers and head for turtle macarons.
- Tap trays firmly on the counter. Let rest for 30-60 minutes until a dry skin forms.
- Bake at 300°F (150°C) for 14-16 minutes. Cool completely on trays.
- Decorate blue shells with royal icing waves, graham cracker sand, and sugar shells. Decorate green turtles with dark green shell details and eyes.
- Whip butter, powdered sugar, and vanilla to make buttercream. Sandwich decorated shells with plain bottom shells using the filling.