Strawberry Floral Cheesecake
The Ultimate Strawberry Floral Cheesecake Recipe
There is something undeniably magical about a perfectly baked cheesecake. It is the crown jewel of the dessert world, offering a luxurious, velvety texture that balances richness with a subtle tang. But when you take that classic, creamy vanilla base and adorn it with an intricate, vibrant arrangement of fresh strawberries shaped like blossoming flowers, you elevate it from a simple dessert to an edible masterpiece. Welcome to the ultimate guide to making a stunning Strawberry Floral Cheesecake. Whether you are hosting an elegant summer garden party, celebrating a special anniversary, or simply treating your family to a weekend indulgence, this spectacular dessert is guaranteed to leave a lasting impression.
In this comprehensive, step-by-step guide, we will explore everything you need to know to create this breathtaking dessert from scratch. We will dive deep into the science of baking the perfect cheesecake, the secrets to avoiding those dreaded surface cracks, and the artistic technique behind arranging the stunning strawberry floral topping. Get ready to embark on a delightful baking journey that will transform your kitchen into an artisanal bakery.
Why This Strawberry Floral Cheesecake Will Steal Your Heart
Cheesecake is a globally beloved dessert, and for good reason. Its rich history dates back to ancient Greece, where it was served to athletes during the first Olympic games to provide energy. Over centuries, it evolved into the dense, cream cheese-based New York-style classic we adore today. This specific recipe takes that beloved classic and gives it a fresh, botanical twist.
First and foremost, the texture of this cheesecake is unparalleled. By using full-fat cream cheese, rich sour cream, and the gentle, even heat of a water bath, the filling becomes incredibly dense yet melt-in-your-mouth smooth. The crust, a buttery, sweet, and slightly salty foundation of crushed graham crackers, provides the necessary textural contrast to the soft filling. But the true star of the show is the topping. Rather than drowning the cake in a heavy, overly sweet fruit compote, this recipe utilizes fresh, ripe strawberries sliced thinly and layered to mimic the delicate petals of a flower. This not only offers a burst of fresh, tart flavor that cuts through the richness of the cheese but also transforms the cake into a visual showstopper.
The Magic Behind the Perfect Cream Cheese Filling
The foundation of any spectacular cheesecake is the filling. Achieving that signature dense-yet-creamy texture requires attention to detail and an understanding of your ingredients. The most crucial rule of cheesecake baking is temperature: all of your dairy ingredients must be at room temperature before you begin mixing. If your cream cheese is even slightly cold, it will form lumps that are impossible to beat out without over-mixing the batter.
Over-mixing is the enemy of a smooth cheesecake. When you overbeat the batter, especially after adding the eggs, you incorporate too much air into the mixture. In the oven, this trapped air expands, causing the cheesecake to puff up like a soufflé. As it cools, the air pockets collapse, leading to a sunken center and deep, unsightly cracks across the surface. To prevent this, mix your cream cheese and sugar on medium speed until smooth, but once the eggs are added, mix on the lowest possible speed just until combined.
The addition of sour cream in this recipe is a non-negotiable secret weapon. Sour cream adds a necessary tangy flavor that balances the heavy sweetness of the sugar and the richness of the cream cheese. Furthermore, the acidity in sour cream tenderizes the proteins in the eggs and cheese, resulting in a silkier, softer texture that a purely cream cheese-based filling lacks.
Selecting and Slicing the Best Strawberries for Decoration
Because the strawberries are the focal point of this dessert, their quality is paramount. When shopping for strawberries, look for berries that are firm, plump, and uniformly deep red. Avoid any berries with soft spots, bruising, or a significant amount of white around the stem, as these will lack the sweetness and vibrant color needed for your floral arrangement.
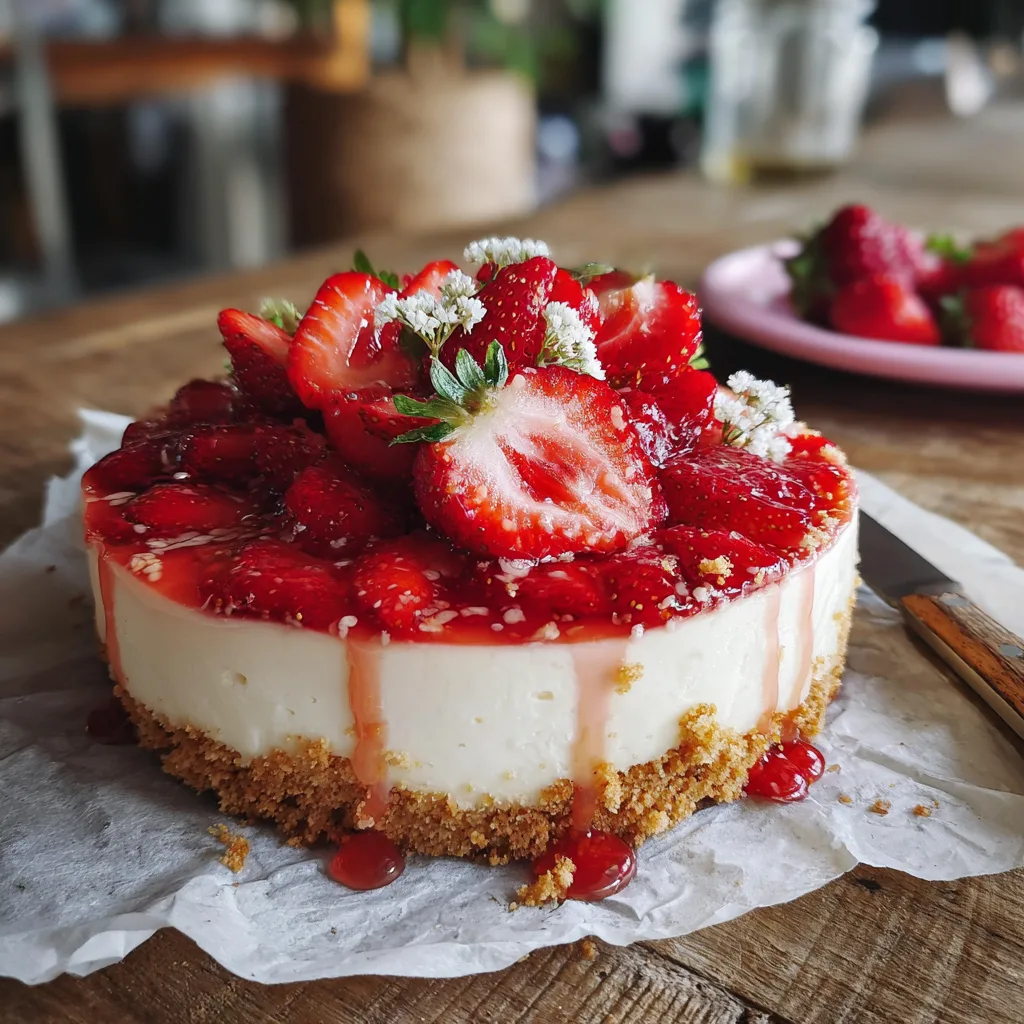
To create the floral design, you will need a sharp paring knife. The goal is to create thin, uniform slices that can be fanned out to represent petals. Start by hulling the strawberries (removing the green leafy top). Stand the strawberry upright on the cutting board and slice it vertically into thin, even pieces, discarding the rounded outer edges. When assembling the flowers on the baked and cooled cheesecake, start from the outside of your “flower” and work your way in, slightly overlapping each slice. Add tiny edible white blossoms (like strawberry blossoms or chamomile) and small green mint or strawberry leaves to complete the realistic floral illusion.
Ingredients
For the Graham Cracker Crust:
- – 1 and 1/2 cups graham cracker crumbs (about 12-14 full sheets)
- – 1/4 cup granulated sugar
- – 6 tablespoons unsalted butter, melted
- – 1/4 teaspoon fine sea salt
For the Cheesecake Filling:
- – 32 ounces (four 8-oz blocks) full-fat cream cheese, softened to room temperature
- – 1 cup granulated sugar
- – 1 cup full-fat sour cream, at room temperature
- – 1 tablespoon vanilla extract
- – 4 large eggs, at room temperature
For the Floral Strawberry Topping:
- – 1 pound fresh, ripe strawberries, washed and dried
- – Fresh small strawberry leaves or mint leaves (for garnish)
- – Tiny edible white flowers (like chamomile or strawberry blossoms, optional)
- – 2 tablespoons apricot jam or strawberry jelly (for glazing, optional)
- – 1 teaspoon warm water (for glazing, optional)
Step-by-Step Instructions
- Prepare the Pan and Oven: Preheat your oven to 350°F (175°C). Take a 9-inch springform pan and line the bottom with a circle of parchment paper. To ensure the crust doesn’t stick to the sides, lightly grease the inside of the pan with non-stick cooking spray or a touch of butter. Since we will be using a water bath later, securely wrap the outside of the springform pan with two or three layers of heavy-duty aluminum foil. Ensure the foil comes all the way up the sides to prevent any water from seeping in and ruining your crust.
- Make the Crust: In a medium-sized mixing bowl, combine the graham cracker crumbs, granulated sugar, melted butter, and fine sea salt. Use a fork to toss the mixture until it resembles wet sand and the butter is evenly distributed. Pour this crumb mixture into your prepared springform pan. Using the bottom of a measuring cup or a sturdy glass, press the crumbs firmly and evenly into the bottom of the pan and slightly up the sides (about 1 inch high).
- Bake the Crust: Place the pan in the preheated oven and bake for 8 to 10 minutes, or until the edges are just beginning to turn golden brown and the kitchen smells fragrant and buttery. Remove from the oven and allow the crust to cool completely on a wire rack while you prepare the filling. Leave the oven on, but reduce the temperature to 325°F (160°C).
- Mix the Cream Cheese and Sugar: In the large bowl of a stand mixer fitted with the paddle attachment, or using a hand mixer, beat the room temperature cream cheese and granulated sugar together on medium speed. Beat for about 2 to 3 minutes until the mixture is completely smooth, creamy, and free of any lumps. Remember to scrape down the sides and bottom of the bowl with a rubber spatula frequently.
- Add Sour Cream and Vanilla: Add the room temperature sour cream and vanilla extract to the cream cheese mixture. Beat on medium-low speed just until combined and smooth. Again, scrape down the bowl to ensure an even mixture.
- Incorporate the Eggs: This is the most crucial step. Reduce your mixer speed to the lowest setting. Add the room temperature eggs one at a time, allowing each egg to fully incorporate into the batter before adding the next. Do not over-mix here; over-mixing incorporates air, which leads to cracks. Stop the mixer as soon as the last egg is blended in.
- Prepare the Water Bath: Boil a kettle or a large pot of water. Place your foil-wrapped springform pan (with the cooled crust) into a large roasting pan. Carefully pour the smooth cheesecake filling over the cooled graham cracker crust, using a spatula to smooth the top into an even layer. Pour the boiling water into the roasting pan until it reaches about halfway up the sides of the springform pan.
- Bake the Cheesecake: Carefully transfer the roasting pan to the middle rack of your preheated 325°F (160°C) oven. Bake for 55 to 70 minutes. You will know the cheesecake is done when the edges are set and slightly puffed, but the center (about a 2-inch circle in the middle) still has a slight jiggle when you gently shake the pan. It should not look liquid, just soft.
- The Cooling Process: Turn off the oven completely. Leave the cheesecake in the oven with the door cracked open slightly (you can use a wooden spoon to keep the door propped open). Let the cheesecake cool in the oven for 1 full hour. This gradual cooling process is essential for preventing cracks caused by sudden temperature changes.
- Chill the Cheesecake: After the hour, carefully remove the roasting pan from the oven. Lift the springform pan out of the water bath and remove the wet foil. Let the cheesecake cool completely to room temperature on a wire rack. Once at room temperature, run a thin knife around the edge of the cake to loosen it from the pan. Cover the top loosely with plastic wrap and refrigerate for at least 6 hours, preferably overnight, to allow the texture to set up completely.
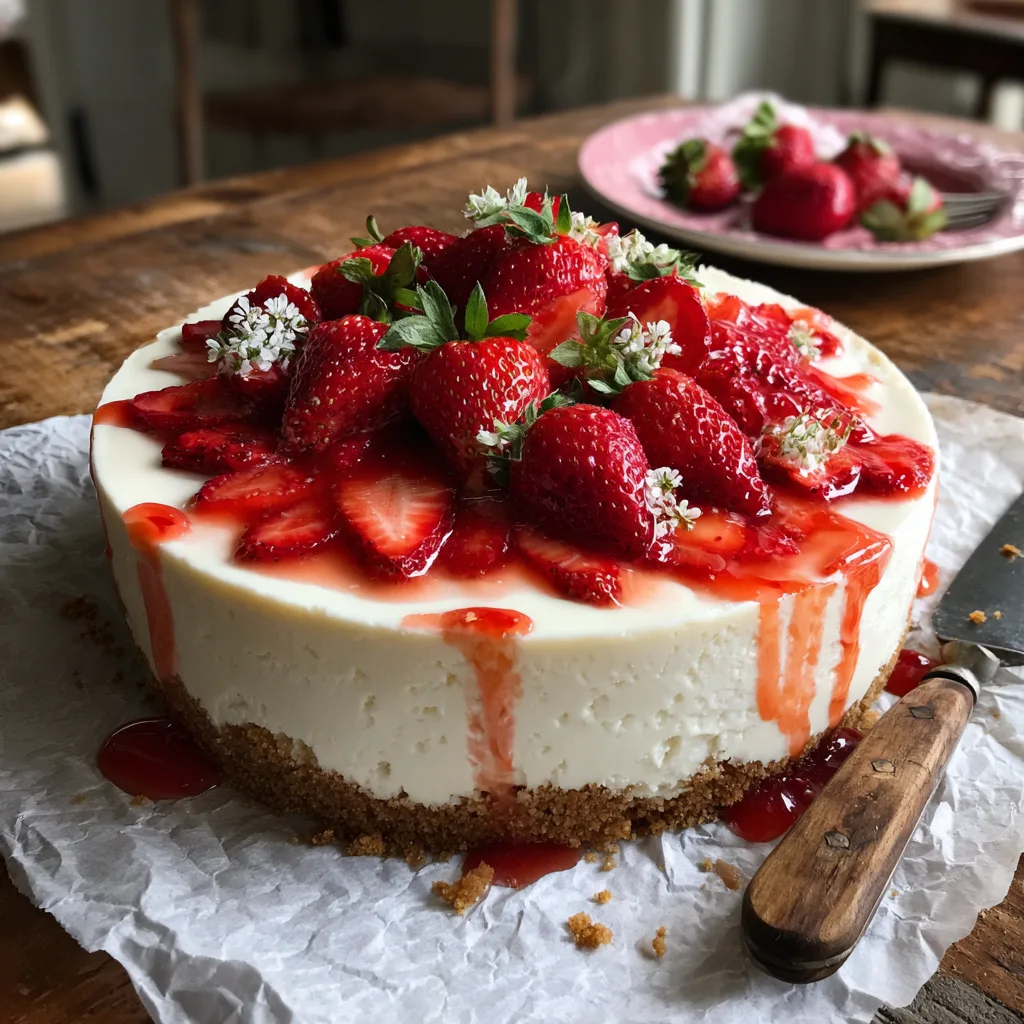
- Decorate with Strawberry Flowers: Once the cheesecake is fully chilled and firm, carefully release it from the springform pan and transfer it to your serving platter or leave it on the rustic parchment paper as seen in the inspiration photo. Slice your strawberries thinly. Starting on one side of the cheesecake, arrange the strawberry slices in overlapping concentric circles to mimic the petals of a flower. Create a few large flowers and a few smaller ones. Tuck small green leaves and tiny white edible blossoms around the berries for a realistic botanical look.
- Glaze (Optional): For that ultra-glossy, bakery-style finish, heat the apricot jam or strawberry jelly with a teaspoon of warm water in the microwave for 15 seconds. Stir until smooth. Using a pastry brush, gently dab the sweet glaze over the arranged strawberries. This gives them a beautiful shine and helps preserve their freshness.
Essential Tips for a Crack-Free Cheesecake
Baking a cheesecake can seem intimidating, but understanding the science behind the steps makes it foolproof. The water bath, or bain-marie, is perhaps the most vital technique. Cheesecakes are essentially baked custards, and custards love gentle, humid heat. The water bath ensures the temperature around the cheesecake never exceeds 212°F (100°C), the boiling point of water. This prevents the outer edges of the cake from baking too quickly and drying out before the center has time to set.
Another major culprit for cracks is sudden temperature drops. Taking a hot cheesecake out of a warm oven and placing it into a cool kitchen causes the cake to shrink rapidly. As it shrinks, the tension causes the surface to split. The method of leaving the cake in the turned-off oven with the door cracked allows the internal temperature of the cake to come down gently, ensuring a flawless, smooth top perfect for your strawberry canvas.
Fun Facts and the Cultural History of Cheesecake
Did you know that the first “cheesecake” may have been created on the Greek island of Samos over 4,000 years ago? Physical anthropologists excavated cheese molds there dating back to 2,000 B.C. In Greece, cheesecake was considered a fantastic source of energy, and there is evidence that it was served to athletes during the first Olympic games in 776 B.C.
When the Romans conquered Greece, they adopted the recipe, adding crushed cheese and eggs, and served it warm. It wasn’t until the 18th century, as Europeans began migrating to America, that the modern cheesecake started taking shape. But the most significant breakthrough happened accidentally in 1872 when an American dairyman named William Lawrence of Chester, New York, was attempting to recreate the soft French cheese Neufchâtel. Instead, he accidentally created an overly rich, unripened cream cheese. This happy accident eventually became Philadelphia Cream Cheese, the staple ingredient in the classic American cheesecake we enjoy today.
Creative Variations to Try
While this recipe focuses on the classic vanilla base with a strawberry topping, the beauty of a standard cheesecake recipe is its versatility. You can easily modify the crust or the flavor profile to suit different seasons and tastes.
Change the Crust: Graham crackers are traditional, but they are far from the only option. For a richer flavor, try using crushed digestive biscuits, vanilla wafers, or even shortbread cookies. If you want a chocolate and strawberry pairing, crush up chocolate sandwich cookies (like Oreos) and use them in place of the graham crackers. Simply omit the added granulated sugar since chocolate cookies are already quite sweet.
Flavor the Filling: You can add a tablespoon of fresh lemon zest to the cream cheese mixture for a bright, citrusy lift that pairs incredibly well with the fresh strawberries. Alternatively, scraping the seeds of a real vanilla bean into the batter instead of using extract will give you those beautiful black speckles and an intense, authentic vanilla flavor.
Serving and Storage Suggestions
When it comes time to serve your masterpiece, presentation is key. For clean, professional-looking slices, fill a tall pitcher or container with hot water. Dip a long, sharp chef’s knife into the hot water, wipe it completely dry with a clean towel, and make your first cut. Repeat this process of dipping and wiping for every single slice. The hot blade will melt cleanly through the dense cream cheese, preventing dragging and crumbling.
Leftover cheesecake should always be stored in the refrigerator. Cover it loosely with plastic wrap or place it in an airtight cake keeper to prevent it from absorbing any odors from your fridge. It will stay fresh and delicious for up to 5 days. You can also freeze a cheesecake! To freeze, do not add the fresh strawberry topping. Wrap the plain, fully cooled and chilled baked cheesecake tightly in two layers of plastic wrap, followed by a layer of aluminum foil. It can be frozen for up to 2 months. Thaw it overnight in the refrigerator before decorating with the fresh fruit.
Frequently Asked Questions (FAQs)
Do I really have to use a water bath?
While you can technically bake a cheesecake without one, highly recommending skipping it is a recipe for disaster. Without a water bath, the edges will overbake, the texture will be grainy instead of creamy, and the surface is almost guaranteed to crack. It is worth the extra 5 minutes of effort.
Can I use low-fat cream cheese?
For the best results in terms of texture and flavor, full-fat block cream cheese is strongly recommended. Low-fat or fat-free cream cheese contains a higher water content and stabilizing additives that can alter the structure of the cake, making it less creamy and more prone to weeping or separating.
Why is my crust soggy?
A soggy crust usually occurs if water from the water bath seeps into the springform pan. Ensure you are using heavy-duty, wide aluminum foil and wrapping the pan tightly in multiple layers. If you are still having trouble, you can place the springform pan inside a slightly larger cake pan, and place that cake pan into the water bath.
Conclusion
Creating this Strawberry Floral Cheesecake is an incredibly rewarding baking project. By understanding the importance of room-temperature ingredients, embracing the gentle cooking method of the water bath, and unleashing your creativity with the beautiful fresh fruit arrangement, you are well on your way to dessert perfection. The combination of the buttery, crisp graham cracker base, the dense and tangy vanilla cream cheese filling, and the bright, juicy sweetness of the strawberries makes for an unforgettable culinary experience. So tie on your apron, preheat your oven, and enjoy the art of baking something truly spectacular!
Strawberry Floral Cheesecake
Ingredients
Equipment
Method
- Preheat oven to 350°F (175°C). Line the bottom of a 9-inch springform pan with parchment paper and wrap the outside tightly in multiple layers of heavy-duty aluminum foil.
- In a bowl, mix graham cracker crumbs, sugar, salt, and melted butter. Press firmly into the bottom and slightly up the sides of the prepared pan.
- Bake the crust for 8-10 minutes. Remove and let cool. Reduce oven temperature to 325°F (160°C).
- In a stand mixer, beat the room temperature cream cheese and sugar on medium speed until completely smooth.
- Add the sour cream and vanilla extract, mixing until just combined. Scrape down the sides of the bowl.
- With the mixer on low, add the eggs one at a time, mixing just until the yolk disappears. Do not overmix.
- Pour the filling over the cooled crust. Place the springform pan into a larger roasting pan and fill the roasting pan with boiling water halfway up the sides of the springform pan.
- Bake for 55-70 minutes until the edges are set but the center still slightly jiggles. Turn off the oven, crack the door, and let cool inside for 1 hour.
- Remove from water bath, remove foil, and cool to room temperature on a wire rack. Chill in the refrigerator for at least 6 hours or overnight.
- Slice strawberries thinly and arrange on top of the chilled cheesecake in overlapping concentric circles to resemble flowers. Glaze with warmed apricot jam if desired.