Chocolate Chip Pancakes
The Ultimate Fluffy Chocolate Chip Pancakes Recipe
There is an undeniable, universal magic to lazy weekend mornings. The sun streams through the kitchen windows a little differently, the rush of the workweek fades into a distant memory, and the air is ripe with the possibility of a truly spectacular breakfast. While eggs and bacon hold a special place in the culinary pantheon, nothing quite captures the essence of weekend comfort like a towering, steaming stack of homemade pancakes. And when you want to elevate that comfort to the realm of absolute decadence, there is only one true path to take: the chocolate chip pancake. This recipe is not just about combining batter and chocolate; it is a masterclass in achieving the perfect structural fluffiness, the ideal golden-brown crust, and the ultimate ratio of gooey, melted chocolate in every single bite.
For generations, pancakes have been the centerpiece of the family breakfast table. However, too often, home cooks settle for boxed mixes that yield flat, rubbery, or flavorless results. This from-scratch ultimate fluffy chocolate chip pancake recipe is here to change that narrative forever. By utilizing a few fundamental baking techniques and understanding the science behind the batter, you will create pancakes so impossibly thick, tender, and flavor-packed that they rival the most renowned diners and brunch spots in the world. As the syrup cascades over the dollop of fresh whipped cream, mingling with the semi-sweet chocolate chips and pooling on the plate, you will understand why this dish is the undisputed king of sweet breakfasts.
Why You Will Fall in Love with This Recipe
There are countless pancake recipes scattered across the internet, but this one stands head and shoulders above the rest for several vital reasons. First and foremost is the texture. The holy grail of pancake making is achieving a crumb that is light, airy, and fluffy, yet sturdy enough to hold a generous payload of chocolate chips without collapsing into a dense, soggy puck. This recipe achieves that delicate balance perfectly, resulting in a cloud-like interior that practically melts in your mouth.
Secondly, this recipe perfects the flavor profile. A great pancake batter should not just be a flavorless vessel for syrup; it needs to have its own character. We incorporate a touch of vanilla extract and just the right amount of sugar and salt to create a batter that is deeply flavorful, with subtle notes of butter and caramel. When the semi-sweet chocolate chips melt into this complex batter, the contrast between the rich, slightly bitter cocoa and the sweet, vanilla-scented cake is nothing short of extraordinary.
Finally, this recipe is incredibly forgiving and accessible. You do not need any specialized equipment—just a couple of mixing bowls, a whisk, and a good skillet or griddle. The ingredients are pantry staples that you likely already have on hand. Once you understand the basic rules of pancake batter (which we will cover in depth), you can whip these up on a moment’s notice, transforming an ordinary Saturday morning into a celebration.
The Science of the Perfect, Fluffy Pancake
Cooking is often an art, but baking—even stovetop baking like pancakes—is purely scientific. To achieve that towering height and airy texture, we need to understand the chemical reactions happening inside the bowl and on the griddle.
The secret to fluffiness lies in the leavening agents: baking powder and baking soda. Baking powder is a complete leavening agent containing both an acid and a base. It is double-acting, meaning it activates twice: first when it gets wet, and second when it hits the heat of the pan. This double reaction creates the crucial carbon dioxide bubbles that lift the batter. We also use a small amount of baking soda, which requires an external acid (like buttermilk or the natural acidity in brown sugar, if used) to activate. The combination ensures maximum lift.
The next scientific principle is gluten development. Flour contains proteins that, when hydrated and agitated (mixed), form gluten strands. In bread making, you want strong gluten for a chewy texture. In pancakes, gluten is the enemy. Overmixing the batter creates tough, rubbery pancakes. The golden rule of pancake batter is to mix only until the wet and dry ingredients are just combined. Lumps are not just acceptable; they are desired! Those lumps of flour will hydrate as the batter rests and will steam while cooking, contributing to the tender crumb.
Finally, resting the batter is a non-negotiable step. Letting the batter sit for just 10 to 15 minutes allows the flour to fully hydrate and gives the baking powder time to start its first reaction, creating a bubbly, aerated batter before it even touches the pan.
Key Ingredients for the Ultimate Stack
Great dishes are built on great ingredients. While pancake ingredients are simple, their quality and proportions make all the difference.
All-Purpose Flour: The foundation of the pancake. It provides the necessary structure without being too heavy. Do not use bread flour, as the high protein content will make the pancakes tough.
Baking Powder & Baking Soda: Ensure your leavening agents are fresh. If your baking powder has been sitting in the pantry for two years, it has likely lost its potency, and your pancakes will be flat. You can test it by dropping a spoonful into hot water; if it bubbles vigorously, it is good to go.
Milk: Whole milk provides richness and tenderizes the crumb. For an even more tender pancake with a slight tang, you can substitute buttermilk. If you only have regular milk but want the buttermilk effect, add a tablespoon of white vinegar or lemon juice to the milk and let it curdle for 5 minutes before using.
Melted Butter: Fat equals flavor and tenderness. Using melted, slightly cooled unsalted butter in the batter enriches the flavor profile far better than neutral oils.
Egg: The egg acts as a binder, holding the structure together while providing additional richness from the yolk and lift from the white.
Vanilla Extract: A crucial background note that bridges the flavors of the batter and the chocolate.
Chocolate Chips: Semi-sweet chocolate chips are the standard, providing the perfect balance of cocoa intensity and sweetness. Standard size chips are great, but mixing standard chips with mini chips ensures that every single bite contains a pocket of melted chocolate.
Ingredients
- – 2 cups all-purpose flour
- – 1/4 cup granulated sugar
- – 1 tablespoon baking powder
- – 1/2 teaspoon baking soda
- – 1/2 teaspoon kosher salt
- – 1 3/4 cups whole milk (or buttermilk)
- – 1/4 cup unsalted butter, melted and slightly cooled
- – 2 large eggs, room temperature
- – 2 teaspoons pure vanilla extract
- – 1 cup semi-sweet chocolate chips (plus extra for topping)
- – Additional butter or neutral oil for greasing the pan
- – Whipped cream and maple syrup, for serving
Instructions
- Whisk the dry ingredients: In a large mixing bowl, thoroughly whisk together the all-purpose flour, granulated sugar, baking powder, baking soda, and kosher salt. Ensure the leavening agents are evenly distributed throughout the flour.
- Combine the wet ingredients: In a separate medium bowl, whisk together the whole milk, melted (and cooled) butter, eggs, and vanilla extract until smooth and well combined.
- Combine wet and dry: Pour the wet ingredient mixture into the center of the dry ingredients. Using a rubber spatula or a whisk, gently fold the mixture together. Stop mixing when there are still streaks of flour visible. Do not overmix; lumps are perfectly fine and necessary for a fluffy texture.
- Fold in the chocolate: Gently fold the chocolate chips into the batter with just a few strokes.
- Rest the batter: Allow the batter to sit undisturbed at room temperature for 10 to 15 minutes. You will notice it becoming bubbly and slightly thicker as the leavening agents activate and the flour hydrates.
- Preheat the skillet: While the batter rests, heat a large non-stick skillet or cast-iron griddle over medium-low heat. Getting the temperature right is critical; it should be hot enough to sizzle a drop of water, but not so hot that the pancake burns before cooking through.
- Grease the pan: Lightly coat the cooking surface with a small amount of butter or neutral oil. Wipe away excess with a paper towel so the pancakes don’t fry in pools of fat.
- Pour the batter: Using a 1/3 cup measuring cup or a large cookie scoop, drop the batter onto the skillet, leaving a few inches of space between each pancake to allow for spreading and easy flipping.
- Cook the first side: Cook until the edges begin to look set and matte, and bubbles form on the surface of the pancake and begin to pop, leaving little holes. This usually takes about 2 to 3 minutes.
- Flip and finish: Slide a thin, wide spatula under the pancake and flip it confidently in one quick motion. Cook on the second side for another 1 to 2 minutes, or until the bottom is a deep golden brown and the center is cooked through.
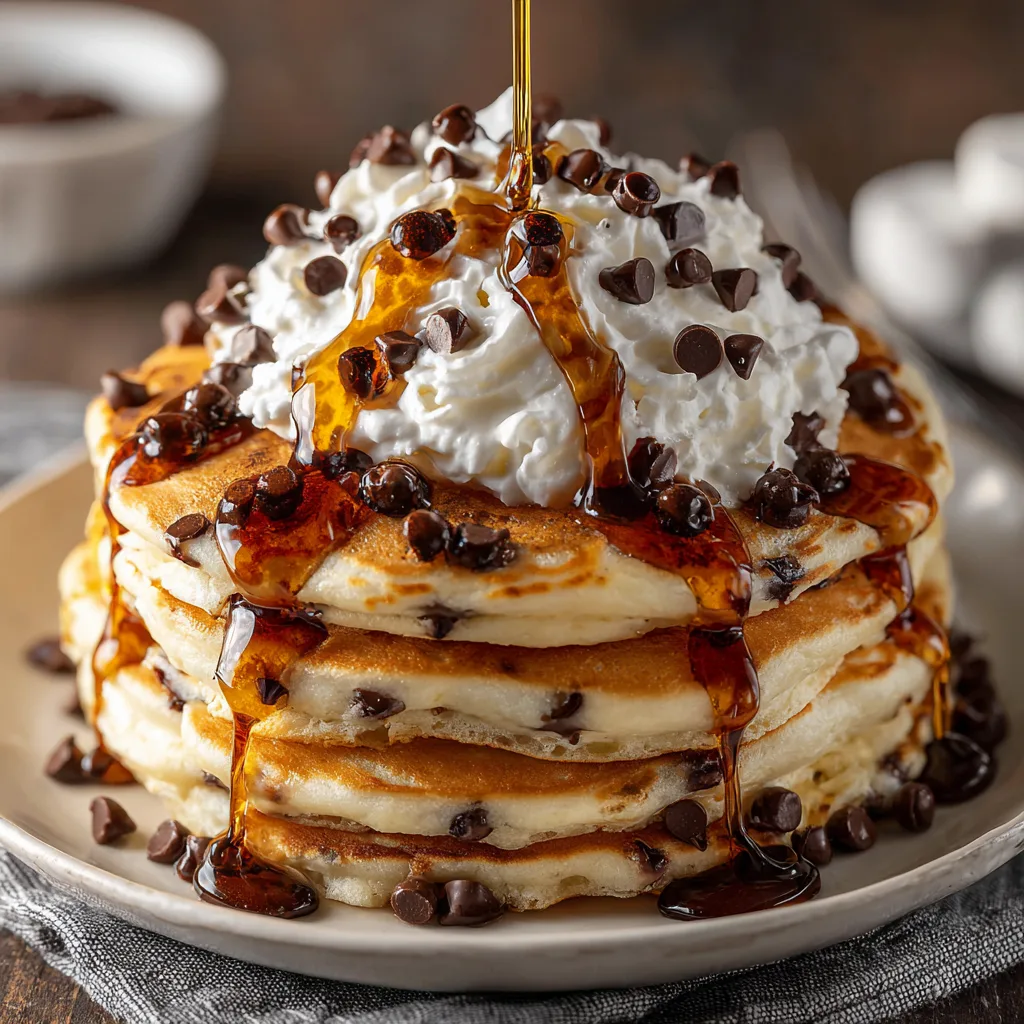
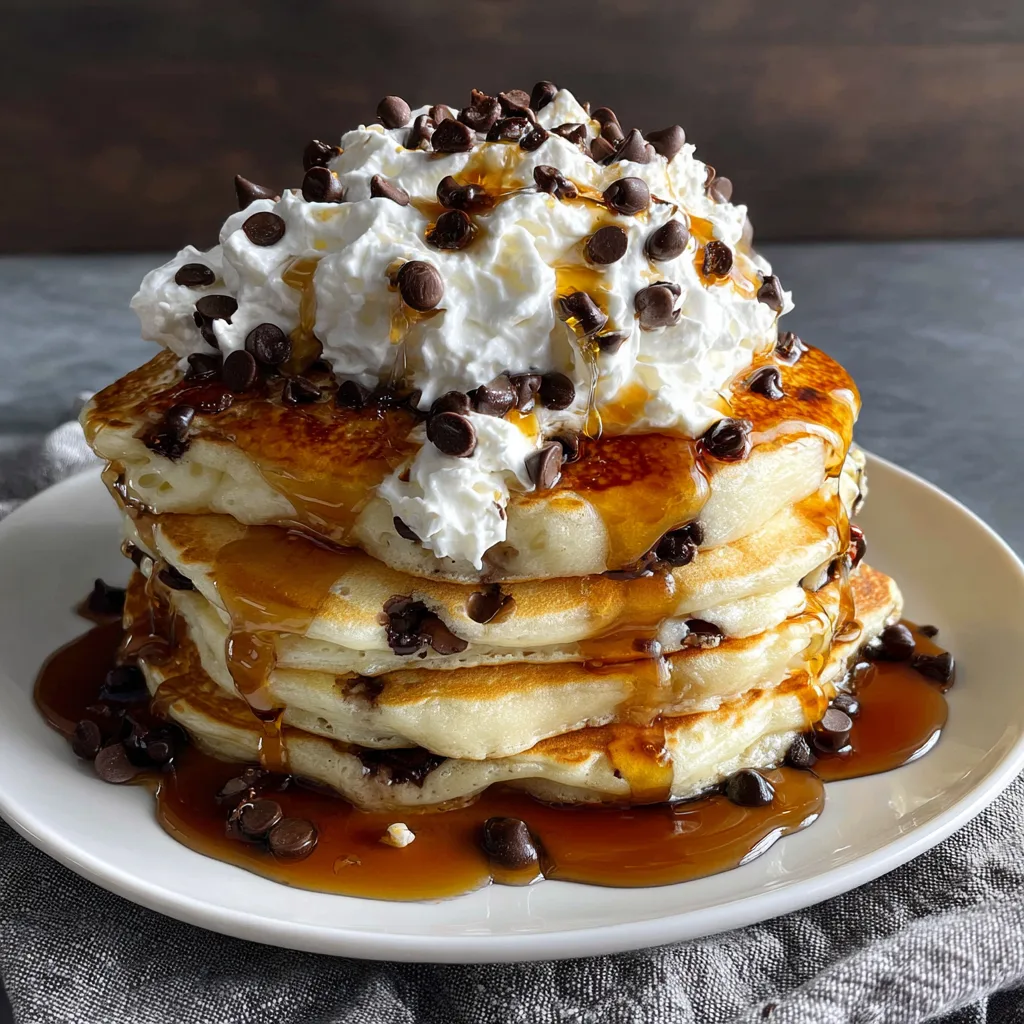
- Serve immediately: Transfer the cooked pancakes to a warm plate. Repeat the process with the remaining batter. Serve in a tall stack, topped generously with a dollop of whipped cream, a scattering of extra chocolate chips, and an absolute cascade of warm maple syrup.
Expert Tips for the Ultimate Golden Brown Cook
Cooking pancakes perfectly is an exercise in heat management. Many home cooks suffer from the “first pancake syndrome,” where the first batch is pale or misshapen, while the second batch is burnt. This happens because the pan is either not preheated enough or gets too hot over time. Keep your stove at a steady medium-low. It takes longer, but this gentle heat allows the thick batter to cook all the way through to the center without scorching the outside.
When it comes to greasing the pan, there is a fierce debate between butter and oil. Butter provides superior flavor, but its milk solids burn easily, leading to dark, bitter spots on your pancakes. Neutral oil prevents burning but lacks flavor. The ultimate hack? Clarified butter (ghee), which has the milk solids removed and can withstand higher heat. Alternatively, wipe the pan with an oiled paper towel between batches, and rely on the melted butter *inside* the batter for that rich flavor.
Finally, never press down on your pancakes with the spatula after flipping them! This forces all the precious air bubbles out of the batter, ruining the fluffy texture you worked so hard to create. Let them sit proudly on the griddle.
Exciting Variations to Elevate Your Stack
Once you have mastered the base chocolate chip pancake, the variations are truly limitless. For a tropical twist, fold in a half cup of toasted shredded coconut alongside the chocolate chips. If you love the combination of fruit and chocolate, slice a ripe banana into thin rounds and drop a few slices directly onto the wet batter of the pancake immediately after pouring it onto the griddle, before flipping. The bananas will caramelize beautifully.
You can also play with the chocolate itself. Swap the semi-sweet chips for white chocolate chunks and macadamia nuts, or use dark chocolate chunks and a pinch of espresso powder in the dry mix to create a mocha pancake. For the holidays, a dash of cinnamon and nutmeg in the batter paired with dark chocolate chips creates a warm, festive flavor profile.
Serving Suggestions and Pairings
A towering stack of chocolate chip pancakes demands an equally impressive presentation. The classic serving method—a generous dollop of freshly whipped cream (sweetened with just a touch of powdered sugar and vanilla) and a flood of warm, 100% pure maple syrup—is a classic for a reason. Do not insult these magnificent pancakes with artificial “pancake syrup” made from high fructose corn syrup. Pure maple syrup offers complex, woody, and caramel notes that elevate the dish.
To balance the intense sweetness and richness of the pancakes, serve them alongside savory accompaniments. Thick-cut, smoky bacon or crispy breakfast sausage links provide the perfect salty contrast. A side of fresh, tart berries (like raspberries or strawberries) will cut through the heavy chocolate and syrup, resetting your palate for the next decadent bite. Serve with freshly brewed, robust black coffee or cold milk to complete the ultimate breakfast experience.
Cultural Context: The History of the American Pancake
While flatcakes made from grain and water have been consumed by humans since the Stone Age, the fluffy, leavened pancake is a distinctly North American culinary icon. Early American colonists made “journey cakes” or “hoecakes” out of cornmeal, which were dense and meant for survival rather than indulgence. The evolution of the pancake as we know it today began in the 18th and 19th centuries with the increased availability of refined wheat flour and the introduction of chemical leaveners like pearl ash, followed by baking soda and eventually baking powder.
By the 20th century, the pancake had become a staple of American diner culture. It was cheap to produce, filling, and offered a canvas for sweet toppings. The addition of chocolate chips was a natural evolution that likely gained massive popularity in the mid-20th century alongside the rise of the chocolate chip cookie. Today, the chocolate chip pancake is more than just food; it is a cultural symbol of comfort, childhood, and the luxury of time on a weekend morning. Preparing this recipe is a way to tap into that rich culinary nostalgia while treating yourself to a truly exceptional meal.
Ultimate Fluffy Chocolate Chip Pancakes
Ingredients
Equipment
Method
- In a large bowl, whisk together the flour, sugar, baking powder, baking soda, and salt.
- In a medium bowl, whisk the milk, melted butter, eggs, and vanilla extract until smooth.
- Pour the wet ingredients into the dry ingredients. Gently fold together until just combined. Do not overmix; lumps are okay.
- Gently fold in the chocolate chips. Let the batter rest for 10-15 minutes.
- Preheat a skillet or griddle over medium-low heat. Lightly grease with butter or oil.
- Pour 1/3 cup of batter per pancake onto the skillet. Cook until edges set and bubbles pop on the surface (2-3 minutes).
- Flip carefully and cook for another 1-2 minutes until golden brown and cooked through.
- Serve in stacks topped with whipped cream, extra chocolate chips, and maple syrup.