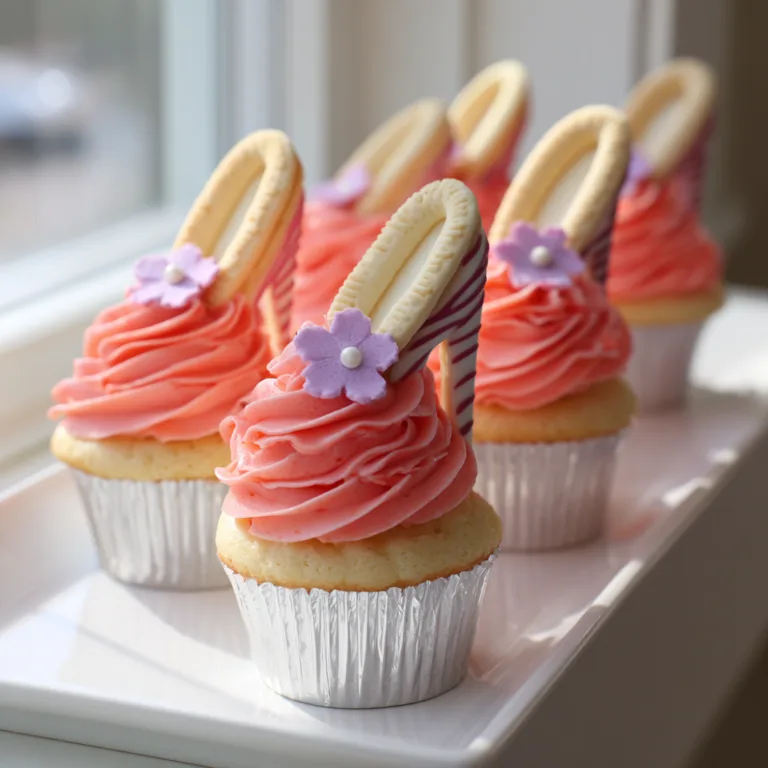
Ombré Sunset Ruffle Cake
Master the Tropical Sunset Ombré Ruffle Cake: The Ultimate Luau Party Centerpiece
There is a singular, powerful magic in bringing a true centerpiece to a celebration. It’s that moment when your guests’ eyes widen, a collective gasp ripples through the room, and the questions start pouring in: “Did you make that?” “Is that real?” The cake is more than just a dessert; it is the physical manifestation of your effort, your creativity, and your desire to create a memorable experience. And nothing—nothing—says, “I am a professional-level home baker who has absolutely mastered the art of cake” like a multi-tiered, complexly decorated, and intensely flavored cake like this Tropical Sunset Ombré Ruffle Cake. It is the king of desserts, a towering, edible sculpture designed to stop hearts and steal the show.
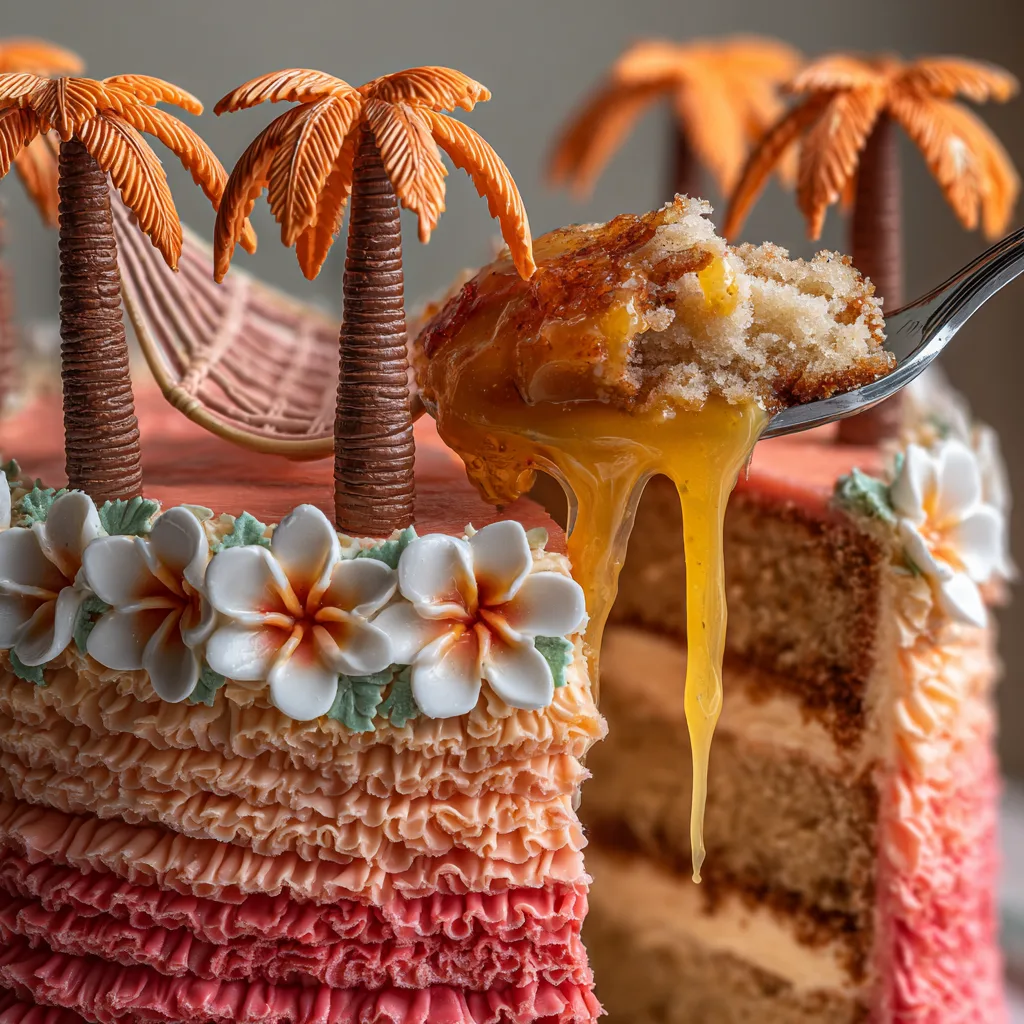
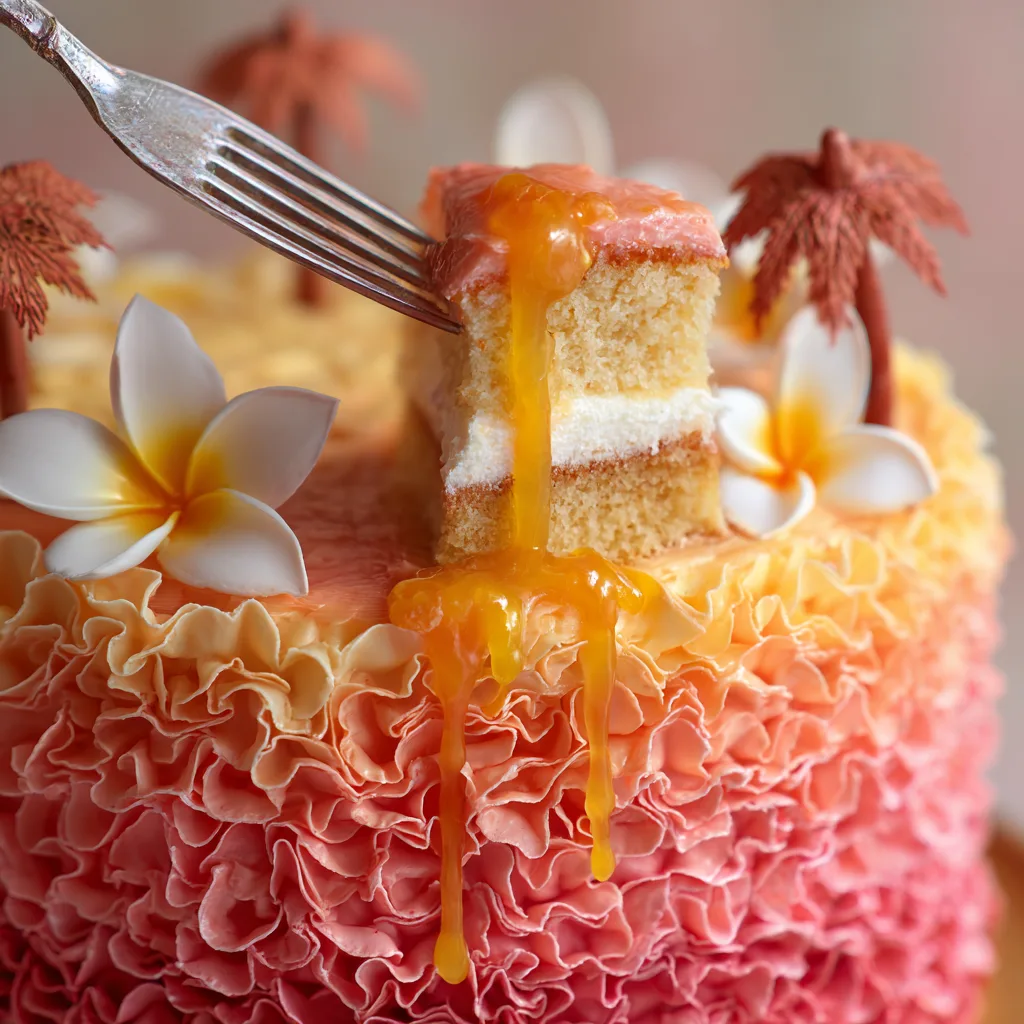
This cake is a profound statement piece, a complex culinary journey that requires patience, skill, and the right techniques. It is an exploration of color and texture, combining the soft, fading hues of a tropical sunset with the complex visual layering of ruffled buttercream. But the real surprise is hidden beneath that elaborate exterior. Imagine a cake that captures the flavors of the beach—dense, moist, coconut-pineapple sponge layers, interleaved with a tangy, vibrant, dripping passionfruit curd filling that bursts with tropical acidity. It is an experience that delights every sense, from the visual spectacle of the ombré and the edible decorations, to the aromatic profile of the curd, to the ultimate flavor explosion when the fork hits the plate.
This article is your definitive guide to recreating this masterpiece at home. I am not going to lie; this is a challenging project. It involves making multiple complex components, stacking tiers, and mastering a complex piping technique. But if you have been looking for that single recipe to take your baking to the next level, this is it. I will walk you through every step, from selecting the right ingredients to crafting those intricate fondant palm trees, to achieving the perfect, smooth color gradient in your frosting, to ensuring your tiers are structurally sound. Put on your apron, fire up your stand mixer, and prepare to elevate your baking game forever. We are bringing the beach directly to your kitchen.
The Architectural Marvel: The Two-Tiered Structure
The core visual impact of this cake comes from its size and structure. A two-tier cake immediately signals a celebration that is significant and special. It suggests sophistication and a higher level of skill than a simple single-tier cake. But with that architectural impressiveness comes technical challenges. You cannot simply stack one cake on top of another and hope for the best; the weight of the top tier will cause the bottom tier to collapse, turning your beautiful cake into a sad, squashed pancake.
To prevent this, you must build internal support. This involves inserting structural dowels (either thick wooden dowels or specialized plastic cake straws) into the bottom tier. These dowels support a food-safe cake board upon which the top tier rests. The weight is distributed through the dowels to the base plate, leaving the delicate crumb of the bottom tier completely protected. Stacking a cake is an art form, and mastering this one skill unlocks the door to creating three-tier, four-tier, and even wedding-style cakes. If you are nervous about stacking, this is the perfect project to practice on a smaller scale before attempting larger structures.
The Heart of the Cake: Reimagining the Flavors
A cake this spectacular on the outside must be equally spectacular on the inside. While you can certainly use a standard vanilla or chocolate recipe, a truly great multi-tier cake deserves a cohesive flavor profile that ties the whole experience together. For this Tropical Sunset Ombré Ruffle Cake, we are using the colors of the sunset as inspiration for the interior. The cake itself is a dense, moist coconut-pineapple sponge, infused with real shredded coconut and crushed pineapple, creating a textural profile that is both complex and incredibly juicy. This cake is sturdy enough to hold its shape across multiple tiers, but tender enough to be delightful.
To cut through the sweet, dense crumb of the coconut cake, we are filling it with a vibrant, tangy passionfruit curd. If you have never made a curd before, you are in for a treat. It is a smooth, creamy, custard-like spread that achieves its characteristic tang not through acidity, but through the unique flavor profile of the passionfruit itself. We reduce fresh passionfruit juice to create a concentrated flavor profile that bursts with tropical acidity. This curd is incredibly rich and stable, making it the perfect filling to stack multiple layers upon. The curd is allowed to cool and set, becoming a firm, yet silky, layer that provides a surprising pop of flavor in every bite.
Mastering the Ombré Ruffle Buttercream Technique
The visual signature of this cake is undoubtedly the ombré ruffle frosting. This is not a simple technique, but it is one that yields spectacular results. Achieving the perfect gradient involves making five or six separate batches of buttercream, each tinted to a precise shade, and then applying them in sequence to create a smooth transition from one color to the next. For this cake, we will be using colors that represent the phases of a sunset, starting with a deep, vibrant hot pink at the base, shifting into a warmer coral, and then fading into a creamy off-white at the top. This technique requires constant color checking, precise application, and careful blending of the colors at their meeting points. It is a test of color theory as much as a test of piping.
The ruffles themselves are created using a specialized piping tip (like a petal tip or a large basketweave tip). You must pipe the ruffles in a continuous, even motion, creating a complex layered effect that mimics the waves of the ocean. This technique is easier to master than it looks, as the complex layering of the ruffles automatically creates a beautiful pattern. The real challenge is maintaining a consistent pressure and distance from the cake. Once you find your rhythm, you will be able to cover the entire surface with these delicate, cascading ruffles, creating a truly spectacular textural experience that has to be seen to be believed.
Crafting the Edible Palm Trees and Hammock Decorations
The final, show-stopping elements are the intricate, edible decorations. While you could use pre-made, plastic toppers, a true professional-level cake deserves hand-crafted, edible art. We will be making three detailed palm trees with brown trunks and orange fronds, and a detailed, woven yellow hammock strung between two of them. To add a final touch of elegance, we will also create delicate, white plumeria or hibiscus-style flowers that soften the overall look and add a botanical touch of realism. These decorations are made using fondant or gum paste, a specialized, sugar-based clay that can be sculpted into detailed, intricate shapes.
Sculpting these elements involves a combination of rolling, cutting, texturing, and supporting. The palm tree trunks are made by rolling thick brown fondant into cones and texturing them with a small knife to create the complex pattern of the bark. The fronds are made by cutting intricate leaf shapes from orange fondant and giving them a textured, organic veining pattern. The flowers are created by layering multiple delicate petals to create a full, blooming appearance. The hammock requires the most precise work, involving rolling thin strands of yellow fondant and weaving them together to create a true, textured net. Once dry, these elements become firm, structural pieces that can be easily placed on the cake to create a truly unforgettable scene.
Ingredients You Will Need
For the Coconut Pineapple Cake Batter:
For the Passionfruit Curd Filling:
For the Italian Meringue Buttercream (for Frosting):
For the Fondant Decorations:
Step-by-Step Instructions
- Prepare the Cake: Preheat your oven to 350°F (175°C). Prepare two 8-inch and two 6-inch round cake pans by greasing them with cooking spray, lining the bottoms with parchment paper, and dusting the sides with flour. In a large mixing bowl, whisk together the cake flour, granulated sugar, baking powder, baking soda, and salt until well combined. In a separate bowl, cream together the softened butter and coconut oil until smooth and fluffy. Beat in the eggs, one at a time, followed by the coconut milk and coconut extract. Gradually add the wet ingredients to the dry, mixing on low speed just until combined. Fold in the toasted shredded coconut and well-drained crushed pineapple. Divide the batter evenly between the prepared pans and bake for 30-35 minutes, or until a skewer inserted into the center comes out clean. Allow the cakes to cool in the pans for 10 minutes before turning them out onto wire racks to cool completely. Once cool, wrap each cake tightly in plastic wrap and chill in the refrigerator for at least 4 hours, or overnight.
- Make the Passionfruit Curd: In a small, non-reactive saucepan, combine the passionfruit juice and granulated sugar. Bring the mixture to a gentle simmer over medium heat, stirring until the sugar has completely dissolved. In a small bowl, whisk together the egg yolks, lemon juice, and salt. Gradually pour a small amount of the hot passionfruit mixture into the egg yolk mixture, whisking constantly. Return the tempered egg yolk mixture to the saucepan and cook over low heat, whisking constantly, until the curd has thickened and coats the back of a spoon, about 5-7 minutes. Remove the saucepan from the heat and stir in the cubed unsalted butter, one piece at a time, until the curd is smooth and glossy. Strain the curd through a fine-mesh sieve to remove any lumps. Allow the curd to cool to room temperature before covering it with plastic wrap (ensure the plastic is touching the surface of the curd to prevent a skin from forming) and chilling it in the refrigerator until completely firm, about 4 hours.
- Prepare the Italian Meringue Buttercream: In a clean mixing bowl, beat the egg whites and cream of tartar on medium speed until soft peaks form. In a small saucepan, combine the granulated sugar and water. Bring the mixture to a boil over high speed, stirring just until the sugar has dissolved. Clip a candy thermometer to the side of the pan and cook the syrup until it reaches the soft-ball stage, exactly 240°F (115°C). With the mixer running on low speed, carefully pour the hot sugar syrup into the egg whites in a slow, steady stream. Increase the mixer to high speed and beat until a stiff, glossy meringue has formed and the bowl is cool to the touch. With the mixer on medium speed, gradually add the softened butter, one cube at a time, until a smooth, velvety buttercream has formed. Stir in the clear vanilla extract.
- Stack and Frost the Cake: Once the cakes are completely chilled, level each cake using a serrated knife. Divide the Italian Meringue Buttercream into five separate bowls. Keep one bowl white (tinted with clear vanilla) for the top and for crumb coating. Tint the remaining four bowls to precise shades to create your sunset ombré: a deep hot pink, a vibrant coral/orange, a lighter peach, and a pale cream. Place one 8-inch cake layer on your serving plate or cake stand and crumb coat the top with white buttercream. Place the other 8-inch cake layer on top and press gently to secure. Insert four or five structural dowels (wooden or thick plastic) into the center of the 8-inch cake, cutting them flush with the surface. Place a 6-inch cake board on top of the dowels. Place one 6-inch cake layer on the board and crumb coat the top. Place the second 6-inch cake layer on top and press gently to secure. Crumb coat the entire surface of both tiers with white buttercream and chill the cake for 30 minutes to set the frosting.
- Apply the Ombré Ruffle Frosting: Fit your piping bag with a large petal tip. Start at the base of the bottom tier and apply a thick, continuous row of ruffles using the deep hot pink buttercream. Continue making horizontal rows of ruffles, changing to the next lighter shade every three or four rows (coral/orange, lighter peach, pale cream). Apply the ruffles in overlapping rows, slightly higher with each row, to create the complex layered effect. Smooth the top of the top tier with white buttercream. Chill the finished cake for 1 hour to set the ruffles.
- Create and Place the Fondant Decorations: Tint your fondant to the correct shades: brown, orange, yellow, and a small amount of green for any additional leaves. Roll the brown fondant into thick cones to create the trunks of the three palm trees. Texture the trunks with a small knife to create the bark. Attach small skewers to the top of the trunks for support. Roll the orange fondant into thin sheets and cut intricate leaf shapes to create the fronds. Texture the fronds with a veining tool and attach them to the trunks. Roll thin strands of yellow fondant and weave them together to create the detailed hammock. Sculpt delicate white plumeria or hibiscus flowers from the remaining cream fondant. Allow all of the fondant elements to dry and set completely. Once the cake has chilled, carefully place the palm trees, hammock, and flowers on the top tier and base of the cake, pressing gently to secure.
- The Final Gloss: The defining moment of this cake is achieving that spectacular, ultra-glossy finish. Using a food-safe brush, apply a generous layer of clear vanilla glaze over all of the fondant decorations, the top surface, and the ruffled buttercream. Let the glaze pool and create mirror reflections. Brush a thick layer of melted, browned butter mixed with additional passionfruit curd over the glaze to create the complex dripping effect. Let the butter create mirror pools at the base border and drip down the sides of the cut piece in thick glossy ribbons. Let it set.
- Rest, Slice, and Serve: Allow the completed cake to rest at cool room temperature for 10 minutes before slicing. Use a sharp, hot serrated knife to cut clean, beautiful slices that showcase the dense cake layers, the vibrant passionfruit curd filling, and the spectacular multi-layered ruffled buttercream. Serve immediately with a shiny spoon, ensuring every surface is wet and glistening, and enjoy the fruits of your incredible effort!
Tips for a Structurally Sound and Visually Stunning Cake
Creating a large, tiered cake is a test of structural integrity, but by following a few simple tips, you can ensure your masterpiece is safe to serve. First, always use cake dowels. This is not optional for a tiered cake; the weight of the top tier must be supported to prevent a catastrophic collapse. Use strong dowels, make sure they are exactly flush with the top of the bottom tier, and always use a cake board. Second, work with chilled cakes. Chilling makes the crumb of the cake denser and more sturdy, making it easier to stack and frost without crumbling or shifting. Finally, give your cake time to set. The multiple chilling periods—after leveling, crumb coating, and applying the final frosting—are crucial for allowing the buttercream to firm up, creating a rigid structure that can withstand being moved or decorated without sagging or distorting.
To achieve the visual stunningness, focus on the details. When tinting your buttercream, go for smooth, clean transitions of color rather than jarring, abrupt changes. This requires careful blending and constant testing on a separate plate. When piping the ruffles, work slowly and consistently, trying to maintain an even pressure and distance from the cake. Don’t worry about minor imperfections; the complex layered effect of the ruffles is highly forgiving and often hides small mistakes. Finally, take your time with the edible decorations. The hand-crafted palm trees, hammock, and flowers add a touch of professional-level detail that makes your cake stand out from the crowd. These elements can be made days or even weeks in advance, so work on them when you are feeling creative and unstressed.
Variations and Adaptations for Any Celebration
While this Tropical Sunset Ombré Ruffle Cake is stellar as it is, you can easily adapt the recipe to suit your own personal style or the specific theme of your celebration. If you are not a fan of coconut, you can easily use a different sturdy cake base, like a rich vanilla bean pound cake, a tangy lemon cake, or even a dark chocolate cake, as long as it is sturdy enough to be stacked. The filling can be similarly adapted; a classic cream cheese frosting, a rich white chocolate ganache, or even a simple mixed berry compote can create a different, but equally delicious, flavor profile that complements the cake.
In terms of decoration, the sky is the limit. Instead of a sunset-themed ombré, you can use any color palette that fits your event. Think of an elegant blue-to-white gradient for a beach wedding, a bright green-to-pink gradient for a whimsical baby shower, or a sophisticated black-to-gold gradient for a formal anniversary celebration. The fondant decorations can also be adapted to fit your theme. Add fondant seashells, a tiny surfboard, or even a family of fondant sea turtles for a different take on the beach. Finally, the ruffling technique can be used with different piping tips to create a wide variety of textural effects. A star tip can create delicate, ruffled rosettes, while a larger tip can create dramatic, flowing ruffles that completely transform the look of your cake.
Serving Suggestions and Make-Ahead Advice
A cake of this scale and complexity requires careful planning, and there are several components that can be made in advance to save you time and stress on the day of your celebration. The cake layers can be baked, leveled, and frozen up to a month in advance. Simply thaw them in the refrigerator overnight before stacking. The passionfruit curd can be made up to a week in advance and stored in an airtight container in the refrigerator. The Italian Meringue Buttercream can be made 3 days in advance and stored in the refrigerator; just be sure to let it come to room temperature and re-whip it until smooth and glossy before using. Finally, the fondant decorations can be made up to a month in advance; store them in a cool, dry place away from direct sunlight, which can cause the colors to fade.
When it comes to serving, this cake is best presented as a true centerpiece on a rustic earthenware cake stand that complements the beachy theme. Surround the base of the cake stand with fresh tropical leaves (like Monstera or palm fronds) and a scattering of fresh flowers to enhance the natural feel. When slicing, use a long, hot serrated knife (dip it in hot water and wipe it clean between every single cut) to create clean, perfect slices that showcase the dense cake layers, the vibrant passionfruit curd filling, and the spectacular multi-layered ruffled buttercream. Serve immediately with a shiny spoon to ensure every surface is wet and glistening, and enjoy the fruits of your incredible effort!
Conclusion: The Taste of Pure Achievement
The **Tropical Sunset Ombré Ruffle Cake** is more than just a recipe; it is an accomplishment. It is a complex, time-consuming project that tests your patience, your skills, and your understanding of core baking and decorating techniques. But the reward is a truly breathtaking centerpiece that creates a moment of pure spectacle for your guests and a profound sense of achievement for you. This cake is a celebration of the season, a tribute to the flavors of the beach, and a manifestation of your passion for creating unforgettable, edible art. So, source the highest-quality tropical ingredients, fire up your stand mixer, and prepare to elevate your baking game forever. We are bringing the beach directly to your kitchen. So head to your local market, grab the heaviest, most fragrant passionfruit you can find, and enjoy the ultimate taste of pure achievement.
Tropical Sunset Ombré Ruffle Cake
Ingredients
Equipment
Method
- Prepare Cake: Preheat oven to 350°F (175°C). Grease, line, and flour two 8-inch and two 6-inch pans.
- In a large bowl, whisk cake flour, sugar, baking powder, baking soda, and salt. In a separate bowl, cream softened butter and coconut oil until fluffy. Beat in eggs, followed by coconut milk and extract.
- Gradually add dry ingredients to wet, mixing just until combined. Fold in toasted shredded coconut and well-drained crushed pineapple. Divide batter between prepared pans and bake for 30-35 minutes.
- Make Curd: In a non-reactive saucepan, simmer passionfruit juice and 1/2 cup sugar until dissolved. In a small bowl, whisk egg yolks, lemon juice, and salt. Temper the yolk mixture with a small amount of the hot juice, then return the entire mixture to the saucepan.
- Cook curd over low heat, whisking constantly, until thickened and coats the back of a spoon. Strain through a fine sieve and whisk in the cubed unsalted butter. Cool to room temperature, cover with plastic wrap touching the surface, and chill until firm (at least 4 hours).
- Make Buttercream: Beat egg whites and cream of tartar to soft peaks. In a small saucepan, boil granulated sugar and water to the soft-ball stage (240°F/115°C). With mixer running on low, carefully pour the hot sugar syrup into the egg whites in a slow, steady stream. Increase mixer to high and beat until stiff, glossy meringue is formed and the bowl is cool. Gradually add softened butter, cube by cube, until a smooth buttercream forms.
- Level chilled cakes. Divide buttercream into bowls. Keep one white. Tint the others to precise sunset shades (hot pink, vibrant coral, lighter peach, cream).
- Assemble: Stack the two 8-inch cake layers on a plate, crumb coating the center with white buttercream. Place another cake on top. Insert structural dowels into the bottom tier, cutting them flush. Place a 6-inch cake board on top. Stack and crumb coat the two 6-inch layers. Crumb coat the entire surface of both tiers and chill for 30 minutes to set.
- Frost Ruffles: Fit a piping bag with a large petal tip. Starting at the base of the bottom tier, apply a thick row of continuous ruffles using the deep hot pink buttercream. Change color every few rows to create your sunset gradient, finishing with cream on the top tier. Chill for 1 hour to set.
- Decorate: Tint fondant to create palm trees (brown trunks, orange fronds) and a woven yellow hammock. Sculpt plumeria or hibiscus-style flowers. Allow decorations to set, then place them on the chilled cake using a gentle press to secure.
- Finish with Gloss and Butter: Brush a generous layer of clear vanilla glaze over the entire surface, decorations, top, and ruffles. Let pool and create mirror pools at the base border. Drizzle melted brown butter mixed with extra passionfruit curd over the glaze to create complex dripping effects.
- Rest and Serve: Allow the cake to rest at cool room temperature for 10 minutes before slicing. Use a hot serrated knife to cut clean slices showcasing the dense cake layers, passionfruit curd filling, and complex ruffled buttercream. Serve immediately with a shiny spoon.