Tropical Sunset Ombré Cake
The Ultimate Tropical Sunset Ombré Cake with Palm Trees and Ruffled Buttercream
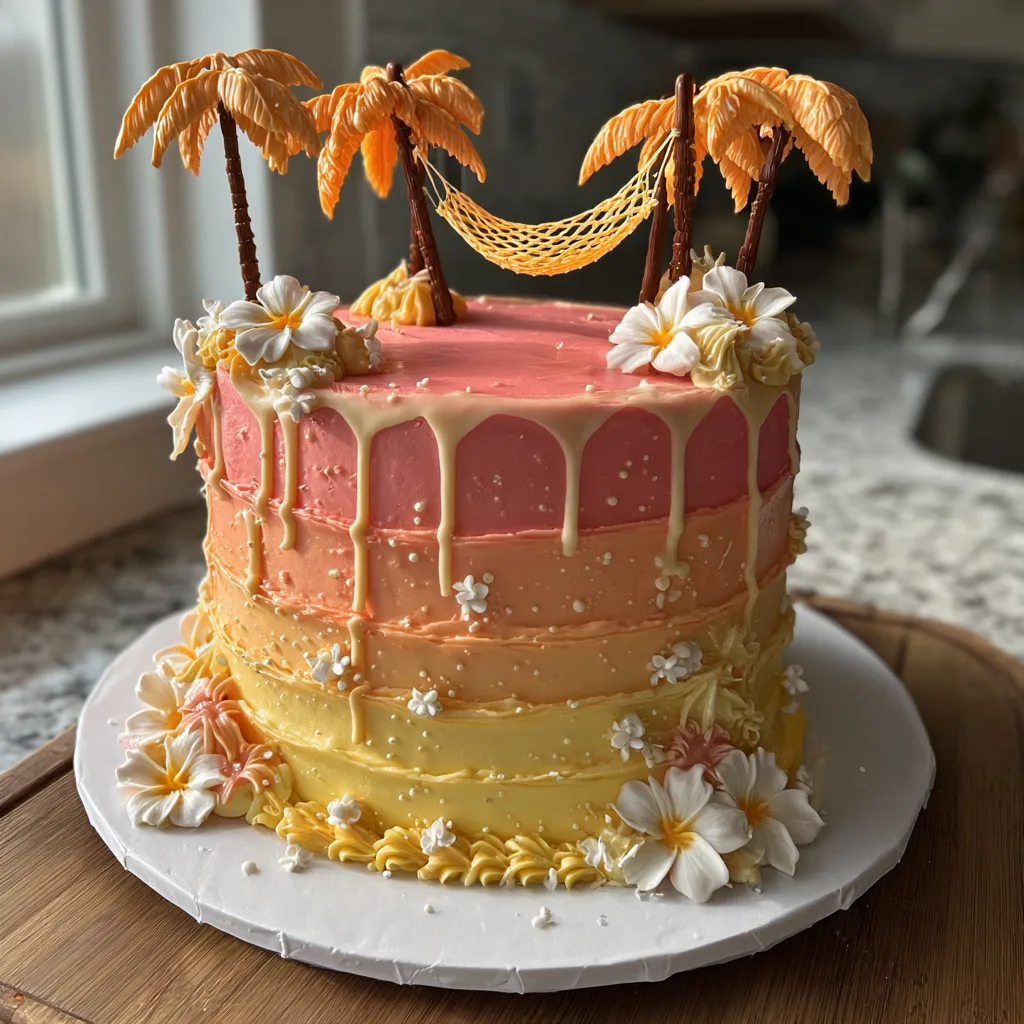
There is absolutely nothing quite as captivating as a breathtaking sunset over a pristine tropical beach. The warm, vibrant hues of pink, coral, orange, and soft yellow melting into the horizon evoke a profound sense of relaxation, joy, and summer bliss. What if you could capture that exact magical moment and serve it on a platter? Enter the spectacular Tropical Sunset Ombré Cake. This awe-inspiring two-tiered masterpiece features delicate, cascading buttercream ruffles that perfectly mimic the fading light of a tropical evening. Topped with meticulously crafted edible palm trees, a charming yellow hammock, and delicate white sugar flowers, this dessert is much more than just a sweet treat—it is a true centerpiece, a conversation starter, and an edible work of art.
Whether you are planning an extravagant backyard luau, a summer birthday bash, a tropical-themed bridal shower, or simply want to challenge your cake-decorating skills over a long weekend, this cake promises to deliver maximum visual impact and unforgettable flavor. In this comprehensive guide, we will walk you through every single step required to bring this beachside dream to life. From baking the perfect, moist, and tender coconut-pineapple cake layers to mastering the intimidating yet highly rewarding ombré ruffled buttercream technique, you will learn all the secrets of professional cake artisans.
The Inspiration Behind the Sunset Vibe
When designing a cake of this magnitude, the inspiration is drawn directly from the natural beauty of tropical coastlines. The bottom tier anchors the design with deep, saturated magentas and hot pinks, representing the last intense flashes of the sun as it dips below the waterline. As your eyes travel upwards, the colors transition seamlessly into warm tangerine, soft peach, and finally, a buttery pastel yellow on the top tier, reminiscent of the glowing sky. The texture is just as important as the color. By utilizing a ruffled piping technique, the frosting mimics the gentle, rhythmic lapping of ocean waves or the layered clouds painted by the setting sun.
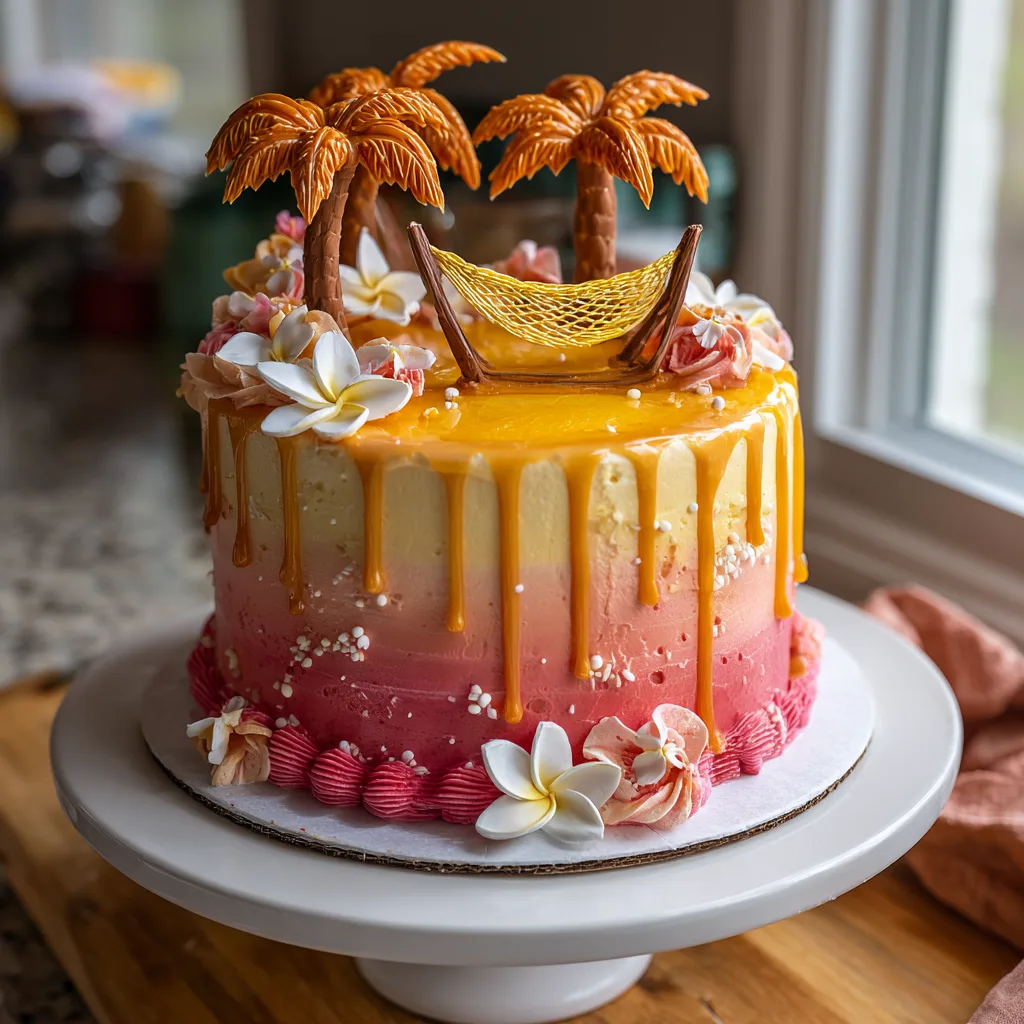
To ground this ethereal sky, we introduce structural, three-dimensional elements. The modeling chocolate palm trees provide height and a sense of scale, while the intricate woven texture of the fondant hammock invites viewers to imagine themselves lounging under the fronds. The addition of simple, elegant white tropical blossoms—resembling plumeria or lilies—softens the transition between the tiers and adds a touch of botanical realism.
The Flavor Profile: A Taste of the Tropics
A cake this magnificent on the outside deserves an equally spectacular interior. While you can certainly use a standard vanilla or chocolate sponge, adapting the flavor profile to match the tropical aesthetic elevates the entire experience. For this specific recipe, we highly recommend a toasted coconut and crushed pineapple cake, layered with a tangy passionfruit or mango curd, and enveloped in a silky smooth, vanilla-scented Swiss Meringue Buttercream. The dense crumb of the coconut cake provides the necessary structural integrity to hold up two stacked tiers, while the tropical fruit curd cuts through the sweetness of the buttercream, offering a bright, refreshing tartness that dances on the palate.
If you prefer to keep things simple, a sturdy vanilla pound cake or a rich lemon cake will also work beautifully. The most important factor is choosing a cake recipe that is firm enough to be carved, stacked, and frosted without crumbling under the weight of the upper tier and decorations. The use of a simple syrup wash—perhaps lightly spiked with a quality dark rum or coconut extract—will ensure your layers remain incredibly moist for days.
Essential Tools for Masterful Cake Decorating
Attempting a tiered, heavily decorated cake without the proper tools can quickly turn a fun baking project into a stressful endeavor. To ensure your success in recreating this Tropical Sunset Cake, you will need to gather a few essential items before you even preheat your oven. First and foremost, you will need professional-quality cake pans with straight sides (two 8-inch pans for the bottom tier and two 6-inch pans for the top tier). A heavy-duty stand mixer is crucial for whipping up the volume required for both the cake batter and the massive amount of buttercream you will need.
For the decorating phase, a sturdy rotating cake turntable will be your best friend, allowing you to pipe the ruffles continuously without awkwardly contorting your wrists. You will also need an offset spatula, a large bench scraper for achieving smooth base coats, and several piping bags. The star of the show for the ruffled effect is a petal piping tip, such as a Wilton 104 or 127. Additionally, having wooden dowels or bubble tea straws for structural support, cake boards for each tier, and a set of food-safe paintbrushes and modeling tools for the palm trees will make the entire assembly process exponentially smoother.
Ingredients Needed
For the Coconut Pineapple Cake Base:
- – 3 and 1/2 cups all-purpose flour
- – 1 tablespoon baking powder
- – 1 teaspoon baking soda
- – 1 teaspoon fine sea salt
- – 1 cup (2 sticks) unsalted butter, softened to room temperature
- – 2 cups granulated sugar
- – 1/2 cup lightly packed brown sugar
- – 5 large eggs, at room temperature
- – 1 tablespoon pure vanilla extract
- – 1 teaspoon coconut extract
- – 1 cup full-fat buttermilk, at room temperature
- – 1/2 cup crushed pineapple, well drained
- – 1 cup sweetened shredded coconut, lightly toasted
For the Vanilla Swiss Meringue Buttercream:
- – 2 cups fresh egg whites (about 14 large egg whites)
- – 4 cups granulated sugar
- – 6 cups (12 sticks) unsalted butter, softened but cool
- – 2 tablespoons pure vanilla bean paste or extract
- – High-quality gel food coloring in Electric Pink, Orange, Peach, and Lemon Yellow
For the Tropical Decorations:
- – 1 pound brown modeling chocolate or fondant (for tree trunks)
- – 1/2 pound orange/peach modeling chocolate or fondant (for palm fronds)
- – 1/4 pound yellow fondant (for the hammock)
- – 1/4 pound white fondant or gum paste (for the flowers)
- – Edible glue or water
- – Floral wire and tape (for supporting the palm trees)
Step-by-Step Instructions
- Prepare the Cake Pans: Preheat your oven to 350°F (175°C). Generously grease two 8-inch round cake pans and two 6-inch round cake pans. Line the bottoms with parchment paper circles and dust the sides lightly with flour to ensure an easy release.
- Mix the Dry Ingredients: In a large mixing bowl, whisk together the all-purpose flour, baking powder, baking soda, and fine sea salt until well aerated and completely combined. Set this bowl aside.
- Cream Butter and Sugars: In the bowl of a stand mixer fitted with a paddle attachment, beat the softened unsalted butter on medium-high speed for about two minutes until smooth. Add both the granulated sugar and brown sugar, and cream together for an additional four to five minutes until the mixture is incredibly light, fluffy, and pale in color.
- Incorporate Eggs and Flavorings: Scrape down the sides and bottom of the bowl with a rubber spatula. With the mixer on low speed, add the room temperature eggs one at a time, ensuring each is fully incorporated before adding the next. Stir in the pure vanilla extract and coconut extract.
- Alternate Dry and Wet: Keeping the mixer on its lowest speed, add one-third of the dry flour mixture. Once barely mixed, pour in half of the room temperature buttermilk. Follow with another third of the flour, the remaining buttermilk, and finally the last of the flour. Do not overmix.
- Fold in the Tropics: Remove the bowl from the mixer and gently fold in the thoroughly drained crushed pineapple and the toasted shredded coconut by hand using a spatula. Ensure they are evenly distributed throughout the batter.
- Bake the Tiers: Divide the batter evenly among the prepared cake pans (the 8-inch pans will require more batter than the 6-inch pans). Bake in the preheated oven for 35-45 minutes, or until a wooden skewer inserted into the center of the cakes comes out perfectly clean. Allow the cakes to cool in their pans for 15 minutes before turning them out onto wire racks to cool completely.
- Make the Swiss Meringue Buttercream: In a heatproof bowl set over a saucepan of simmering water (a double boiler), whisk the egg whites and granulated sugar constantly until the sugar is completely dissolved and the mixture reaches 160°F (71°C) on a candy thermometer.
- Whip the Meringue: Transfer the hot egg white mixture to the bowl of a stand mixer fitted with the whisk attachment. Whip on high speed until stiff, glossy peaks form and the bowl feels entirely cool to the touch (this can take up to 15 minutes).
- Add the Butter: Switch to the paddle attachment. With the mixer on medium-low speed, add the softened butter one tablespoon at a time. The mixture may look curdled at some point, but keep mixing! It will eventually come together into a silky, smooth buttercream. Beat in the vanilla bean paste.
- Color the Frosting: Divide the buttercream into five separate bowls. Leave one bowl white. Tint the other bowls into four distinct shades: hot pink, vibrant coral/orange, soft peach, and pastel yellow, using gel food coloring.
- Assemble and Crumb Coat: Level the cooled cake layers with a serrated knife. Place the bottom 8-inch layer on an 8-inch cake board. Fill and stack the 8-inch layers, then apply a thin layer of white buttercream all over to trap the crumbs. Repeat this process with the 6-inch cakes on a 6-inch board. Chill both tiers in the refrigerator for at least 30 minutes.
- Stack the Tiers: Insert 4-5 wooden dowels or bubble tea straws into the center of the chilled 8-inch tier, cutting them perfectly flush with the frosting. Carefully lift the 6-inch tier (still on its board) and place it directly in the center of the 8-inch tier. Use a small dollop of buttercream as glue between them.
- Pipe the Ombré Ruffles: Fit a piping bag with a petal tip (like Wilton 104). Fill the bag with the hot pink buttercream. Starting at the very bottom of the 8-inch tier, hold the piping bag with the wide end of the tip against the cake and the narrow end pointing out. Apply even pressure and move your hand in a slight up-and-down zigzag motion to create a continuous ruffle around the base. Pipe two to three rows of pink, then switch to the coral/orange buttercream for the next few rows. Continue moving up the cake, transitioning to peach, and finishing the top tier with the pastel yellow buttercream.
- Create the Palm Trees and Hammock: Knead your brown modeling chocolate until pliable. Sculpt it around floral wires to form two textured palm tree trunks of varying heights. Use a small knife to score bark lines. For the fronds, roll out the orange/peach fondant and cut leaf shapes, texturing them with a veining tool. Attach them to the top of the trunks with a dab of water. Roll out the yellow fondant, emboss it with a fabric or mesh texture mat, and cut it into a crescent hammock shape. Let these elements dry and harden overnight.
- Final Assembly: Carefully insert the floral wire extending from the bottom of the hardened palm trees into the top tier of the cake. Gently drape the yellow fondant hammock between the two trees, using a tiny bit of edible glue to secure the ends to the trunks. Arrange the pre-made white fondant tropical flowers on the ledge where the two tiers meet, and at the base of the palm trees to hide any seams.
Mastering the Ombré Ruffled Buttercream Technique
The defining feature of this Tropical Sunset Cake is the breathtaking ombré ruffle effect. While it looks incredibly intricate and time-consuming, it is actually one of the more forgiving cake decorating techniques once you find your rhythm. The key to perfect ruffles lies entirely in the consistency of your buttercream and the pressure you apply to the piping bag. Swiss Meringue Buttercream is the absolute ideal choice for this because it is incredibly stable, silky, and less prone to melting from the heat of your hands compared to traditional American buttercream.
When piping, always keep the fat end of the petal tip pressed gently against the side of the cake. This anchors the ruffle. The thin end of the tip should face outward towards you. If you want tighter, more condensed ruffles, move your hand quickly up and down while moving slowly around the cake. For wider, looser waves, use a slower up and down motion. The ombré fade is achieved by simply changing the color of the buttercream in your piping bag as you work your way up the tiers. To make the transition look natural, you can mix a little bit of the previous color into the new color as you switch bags, creating intermediate shades that blend flawlessly.
Crafting the Edible Palm Trees and Hammock
The topper of this cake is what transforms it from a pretty dessert into a true tropical scene. Modeling chocolate is highly recommended over fondant for the palm tree trunks because it sets up much firmer, allowing it to hold the weight of the overhanging fronds without drooping or snapping. When inserting the floral wire into the trunks, leave at least two inches of wire exposed at the bottom; this acts as an anchor that you will eventually stab deep into the cake to keep the trees upright.
The hammock is a charming detail that requires a delicate touch. You want the fondant to be rolled quite thin so it looks like fabric, but not so thin that it tears when you lift it. Using a texture mat adds a wonderful woven look that elevates the realism. When attaching the hammock, you may need to prop it up with small wads of paper towel or cotton balls for a few hours until the fondant dries completely and holds its curved shape in the air between the trees.
Variations and Substitutions
One of the joys of baking is tailoring a recipe to your exact preferences. If you are not a fan of coconut or pineapple, this design works brilliantly with almost any flavor profile. Imagine a rich, dark chocolate mud cake hidden beneath those sunny ruffles, or a zesty lime and raspberry sponge that echoes the tartness of tropical fruits. For the frosting, if you find Swiss Meringue too tedious, a high-quality American crusting buttercream will also hold the ruffle shape beautifully, though it will yield a much sweeter final product.
In terms of decoration, the sky is the limit. Instead of a hammock, you could sculpt a small fondant surfboard leaning against the palm trees. You could crush graham crackers or Nilla wafers and sprinkle them around the base border of the cake to mimic real sand. If sculpting palm trees feels too intimidating, you can purchase high-quality plastic or resin tropical cake toppers to achieve a similar look with a fraction of the effort.
Serving Suggestions for a Luau
When presenting this cake at a party, presentation is everything. Display the cake on a sturdy, stark white or natural wood pedestal stand to complement the vibrant colors. Surround the base of the cake stand with fresh, non-toxic tropical leaves (like Monstera or banana leaves) and scatter a few fresh orchids or hibiscus flowers on the table. When cutting the cake, remember to remove all structural dowels and floral wires first. Because this is a dense, tall tiered cake, you will want to cut it using the event style method: slicing a large circle slightly inward from the outer edge, cutting the outer ring into rectangular portions, and then moving inward. This ensures neat, uniform pieces that highlight the beautiful layers and filling inside.
Storage and Make-Ahead Advice
A cake of this scale requires careful planning. You can bake the cake layers up to three days in advance; simply wrap them tightly in plastic wrap and store them in the refrigerator, or freeze them for up to a month. The Swiss Meringue Buttercream can be made a week ahead and stored in the fridge, or frozen for three months. Just remember to bring it back to room temperature and re-whip it until smooth before piping. The fondant and modeling chocolate decorations can (and should) be made at least three days in advance so they have ample time to harden. Fully decorated, this cake will sit beautifully at cool room temperature for 24 hours, but keep it out of direct sunlight to prevent the buttercream from melting and the colors from fading.
Conclusion: Bring the Beach to Your Kitchen
Creating the Tropical Sunset Ombré Cake is undoubtedly a labor of love, but the results are profoundly rewarding. By combining the rich, summery flavors of coconut and pineapple with the visual drama of ruffled, color-fading buttercream and whimsical 3D decorations, you are crafting an unforgettable centerpiece. Embrace the process, take your time with the piping, and don’t be afraid to let your creativity shine through the sunset colors. With a little patience and the right techniques, you can successfully bring the warmth, beauty, and relaxation of a tropical beach directly into your kitchen.
Tropical Sunset Ombré Cake
Ingredients
Equipment
Method
- Preheat oven to 350°F (175°C). Grease and line two 8-inch and two 6-inch cake pans.
- Whisk dry ingredients: flour, baking powder, baking soda, and salt.
- Cream the butter, granulated sugar, and brown sugar until light and fluffy. Add eggs one at a time, followed by extracts.
- Alternate adding the dry ingredients and buttermilk, beginning and ending with the dry ingredients. Fold in drained pineapple and toasted coconut.
- Divide batter between pans and bake for 35-45 minutes. Let cool completely.
- Prepare buttercream: Heat egg whites and sugar over a double boiler until 160°F. Whip into a stiff meringue, then gradually beat in butter and vanilla.
- Divide and color the buttercream into pink, orange, peach, and yellow.
- Level, stack, and crumb coat the 8-inch and 6-inch tiers separately. Chill. Insert dowels into the 8-inch tier and carefully stack the 6-inch tier on top.
- Using a petal tip, pipe continuous ruffles around the cake, starting with pink at the bottom and fading up to yellow at the top.
- Sculpt palm trees and hammock from modeling chocolate and fondant. Insert into the top tier and add white fondant flowers.