Hydrangea Cupcakes
Stunning Hydrangea Cupcakes: A Masterclass in Floral Buttercream
The Elegance of Edible Blooms
There is something undeniably enchanting about desserts that mimic the beauty of the natural world. In the realm of cake decorating, floral designs have always held a special place, bringing a touch of romance, elegance, and springtime cheer to any occasion. Among the myriad of edible flowers you can create, Hydrangea Cupcakes stand out as a breathtakingly beautiful yet surprisingly accessible masterpiece. These exquisite little cakes capture the lush, voluminous, and multi-toned beauty of real hydrangea bushes, transforming a simple baked good into a stunning edible centerpiece. Whether you are planning a sophisticated bridal shower, a vibrant spring garden party, a memorable Mother’s Day brunch, or simply looking to challenge your baking skills on a quiet weekend, these floral cupcakes offer a delightful and rewarding project. The visual impact of presenting a platter of these beautifully piped, pastel-hued blooms is guaranteed to elicit gasps of admiration from your guests, making them a truly unforgettable treat.
Why These Hydrangea Cupcakes Will Steal the Show
The allure of these Hydrangea Cupcakes lies in the perfect marriage of visual spectacle and comforting, classic flavors. At their core, these are incredibly moist, tender, and deeply flavorful vanilla cupcakes—the kind of reliable, delicious bake that everyone loves. But it is the frosting that elevates them from a simple snack to a work of art. Unlike highly complex sugar paste flowers or intricate fondant work that requires expensive tools and years of practice, the hydrangea effect is achieved entirely through clever piping techniques using standard buttercream. By utilizing a simple closed star tip (like a Wilton 2D) and a unique method of swirling multiple frosting colors in a single piping bag, you can create the illusion of hundreds of delicate, overlapping petals with a single, continuous squeeze. The result is a richly textured, domed top that looks incredibly professional but is entirely achievable for the home baker. Furthermore, the thick layer of buttercream required to create the floral shape ensures a decadent, generous frosting-to-cake ratio that sweet-tooths will absolutely adore.
The Foundation: Baking the Perfect Vanilla Cupcake
A spectacular frosting demands a spectacular cake beneath it. For these Hydrangea Cupcakes, we rely on a steadfast, bakery-style vanilla cupcake recipe that promises a flat top, a tender crumb, and a flavor that is rich without being overly sweet. The secret to this perfect texture is the combination of fat and dairy. Using both butter and a touch of vegetable oil ensures the cake has the rich flavor of dairy fat while benefiting from the moisture-retaining properties of the oil. Sour cream or full-fat Greek yogurt is another crucial component; the acidity tenderizes the gluten in the flour, resulting in a remarkably soft and velvety crumb. When mixing your batter, the golden rule applies: do not overmix. Overmixing develops the gluten, leading to dense, tough cupcakes. Mix just until the wet and dry ingredients are combined and no streaks of flour remain. Finally, baking at the correct temperature and avoiding over-baking is essential. You want your cupcakes to remain pale gold on top, ensuring they stay moist and provide a sturdy but delicate base for your heavy buttercream blooms.
The Crown Jewel: Perfecting the Buttercream
The success of your floral piping rests entirely on the consistency and stability of your buttercream. For this project, an American Buttercream—a mixture of softened butter, powdered sugar, vanilla, and a splash of cream—is ideal because it crusts slightly and holds intricate shapes beautifully. However, the temperature of your butter is paramount. It must be room temperature, meaning it yields to a gentle press but does not look greasy or melted. If your butter is too warm, your frosting will be soupy, and your hydrangea petals will melt into a shapeless blob. If it is too cold, the frosting will be stiff, difficult to pipe, and prone to tearing. You must beat the butter on its own for several minutes until it becomes pale and airy before gradually adding the sifted powdered sugar. Sifting your sugar is a non-negotiable step; a single lump of sugar can clog your piping tip and ruin your delicate petal design. A pinch of salt is also essential to cut through the intense sweetness of the sugar, balancing the flavor profile beautifully.
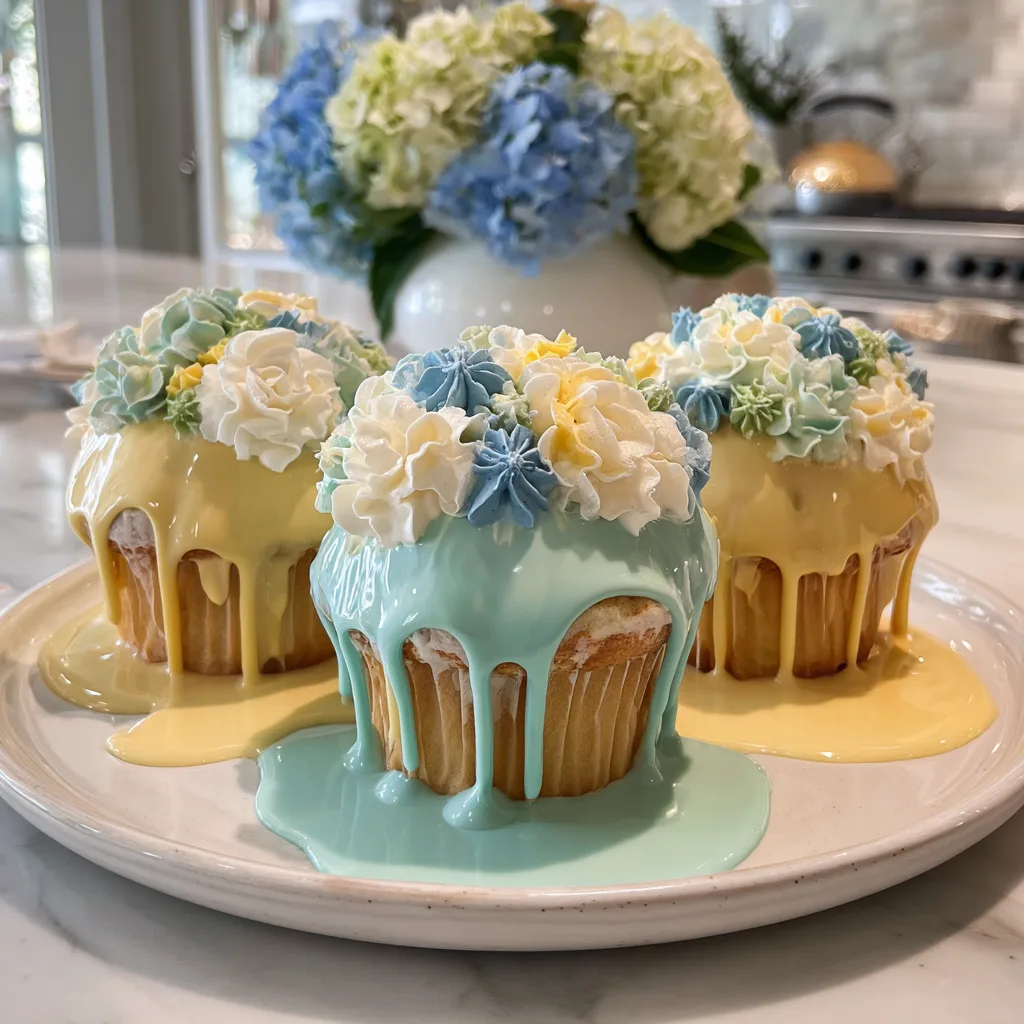
The Art of Color Blending
Real hydrangeas are famous for their stunning, mottled color variations, often displaying shades of blue, purple, pink, and green within a single bloom due to the acidity of the soil they grow in. To replicate this natural, multi-toned beauty, we employ a color-swiping technique in the piping bag. For this specific look, we are using soft pastel blues, creamy pale yellows, and delicate leaf greens. Gel food coloring is absolutely mandatory here; liquid food coloring will thin out your buttercream and alter its piping consistency. You will divide your prepared buttercream into separate bowls and tint them to your desired shades. To achieve the beautiful, blended petal effect, you do not mix the colors together. Instead, you lay out a piece of plastic wrap, spread lines of your colored frosting side-by-side, roll it into a log, snip the end, and drop the entire log into a piping bag fitted with your star tip. As you pipe, the colors will extrude simultaneously, naturally swirling and blending at the edges to create realistic, multi-hued floral petals.
Ingredients You Will Need
To create these stunning cupcakes, you will need the following ingredients. Ensure all cold ingredients for the cake are brought to room temperature before beginning.
For the Vanilla Cupcakes:
- – 1 and 2/3 cups all-purpose flour
- – 1/2 teaspoon baking powder
- – 1/4 teaspoon baking soda
- – 1/2 teaspoon salt
- – 1/2 cup (1 stick) unsalted butter, melted and slightly cooled
- – 1 cup granulated sugar
- – 1 large egg, room temperature
- – 1/4 cup sour cream or plain yogurt, room temperature
- – 3/4 cup whole milk, room temperature
- – 2 teaspoons pure vanilla extract
For the Vanilla Buttercream:
- – 1 and 1/2 cups (3 sticks) unsalted butter, softened to room temperature
- – 4 cups powdered sugar, sifted
- – 1/4 cup heavy cream or whole milk
- – 2 teaspoons pure vanilla extract
- – 1/8 teaspoon salt
- – Gel food coloring (pastel blue, yellow, and green)
Step-by-Step Instructions
Follow these instructions carefully to bake the perfect base and whip up the ideal frosting for your edible garden.
- Preheat and Prep: Preheat your oven to 350°F (177°C). Line a standard 12-count muffin pan with cupcake liners. Set aside.
- Mix Dry Ingredients: In a medium bowl, whisk together the all-purpose flour, baking powder, baking soda, and salt. Set aside.
- Mix Wet Ingredients: In a large microwave-safe bowl, melt the butter. Whisk in the granulated sugar. The mixture will be gritty. Whisk in the egg, sour cream, milk, and vanilla extract until completely smooth and combined.
- Combine Batter: Pour the dry ingredients into the wet ingredients. Gently whisk or fold the mixture together until just combined. Do not overmix; a few small lumps are okay.
- Bake: Divide the batter evenly among the cupcake liners, filling them about halfway to two-thirds full. Bake for 18-21 minutes, or until a toothpick inserted in the center comes out clean. Allow the cupcakes to cool completely in the pan for 5 minutes before transferring them to a wire rack to cool completely. They must be completely cold before frosting.
- Make the Buttercream: In a large bowl using a handheld or stand mixer fitted with a paddle attachment, beat the softened butter on medium speed for about 2 minutes until completely smooth and creamy.
- Add Sugar and Flavoring: Gradually add the sifted powdered sugar, one cup at a time, beating on low speed until incorporated. Once all sugar is added, increase the speed to high and beat for 2 full minutes. Add the vanilla extract, salt, and heavy cream. Beat on high for another minute until fluffy and spreadable.
- Color the Frosting: Divide the buttercream evenly into three bowls. Tint one bowl soft pastel blue, one bowl pale yellow, and one bowl light green using tiny amounts of gel food coloring. Mix well until the colors are even.
- Prepare the Piping Bag: Lay out a large square of plastic wrap. Using a spatula, swipe a thick line of blue frosting down the center. Next to it, swipe a line of yellow, and next to that, a line of green. Roll the plastic wrap into a log, twisting the ends to secure it. Snip off one twisted end of the plastic wrap.
- Pipe the Hydrangeas: Fit a piping bag with a Wilton 2D or 1M closed star tip. Drop the frosting log, snipped side down, into the piping bag. Squeeze a little frosting onto a plate until you see all three colors coming out. Hold the bag straight down over the cooled cupcake. Squeeze gently to form a star/petal shape, then stop squeezing and pull straight up. Repeat this motion, clustering the small stars tightly together all over the surface of the cupcake, building up the center slightly higher to create a rounded, dome-like hydrangea shape.
The Piping Technique: Deep Dive into Creating the Hydrangea Bloom
Mastering the piping technique is the key to transforming these cupcakes from amateur to bakery-level. The Wilton 2D tip, which is a large closed star tip, is the absolute best tool for this job. Because the tines of the tip bend inwards, it naturally curls the edges of the buttercream as you pipe, creating a delicate, ruffled look that perfectly mimics the thin petals of a hydrangea. The motion is crucial: hold the piping bag at a strict 90-degree angle to the cupcake surface. Apply firm, even pressure to form the base of the flower, allow the frosting to fan out slightly, and then—this is the most important part—completely stop applying pressure before you pull the bag away. If you pull away while still squeezing, you will get long, stringy peaks instead of neat, flat petals. Start by piping a ring of petals around the outer edge of the cupcake, then move inward, piping the next ring slightly overlapping the first. Build up the center by piping petals on top of each other to create that signature lush, rounded dome shape characteristic of a hydrangea bush.
Creative Variations and Flavor Twists
While vanilla is a classic canvas, you can easily adapt this recipe to feature different flavor profiles. For a zesty spring twist, add a tablespoon of fresh lemon zest to the cupcake batter and substitute the milk in the buttercream with fresh lemon juice for a bright Lemon Hydrangea Cupcake. If you prefer a richer dessert, swap the vanilla cupcake base for a dark, decadent chocolate cupcake, keeping the bright floral buttercream on top for a striking visual contrast. You can also experiment endlessly with the colors. Create vibrant magenta and purple blooms, or deep, moody blue and indigo hydrangeas by adjusting your gel food coloring. If you want an even more realistic look, use a small leaf tip (like Wilton 352) and some solid green buttercream to pipe a few delicate leaves at the base of the floral dome, framing the hydrangea perfectly and adding an extra touch of botanical realism.
Storage and Make-Ahead Strategies
These Hydrangea Cupcakes are excellent candidates for making ahead of time, which is ideal if you are preparing them for a large event. The unfrosted cupcakes can be baked up to two days in advance and stored in an airtight container at room temperature. The buttercream can be made up to a week in advance and stored in an airtight container in the refrigerator; simply let it come to room temperature and re-whip it for a few minutes to restore its fluffy texture before coloring and piping. Once the cupcakes are fully frosted, they can sit out at room temperature for up to two days, provided your kitchen is not overly hot or humid. The high sugar content in the buttercream acts as a preservative, and the slight crust it forms will protect the intricate piping. If you need to store them longer, place them in a tall, airtight cake dome in the refrigerator for up to 5 days, but allow them to come to room temperature before serving so the cake crumb softens and the buttercream is pleasantly creamy.
Frequently Asked Questions (FAQs)
Why is my buttercream melting and losing its shape while I pipe?
This is the most common issue when piping intricate designs. It usually means your butter was too warm to begin with, or the heat from your hands is melting the butter through the piping bag. If the frosting feels soft or looks shiny, place the entire piping bag in the refrigerator for 5 to 10 minutes to firm up the butter before continuing.
Can I use a different piping tip?
While the Wilton 2D (closed star) or 1M (open star) are the best for this specific hydrangea look, you can use any large star tip. Just keep in mind that an open star tip will create petals that are slightly less ruffled and more defined, looking more like a standard star shape rather than a delicate petal.
Do I have to use gel food coloring?
Yes, it is highly recommended. Liquid food coloring adds unnecessary moisture to the buttercream, which can thin it out and ruin its ability to hold a stiff, piped shape. Gel coloring is highly concentrated, meaning you only need a tiny drop to achieve vibrant colors without altering the frosting’s consistency.

Conclusion
Baking and decorating Hydrangea Cupcakes is a deeply satisfying culinary project that yields spectacular results. They are a testament to the fact that you do not need formal pastry training or complicated fondant tools to create breathtaking, bakery-quality desserts right in your own kitchen. By mastering a moist vanilla cake base, whipping up a sturdy American buttercream, and learning the simple but effective two-tone piping technique, you can produce edible art that will dazzle your family and friends. These charming floral treats bring a touch of garden magic to any dessert table, celebrating the beauty of spring with every delicious, buttery bite. Gather your piping bags, unleash your creativity with colors, and enjoy the process of watching a beautiful garden bloom right before your eyes, one cupcake at a time.
Stunning Hydrangea Cupcakes
Ingredients
Equipment
Method
- Preheat oven to 350°F (177°C) and line a 12-count muffin pan with liners.
- Whisk flour, baking powder, baking soda, and salt together in a bowl.
- In a separate bowl, mix melted butter and sugar. Whisk in the egg, sour cream, milk, and vanilla until smooth.
- Combine wet and dry ingredients gently until just mixed. Do not overmix.
- Divide batter into liners and bake for 18-21 minutes. Let cool completely.
- Beat softened butter for the frosting until smooth. Gradually add sifted powdered sugar, beating until incorporated.
- Add heavy cream, vanilla, and salt to the frosting, beating on high for 2 minutes until fluffy.
- Divide frosting into three bowls. Tint one blue, one yellow, and one green using gel coloring.
- Swipe lines of each color side-by-side on plastic wrap, roll into a log, snip the end, and place into a piping bag fitted with a Wilton 2D or 1M tip.
- Hold the bag vertically over the cooled cupcake and pipe small, clustered star shapes, building them up into a dome to resemble a hydrangea flower.