Glitter Chocolate Covered Strawberries
Sparkling Cotton Candy Glitter Chocolate Covered Strawberries
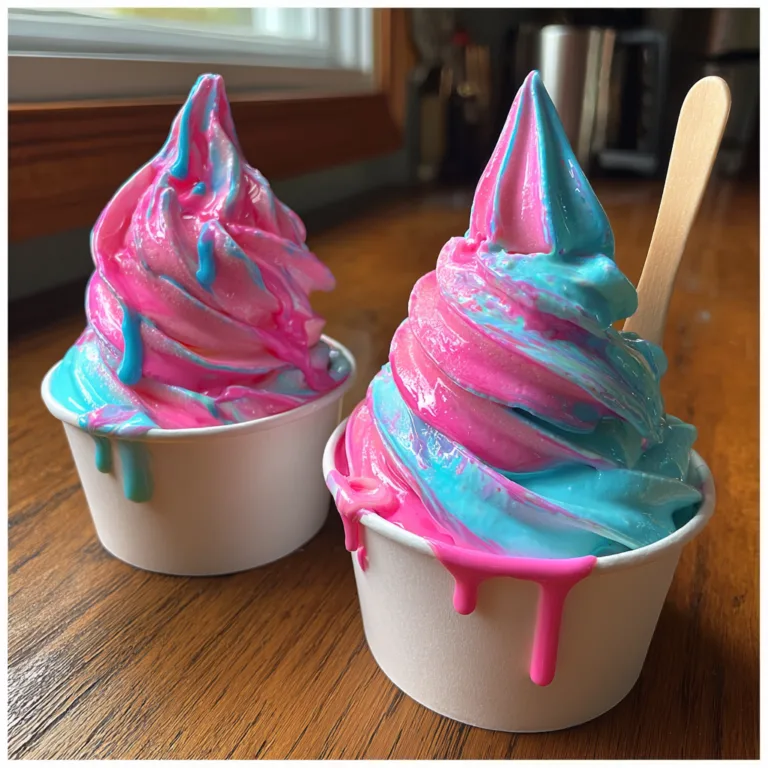
When it comes to show-stopping desserts that require minimal effort but deliver maximum visual impact, few treats can rival the beauty of these Sparkling Cotton Candy Glitter Chocolate Covered Strawberries. Bursting with vibrant pastel colors, dazzling edible glitter, and the timeless combination of fresh fruit and sweet confection, this recipe is a feast for both the eyes and the palate. Whether you are planning a whimsical mermaid-themed birthday party, an unforgettable gender reveal, a baby shower, or simply want to elevate a weekend dessert table, these blue and pink sparkling strawberries are guaranteed to be the center of attention.
There is something inherently magical about taking a simple, humble piece of fruit and transforming it into an edible jewel. The crisp, juicy snap of a perfectly ripe strawberry encased in a smooth, sweet, melt-in-your-mouth candy coating is a textural delight. But when you introduce eye-catching colors like baby blue and hot pink, topped with a generous dusting of holographic edible glitter, you move from simple snacking into the realm of edible art. This comprehensive guide will walk you through everything you need to know to create these bakery-quality treats right in your own kitchen, ensuring your chocolate is perfectly smooth, your berries are beautifully coated, and your glitter shines brightly.
Why You Will Love This Recipe
First and foremost, the aesthetic appeal of these strawberries is unmatched. They look incredibly intricate and professionally made, yet the process is incredibly straightforward and accessible for home cooks of any skill level. You do not need a culinary degree or advanced pastry skills to master this recipe. If you can melt chocolate and dip a piece of fruit, you can successfully create these dazzling treats.

Secondly, this recipe is highly customizable. While this specific guide focuses on the mesmerizing cotton candy color palette of light blue and pink, the fundamental techniques taught here can be applied to any color combination imaginable. You can match the colors to any event theme, holiday, or personal preference. Furthermore, the flavor profile is a guaranteed crowd-pleaser. The natural tartness and juicy freshness of the strawberry perfectly balance the sweet, creamy richness of the candy melts, ensuring that these treats taste just as incredible as they look.
The Magic of Edible Glitter: What You Need to Know
Before diving into the recipe, it is crucial to address the star of the show: the glitter. When shopping for glitter to use on food, you must ensure that the product is explicitly labeled as “edible.” There is a significant difference between “non-toxic” glitter and “edible” food-grade glitter. Non-toxic glitter is generally safe if a tiny amount is accidentally ingested, but it is not meant to be eaten as food. It is often made of micro-plastics. Edible glitter, on the other hand, is completely safe for consumption and is typically made from ingredients like sugar, acacia gum, maltodextrin, and food-safe pearlescent pigments (like mica-based pigments).
For this recipe, you want a fine, dust-like edible glitter or luster dust to achieve that magical, galaxy-like sparkle. Look for holographic or iridescent edible glitter in silver, light blue, or light pink to complement the chocolate coating. The way the glitter catches the light against the glossy chocolate is what gives these strawberries their signature enchanting appearance.
Candy Melts vs. Real Chocolate
You might wonder whether to use real white chocolate colored with food dye or pre-colored candy melts. For beginners and for achieving vivid, consistent colors like the ones pictured, candy melts (or compound chocolate) are highly recommended. Real white chocolate contains cocoa butter and requires a precise process called tempering to set properly with a glossy finish and a firm snap. If tempering is done incorrectly, the chocolate can bloom (develop white streaks) or remain soft at room temperature.
Candy melts, however, are formulated with vegetable oils instead of cocoa butter. This means they bypass the need for tempering. You simply melt them, dip your items, and they will set up beautifully firm and shiny at room temperature. They are specifically designed for candy making and coating, making them incredibly user-friendly. If you decide to use real white chocolate, you must use oil-based food coloring; traditional water-based or gel food coloring will cause real chocolate to seize and turn into a clumpy, unusable mess.
Ingredients
Here is everything you need to create these beautiful berries:
- – Fresh Strawberries: 1 pound of large, uniform strawberries with vibrant, healthy green leaves intact. The stems act as natural handles for dipping.
- – Light Blue Candy Melts: 12 ounces. This will be the base coating for the berries.
- – Bright Pink Candy Melts: 1/2 cup. This will be used for the contrasting decorative drizzle.
- – Edible Glitter: 1 to 2 tablespoons of food-safe iridescent, holographic, or silver edible glitter/luster dust.
- – Coconut Oil or Vegetable Oil: 1 to 2 teaspoons (optional). This is used only if your melted candy is too thick and needs thinning for a smoother dip.
Step-by-Step Instructions
Follow these instructions closely for flawless, bakery-quality chocolate-covered strawberries.
- 1. Prep the Strawberries: Gently wash the strawberries under cold water. This next part is the most critical step of the entire recipe: dry them completely. Use paper towels to pat every single berry completely dry, paying special attention to the area around the leaves. Even a single drop of water can cause the melted candy to seize and ruin the batch. Leave them on a dry paper towel for an hour before dipping to ensure all residual moisture has evaporated.
- 2. Prepare Your Workstation: Line a large baking sheet with parchment paper, wax paper, or a silicone baking mat. Have your edible glitter open and ready, as you will need to apply it while the candy is still somewhat wet.
- 3. Melt the Blue Candy: Place the light blue candy melts in a deep, microwave-safe bowl. Microwave at 50% power for 30 seconds. Remove and stir. Repeat this process (30 seconds at 50% power, followed by stirring) until the candy is completely melted and smooth. Do not overheat, or the candy will become thick and clumpy. If the melted candy seems too thick for dipping, stir in 1/2 teaspoon of coconut oil until the desired consistency is reached.
- 4. Dip the Berries: Hold a strawberry by the green leafy stem. Plunge it directly into the melted blue candy, turning it slightly to coat all sides evenly, leaving a small margin of red near the leaves if desired. Lift the berry out and gently tap the hand holding the berry against the side of the bowl to allow the excess candy to drip off. Scrape the bottom of the berry against the lip of the bowl to prevent a large “foot” of chocolate from forming on the parchment paper.
- 5. Let the Base Coat Set: Place the coated strawberry onto your prepared baking sheet. Repeat the process with the remaining strawberries. Allow the blue coating to set completely at room temperature, which usually takes about 10 to 15 minutes.
- 6. Melt the Pink Candy: Once the blue layer is set, melt the pink candy melts using the exact same microwave method (50% power in 30-second intervals).
- 7. Prepare the Drizzle: Transfer the melted pink candy into a disposable piping bag, a small ziplock bag, or a specialized drizzle spoon. If using a bag, snip a very tiny corner off the tip to create a fine stream.
- 8. Drizzle and Glitter: Working quickly, drizzle the pink candy back and forth over the set blue strawberries in a rapid zig-zag motion. Immediately after drizzling a few berries—while the pink candy is still wet—generously sprinkle the edible glitter over the top. The wet pink candy will help anchor the glitter.
- 9. Final Set and Serve: Allow the pink drizzle to set completely. Once fully hardened, carefully lift the strawberries from the parchment paper and transfer them to a beautiful serving platter. Serve and enjoy the dazzling display!
Pro Tips for Perfect Chocolate Covered Strawberries
To elevate your treats from amateur to professional, keep these essential tips in mind. Temperature control is your best friend. Never pull your strawberries straight from a cold fridge and immediately dip them into warm chocolate. The temperature shock will cause the strawberries to sweat beneath the chocolate shell, leading to a watery, messy interior and causing the chocolate to slide right off. Always let your berries come to room temperature before dipping.
When tapping off excess chocolate, patience is key. Tapping firmly but gently ensures a thin, delicate shell rather than a thick, waxy bite that overpowers the fruit. A thinner shell also cracks more beautifully when bitten into, providing that satisfying textural contrast. Furthermore, to keep the leaves looking fresh and perky, you can gently fold them back like an umbrella while dipping, then let them fall naturally back into place as the berry dries.
Troubleshooting Common Issues
Even the best home bakers run into issues. If your melted candy seizes—meaning it turns grainy, thick, and paste-like—it has likely come into contact with water or has been overheated. Unfortunately, severely seized candy melts cannot be easily reversed for dipping. It is best to start over with a fresh batch. To prevent overheating, always use 50% power in the microwave and stir frequently, as the residual heat from the bowl will do a lot of the melting work.
If you notice a pool of liquid forming around your strawberries after they have set (often called “weeping”), this means the strawberries were either bruised, poked, or cut before dipping, allowing the juices to escape. Always use perfectly intact, unblemished berries. Weeping can also occur if the berries were refrigerated uncovered; condensation forms on the chocolate and ruins the finish.
Variations and Flavor Tweaks
The beauty of this recipe is its immense versatility. If you want to lean heavily into the “mermaid” theme, try adding crushed graham crackers to the bottom of the berries right after dipping to mimic sand. You can also affix small, edible sugar pearls or molded chocolate seashells to the wet candy coating.
For a flavor upgrade, you can infuse the melted candy. While traditional liquid extracts can cause the chocolate to seize, you can purchase special oil-based candy flavorings. A drop of cotton candy flavoring oil or bubblegum flavoring oil mixed into the candy melts will give these strawberries a taste that perfectly matches their whimsical appearance.
Serving Suggestions and Occasions
These Sparkling Cotton Candy Glitter Strawberries deserve a presentation worthy of their beauty. Serve them on a crisp white rectangular platter, as seen in the inspiration photo, to make the vibrant blue and pink colors truly pop. They are perfect for dessert towers at baby showers or gender reveals (you can bite into them to reveal a pink or blue interior if you inject them with colored frosting!). They also make incredibly thoughtful homemade gifts; simply place them in mini cupcake liners inside a beautiful bakery box tied with a satin ribbon.
Fun Facts and Cultural Context
The concept of dipping fruit into chocolate dates back to the 1960s, credited to a woman named Lorraine Lorusso who worked at a small gourmet store in Chicago. She had the brilliant idea to take fresh seasonal strawberries and plunge them into the store’s premium tempered chocolate. They were an instant hit, quickly becoming a symbol of romance, luxury, and celebration worldwide. Today, the art of chocolate-covered strawberries has evolved dramatically, expanding past traditional dark and milk chocolate into an expansive world of colorful candy coatings, intricate designs, and, of course, dazzling edible glitters, reflecting the modern desire for highly photogenic, “Instagrammable” food.

Conclusion
Creating these Sparkling Cotton Candy Glitter Chocolate Covered Strawberries is a delightful culinary project that yields spectacular results. By following the crucial steps of ensuring bone-dry berries, carefully melting your candy coating, and applying that magical dusting of edible glitter, you can create a dessert that is truly unforgettable. Treat yourself, your family, or your party guests to these indulgent, gorgeous, and mouth-watering creations. They are a testament to the fact that with a little creativity and care, homemade treats can outshine even the fanciest bakery displays.
Cotton Candy Glitter Chocolate Covered Strawberries
Ingredients
Equipment
Method
- Wash strawberries gently and dry them completely with paper towels. Ensure zero moisture remains, or the chocolate will seize.
- Line a large baking sheet with parchment paper or a silicone baking mat.
- In a microwave-safe bowl, melt the blue candy melts in 30-second intervals at 50% power. Stir well after each interval until completely smooth. Stir in coconut oil if the mixture needs thinning.
- Holding a strawberry by its green stem, dip it directly into the melted blue candy, turning to coat all sides evenly.
- Lift the berry out, gently tapping the side of the bowl to let excess chocolate drip off. Scrape the bottom against the lip of the bowl and place on the prepared baking sheet. Repeat with remaining strawberries.
- Allow the blue coating to set completely at room temperature, about 10-15 minutes.
- Melt the pink candy melts using the same microwave method. Transfer to a small piping bag or ziplock bag and snip off a tiny corner.
- Drizzle the pink candy over the set blue strawberries in a quick zig-zag pattern.
- Working quickly before the pink drizzle sets, generously sprinkle the edible glitter over the berries so it adheres to the wet candy.
- Let set completely before transferring to a serving platter. Enjoy immediately or store loosely covered in a cool place.