Cookie Butter Brownies
The Ultimate Guide to Fudgy, Gooey One Bowl Cookie Butter Brownies
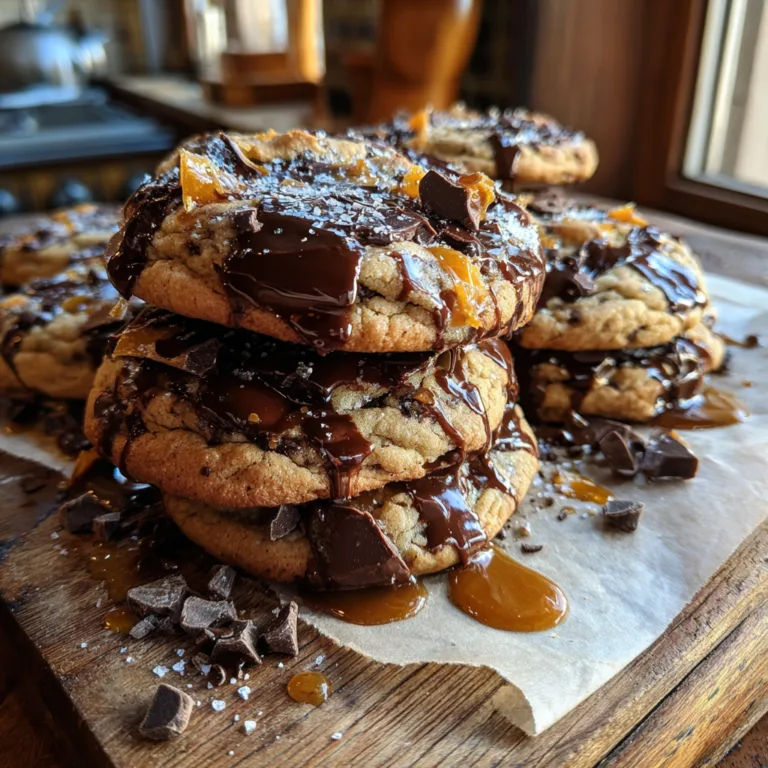
There is nothing quite like a homemade brownie. The deep, rich aroma of cocoa filling the air, the anticipation of that first rich bite, and the blissful satisfaction of a dense, fudgy texture. But what if we told you that we have unlocked a whole new level of brownie perfection? Welcome to your new obsession: One Bowl Cookie Butter Brownies. This recipe isn’t just a delicious treat; it’s a revelation in baking simplicity and flavor indulgence. We’re combining the intensely fudgy character of a gourmet brownie with the addictive, spiced caramel notes of Biscoff cookie butter spread, creating a dessert that is truly drool-worthy, ultra glossy, and completely drenched in flavor.
You may be asking yourself, “What makes this brownie recipe different?” The answer is threefold: the intense fudginess, the molten cookie butter swirl, and the streamlined one-bowl method. Forget the complex, multi-pan baking projects. This recipe is all about maximizing flavor and satisfying cravings with minimum effort. If you are a fan of that decadent, liquid glass look on your desserts, where molten butter and rich sauces pool heavily to create a perfect oil slick shine, then you have found your holy grail recipe. Get ready for a brownies that are completely drenched and saturated in indulgent homemade flavor, making every bite mouth-watering and completely unforgettable.
The Magic of Cookie Butter in Brownies
For the uninitiated, cookie butter (most famously known as Biscoff spread) is a creamy, spreadable version of those irresistible caramelized Belgian speculoos cookies. It has a unique flavor profile: a warm, deeply comforting blend of caramelized sugar, warm brown spices (like cinnamon and nutmeg), and a rich, buttery finish. When you introduce this velvety wonder into a brownie, magic happens. The cookie butter doesn’t just sit there; it melds with the dark chocolate, cutting through the intense richness with its spiced sweetness.
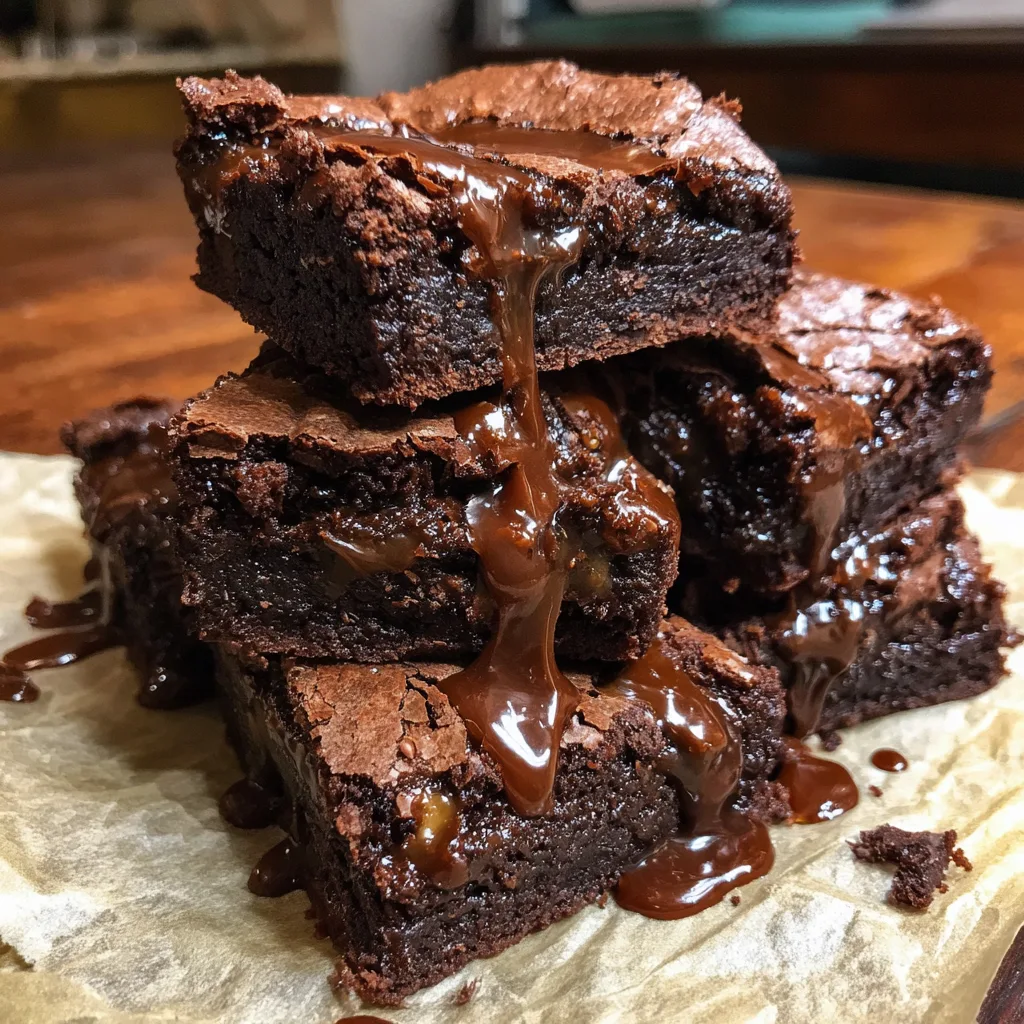
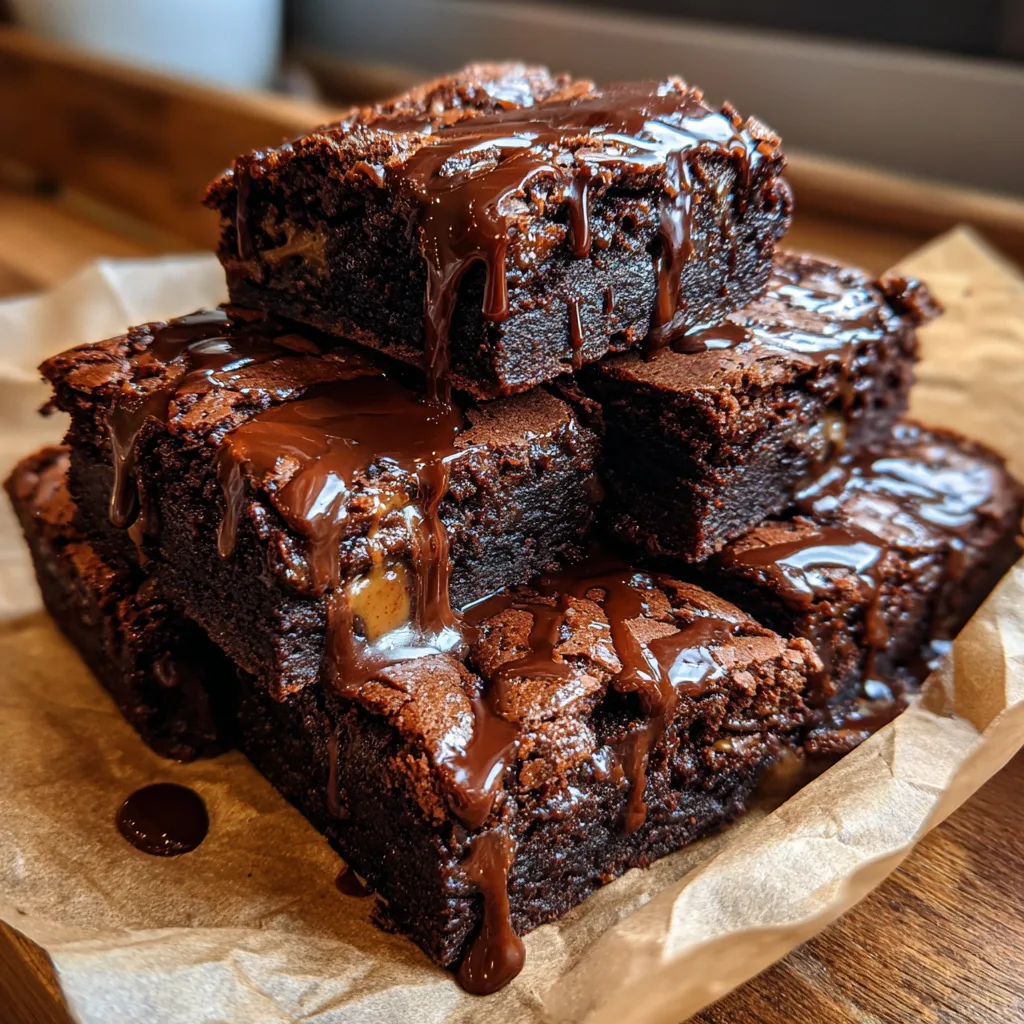
But the real triumph is the texture. We don’t just mix it in; we create molten pockets. The cookie butter is swirled throughout the batter, and because it has a different fat and sugar content than the brownie batter, it stays somewhat molten, creating an ultra shiny, glistening river of flavor. When you cut into one of these brownies, you are met with a sight that defines “drool-worthy”—a thick, dark brownie with a visible, glistening internal glaze of spiced caramel. This molten effect ensures maximum gloss and prevents any trace of dryness.
Unlocking Fudgy Perfection: The No-Leavening Secret
When it comes to brownies, people generally fall into two camps: cakey or fudgy. This recipe is unabruptly and completely a celebration of the fudgy camp. The hallmark of a true fudgy brownie is density, not airiness. To achieve this, we intentionally omit leavening agents. That’s right—no baking powder and no baking soda. Instead, we rely on the aeration from beating the eggs and sugar to provide a slight lift while maintaining that dense, chewy, and completely decadent crumb.
This lack of leavening means the brownies cook down rather than up, intensifying the flavor and concentrating the texture. It also creates that desirable crinkly, paper-thin top crust that is the sign of a gourmet brownie, contrasting beautifully with the completely drenched and saturated interior. When you pull these from the oven, they will appear ultra glossy and slightly wet, promising a mouth-watering experience with zero dry spots. The molten butter and rich sugar content are the drivers of this maximum shine effect, making them irresistible.
The Essential One-Bowl Method
Let’s talk about the beauty of the one-bowl technique. In our modern, busy lives, who has time for dishes? We believe that an amazing dessert shouldn’t require a commercial kitchen’s worth of cleanup. This recipe is designed so that every component, from the initial butter melting to the final dry ingredient incorporation, happens in a single large, microwave-safe bowl. (Or a double boiler if you prefer).
This method isn’t just about saving time on cleanup; it also streamlines the baking process. By melting the butter and chocolate together first, we create a rich, emulsified base that ensures a consistent, glossy texture. We then layer in the sugars and eggs, and finally the dry ingredients, ensuring minimal mixing and maintaining that dense texture. The entire process, from opening the pantry to placing the pan in the oven, takes about 15 minutes of hands-on time, making this an ideal recipe for an impromptu dessert craving or a last-minute gathering.
Ingredients for Maximum Shine and Flavor
To achieve the mouth-watering, ultra glossy appearance seen in the best amateur food posts, quality matters. Let’s look at the key players in this brownie symphony:
- Unsalted Butter: A full cup (2 sticks). This provides the essential rich base that melts into the sugar, creating that molten butter shine and defining the texture. We use unsalted to control the salt level ourselves.
- Semisweet Chocolate: 8 ounces of good quality chocolate, chopped. Don’t rely solely on cocoa powder; real melted chocolate is the secret to true fudginess and that deep, dark, indulgent flavor. It melts to create an almost liquid glass glaze.
- Unsweetened Cocoa Powder: We supplement the real chocolate with cocoa for extra depth of flavor and that signature dark color. This absorbs some fat but doesn’t dull the shine.
- Granulated Sugar & Brown Sugar: A blend of both is key. Granulated sugar helps create the crinkly top, while brown sugar adds moisture, flavor, and contributes to the completely saturated texture.
- Eggs: Large eggs are crucial for structure. They provide the necessary fat and protein, and when beaten, ensure the brownies have a slightly dense, almost custard-like internal structure.
- Cookie Butter Spread: A full cup. Half goes into the batter as a swirl, and the rest is drizzled and swirled on top. Choose a plain, creamy version (like Biscoff) for the most molten effect. This creates those heavy, pooling ribbons of shine.
- Flaky Sea Salt: Optional but highly recommended. A sprinkle on top contrasts the sweet caramel notes and dark chocolate, providing a stunning visual and textural pop that makes the dessert truly mouth-watering.
The Step-by-Step Guide to Baking Bliss
Creating these brownies is a simple but precise process. Here is how to achieve that perfect oil slick shine and gooey center:
- 1. Prep the Station: Preheat your oven to 350°F (175°C). Line an 8×8 inch metal baking pan with parchment paper, allowing some overhang on the sides for easy removal later. Lightly grease the parchment to prevent any sticking.
- 2. Melt the Chocolate Base: In your large, one-bowl setup (microwave-safe bowl or heatproof bowl over simmering water), combine the unsalted butter and the chopped semisweet chocolate. Heat in 30-second intervals in the microwave, stirring in between, until completely melted and smooth. Let it cool for 5 minutes. This base should already look like a rich, ultra glossy pool of chocolate.
- 3. Layer the Sugars: Whisk the granulated sugar and the brown sugar into the warm chocolate-butter mixture until well combined. The mixture might appear grainy at first, which is fine.
- 4. Incorporate the Eggs: Whisk in the eggs, one at a time, making sure each is fully incorporated before adding the next. Stir in the vanilla extract. Vigorous mixing during this stage helps develop the crinkly top.
- 5. Sift the Dry Goods: Sift the unsweetened cocoa powder, all-purpose flour, and salt directly into the wet ingredients in the same bowl. We sift cocoa powder to prevent clumps. Genty fold the dry ingredients in with a spatula until just combined. Overmixing at this stage will create tough brownies; mix only until the flour streaks disappear.
- 6. The Cookie Butter Magic: Warm your cookie butter spread in the microwave for 15-20 seconds until it is molten and easily drizzleable. Pour half of the brownie batter into the prepared pan and spread it evenly. Drizzle half of the warm cookie butter over the batter. Add the remaining brownie batter. Finally, drizzle the rest of the cookie butter on top. Use a knife or skewer to gently marble and swirl the cookie butter through the batter, creating those beautiful, heavy pooling ribbons of molten shine.
- 7. Bake to Perfection: Place the pan in the oven and bake for 30-35 minutes. When done, the top should be crinkly and set, but the center will still be soft. Be careful not to overbake; a toothpick inserted into the center should come out with moist crumbs, not dry, ensuring the completely saturated texture remains.
- 8. Cool and Savor: Let the brownies cool completely in the pan before removing them using the parchment overhang. For the ultimate molten effect and maximum gloss, enjoy them slightly warm. If they have fully cooled, you can warm individual squares in the microwave for 10-15 seconds to recreate that drool-worthy, glistening interior.
Variations and Substitutions
While this recipe is perfect as is, here are some creative ways to make it your own while maintaining that completely drenched appearance:
- Nut Butter Substitute: If you don’t have cookie butter, you can use a high-quality peanut butter or almond butter. Note that natural nut oils may make the pooling ribbons slightly thinner, but the ultra glossy effect will still be present.
- Vegan Option: While this recipe is rich in eggs and dairy, it can be adapted. Substitute the butter with refined coconut oil and use a high-quality flax egg replacement. The cookie butter itself is often accidentally vegan. The resulting brownie will be more dense and possibly less glossy but still rich and fudgy.
- Gluten-Free: Substitute the all-purpose flour with a 1-to-1 gluten-free flour blend. Cookie butter itself often contains gluten (cookies!), so search for a specific gluten-free Biscoff or cookie-flavored spread if this is a requirement.
- The “Loaded” Brownie: Before swirling the cookie butter, fold in 1/2 cup of chocolate chunks or, even better, actual crushed Biscoff cookies. These cookie pieces will absorb some moisture but create a spectacular internal texture that is completely saturated in spiced caramel flavor.
Achieving that Amateur Reddit-Style Food Photo Look
The image prompt for this recipe asks for that casual, drool-worthy, amateur Reddit post feel. To achieve this in real life for your own photos, think about texture and lighting. The key to that ultra glossy, maximum shine effect is temperature. Molten butter and warm cookie butter are your friends. Photographing the brownies slightly warm, or even just warmed, will activate the fats and sugars, creating those visible oil slick shine droplets and heavy pooling ribbons.
Use soft, natural window lighting from the side; avoid harsh flash, which can flatten the dimensions and wash out the glistening textures. Plating should be casual—straight out of the pan on parchment paper, not on fine china. A simple stack of squares, shot from a 45-degree angle slightly above, highlights the texture and that mouth-watering molten cookie butter layer without any professional, studio-perfect aesthetic. The completely drenched and saturated appearance should be the focus, ensuring every surface looks wet, glistening, and totally indulgent with zero dry spots.
Storing and Gifting Your Cookie Butter Brownies
These brownies are so decadent they are best stored at room temperature to maintain that perfect fudgy consistency. Store them in an airtight container for up to 4 days. If they begin to dry (which, with this recipe, is unlikely), just warm them for 10 seconds to bring back that completely saturated, mouth-watering experience. You can also freeze individual squares; wrap them tightly in plastic wrap and store in a freezer bag for up to 3 months. Let them thaw at room temperature before warming.
Looking for an amazing homemade gift? These brownies are a spectacular choice. Because they are so rich and maintain that ultra glossy, impressive look, they travel well. Cut them into generous squares, package them simply in a paper bakery box lined with parchment paper, and finish with a rustic twine. A sprinkle of flaky sea salt on top before gifting adds that perfect, mouth-watering touch that proves you are a kitchen hero.
One Bowl Cookie Butter Brownies
Ingredients
Equipment
Method
- Preheat oven to 350°F (175°C). Line an 8×8 inch metal baking pan with parchment paper, leaving overhangs. Grease parchment.
- In a large microwave-safe bowl, combine butter and chopped semisweet chocolate. Microwave in 30-second bursts, stirring, until melted and smooth. Let cool 5 minutes.
- Whisk both granulated and brown sugars into the melted chocolate mixture until combined. Whisk in eggs, one at a time, followed by vanilla extract.
- Sift cocoa powder directly into the bowl. Add flour and salt. Genty fold the dry ingredients in with a spatula until just combined. Mix only until the flour streaks disappear.
- Warm the cookie butter in the microwave for 15-20 seconds until molten. Pour half of the brownie batter into the pan and spread evenly.
- Drizzle half of the warm cookie butter over the batter. Add the remaining brownie batter and spread. Drizzle the rest of the cookie butter on top.
- Use a knife to gently swirl the cookie butter through the batter. Sprinkle with flaky sea salt if using.
- Bake for 30-35 minutes, until the top is set but the center is still soft. A toothpick inserted should come out with moist crumbs.
- Let cool completely in the pan on a wire rack before removing and slicing. For maximum molten texture, serve slightly warm.