Chocolate Peanut Butter Pie
The Ultimate Chocolate Peanut Butter Pie: A Decadent No-Bake Dream
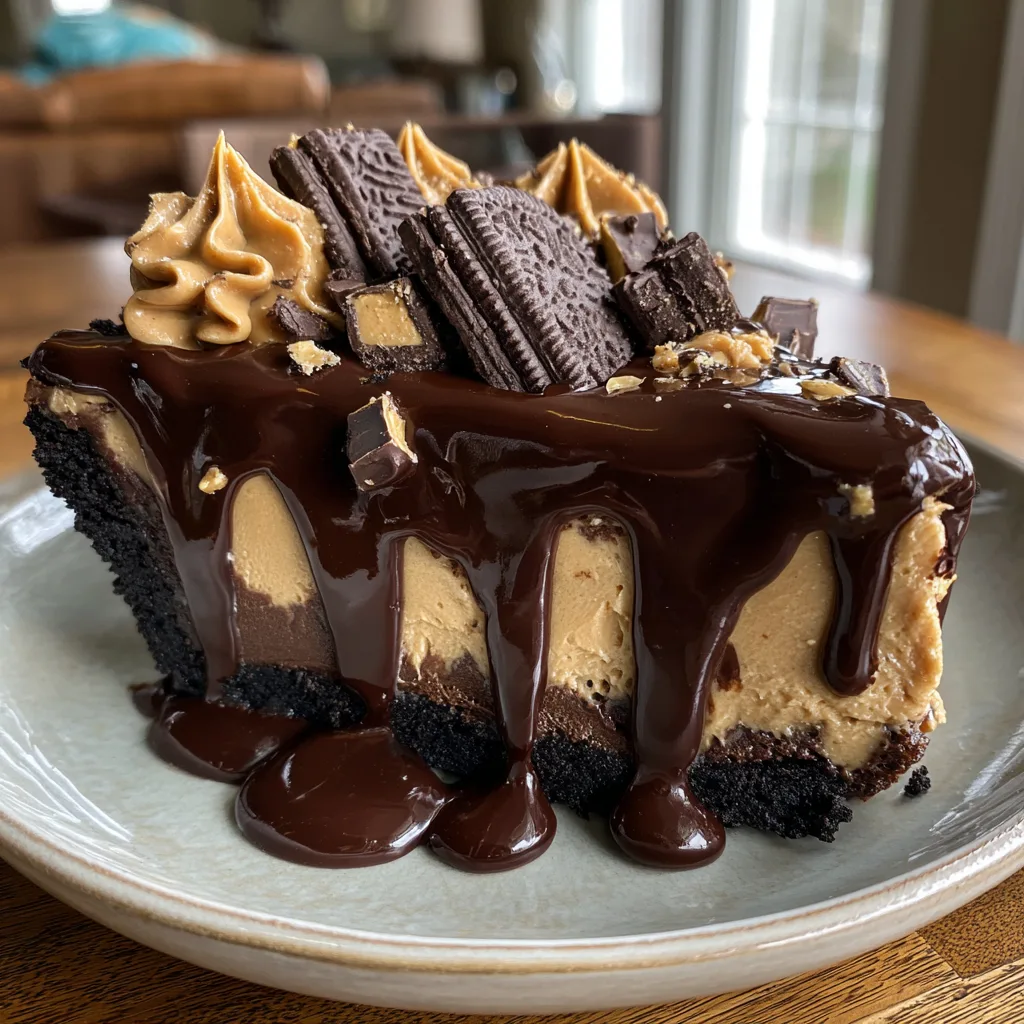
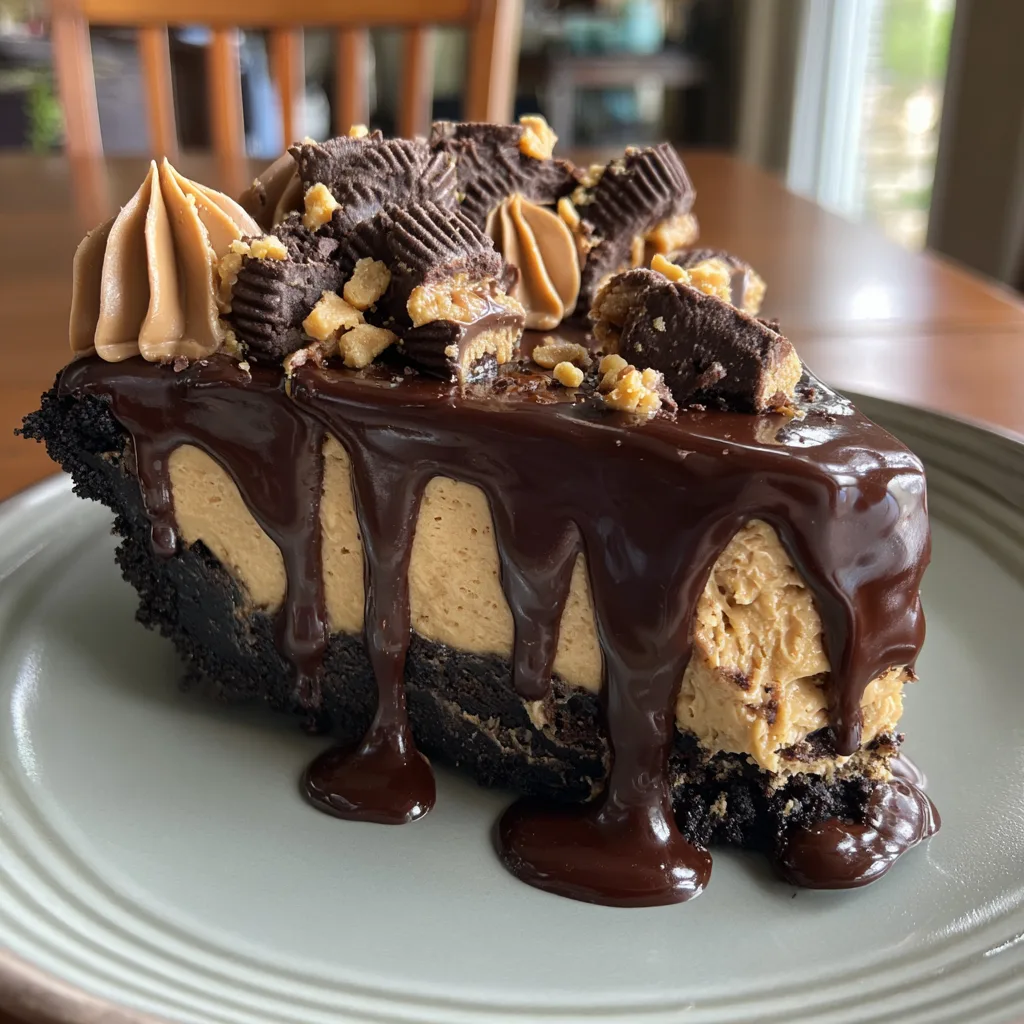
When it comes to flavor combinations that universally conquer hearts and satisfy the deepest of sweet tooth cravings, nothing quite compares to the marriage of rich, dark chocolate and creamy, slightly salty peanut butter. It is a pairing that transcends age and occasion. Enter the Ultimate Chocolate Peanut Butter Pie: a towering, multi-layered masterpiece of contrasting textures and intense flavors that looks like it belongs in a high-end bakery, yet is surprisingly achievable in your own home kitchen. This impressive dessert features a crunchy, buttery chocolate cookie crust, a hidden layer of dense chocolate fudge, a massive center of light-yet-rich peanut butter mousse, a crowning layer of glossy chocolate ganache, and an extravagant topping of piped peanut butter frosting, chopped peanut butter cups, and mini cookies. In this comprehensive guide, we are going to explore every layer, technique, and secret to perfecting this magnificent dessert.
Why This Pie Will Steal the Show
There are countless peanut butter pie recipes circulating the internet, many of which are simply a mixture of cream cheese and peanut butter poured into a store-bought crust. While those serve a purpose, this specific recipe is designed for those moments when you need a true showstopper. The visual appeal of this pie is undeniable. When you slice into it, the distinct, perfectly defined layers are immediately visible, offering a stunning contrast between the deep, dark browns of the chocolate and the golden tan of the peanut butter filling.
Beyond its looks, the texture profile is what truly elevates this dessert. You get the satisfying crunch of the cookie crumb crust, the chewy density of the bottom fudge layer, the ethereal, melt-in-your-mouth creaminess of the massive peanut butter center, and the silky smoothness of the ganache on top. Because this is essentially a no-bake dessert (with only a brief stint in the oven if you choose to bake the crust for extra stability), it is the perfect recipe for warm weather when you do not want to heat up your house, or for busy holidays when your oven space is already monopolized by savory dishes. It is a make-ahead dream that actually tastes better after a night of chilling in the refrigerator.
The Anatomy of the Perfect Pie
To understand how to build this masterpiece, we must break it down layer by layer. Each component plays a vital role in balancing the sweetness, saltiness, and richness of the final slice.
The Chocolate Cookie Crust
The foundation of our pie is a thick, sturdy chocolate cookie crust. We use crushed chocolate sandwich cookies (like Oreos) mixed with melted butter. The filling of the cookies acts as an additional binder, ensuring the crust holds up against the heavy fillings without crumbling when sliced. A thick crust is essential here; it provides the necessary bitter cocoa notes to cut through the sweet peanut butter.
The Hidden Fudge Layer
Directly above the crust sits a secret layer of dense, chewy chocolate fudge or a thickened ganache. This layer serves two purposes. First, it acts as a moisture barrier, preventing the creamy peanut butter filling from making the crust soggy over time. Second, it provides an intense hit of pure chocolate flavor right at the base of the palate, anchoring the lighter peanut butter mousse above it.
The Peanut Butter Mousse Filling
This is the star of the show—the massive, thick, light brown layer that makes up the bulk of the pie. Achieving the perfect texture here is a delicate balancing act. We use full-fat cream cheese for tang and structure, creamy commercial peanut butter for authentic flavor and smooth texture, powdered sugar for sweetness, and freshly whipped heavy cream folded in at the end to aerate the dense mixture. The result is a filling that is simultaneously rich and incredibly light.
The Glossy Chocolate Ganache
Crowning the pie is a layer of pure, silky chocolate ganache made simply from high-quality semi-sweet chocolate and heavy cream. This layer adds a sophisticated finish, a beautiful glossy sheen, and another distinct textural element. It creates a satisfyingly slight resistance when you push your fork through it before hitting the soft filling.
The Extravagant Toppings
A pie this decadent requires toppings that match its energy. We reserve a small amount of the peanut butter filling to pipe into beautiful rosettes around the border. In between these rosettes, we scatter roughly chopped chocolate peanut butter cups and nestle in whole or halved mini chocolate sandwich cookies. This not only signals to the eater exactly what flavors are inside but also adds irresistible crunchy and chewy textures to the top of the pie.
Essential Ingredients You Will Need
Quality ingredients are crucial for a dessert with no baked elements to hide behind. Here is exactly what you need to gather:
- – 1 package (about 14 oz) chocolate sandwich cookies (like Oreos), uncrushed
- – 6 tablespoons unsalted butter, melted
- – 16 oz (2 blocks) full-fat cream cheese, softened to room temperature
- – 1 1/2 cups creamy peanut butter (do not use natural, oil-separated varieties for this)
- – 1 1/2 cups powdered sugar, sifted
- – 2 teaspoons pure vanilla extract
- – 2 1/2 cups heavy whipping cream, divided, very cold
- – 2 cups semi-sweet chocolate chips (or finely chopped high-quality chocolate bars)
- – Chopped peanut butter cups, for garnish
- – Mini chocolate sandwich cookies, for garnish
Step-by-Step Instructions
Building this pie takes a little bit of time and patience, primarily because of the chilling time required between layers, but the actual active preparation is quite simple. Follow these steps for pie perfection.
- Prepare the Crust: Place the entire package of chocolate sandwich cookies (filling included) into a food processor and pulse until they become fine crumbs. Pour the crumbs into a medium bowl and stir in the melted butter until the mixture resembles wet sand. Press this mixture firmly and evenly into the bottom and up the sides of a 9-inch deep-dish pie plate or springform pan. You can use the bottom of a measuring cup to pack it tightly. Place the crust in the freezer for 15 minutes to set.
- Make the Hidden Fudge Layer: In a small microwave-safe bowl, combine 1/2 cup of chocolate chips and 3 tablespoons of heavy cream. Microwave in 20-second bursts, stirring vigorously after each, until smooth and glossy. Pour this mixture into the bottom of the chilled crust and spread it into an even layer using an offset spatula. Return the crust to the freezer for another 15 minutes while you prepare the main filling.
- Whip the Cream: In a large bowl, or the bowl of a stand mixer fitted with the whisk attachment, whip 1 1/2 cups of the cold heavy whipping cream until stiff peaks form. Transfer the whipped cream to a separate bowl and store it in the refrigerator.
- Mix the Peanut Butter Base: In the same large bowl (no need to clean it), switch to the paddle attachment. Beat the softened cream cheese and creamy peanut butter together on medium speed until completely smooth and perfectly combined, scraping down the sides as needed. Add the sifted powdered sugar and vanilla extract, and beat on low speed until incorporated, then increase to medium-high and beat until fluffy, about 2 minutes.
- Fold and Fill: Remove the bowl from the mixer. Take a large dollop of the chilled whipped cream and stir it briskly into the thick peanut butter mixture to lighten it up. Then, gently fold in the remaining whipped cream using a rubber spatula, being careful not to deflate the cream. The mixture should be uniform in color with no white streaks. Remove about 1/2 cup of this filling and set it aside in the fridge (this will be used for the piped rosettes later). Pour the rest of the filling into the pie crust, smoothing the top generously. Cover lightly and refrigerate for at least 4 hours, or ideally overnight, until very firm.
- Prepare the Ganache Topping: Once the pie is fully chilled and firm, prepare the top ganache layer. Place the remaining 1 1/2 cups of chocolate chips into a heat-proof bowl. In a small saucepan or the microwave, heat the remaining 1/2 cup (plus 1 tablespoon if needed) of heavy cream until just simmering (do not let it boil). Pour the hot cream over the chocolate chips. Let it sit undisturbed for 3 minutes, then whisk gently starting from the center and moving outwards until a dark, glossy, completely smooth ganache forms.
- Top the Pie: Pour the slightly cooled ganache over the chilled peanut butter filling. Tilt the pie plate gently to allow the ganache to coat the entire surface evenly. Return the pie to the refrigerator for about 30 minutes to let the ganache set.
- Decorate to Impress: Place the reserved 1/2 cup of peanut butter filling into a piping bag fitted with a large star tip. Pipe decorative rosettes around the border of the pie. Liberally scatter roughly chopped peanut butter cups and mini chocolate sandwich cookies over the top, nesting some of them into the piped rosettes.
- Serve: For the cleanest slices, run a large, sharp knife under hot water, wipe it completely dry with a towel, and make your cuts, wiping the blade clean between every single slice. Serve chilled.
Expert Tips for the Best Results
While this recipe is straightforward, a few professional tips will ensure your pie turns out exactly like the mouth-watering photo.
Room Temperature Ingredients: It is absolutely imperative that your cream cheese is completely softened to room temperature before you begin. If it is even slightly cold, you will end up with tiny, unappealing white lumps of cream cheese throughout your smooth brown peanut butter filling, and no amount of mixing will get them out once the cold cream is added.
The Right Peanut Butter: Resist the urge to use natural peanut butter where the oil separates and sits on top. While natural peanut butter is great for toast, it does not provide the correct structural stability for a no-bake pie. The oils will separate, causing your pie to weep and become a puddle. Use a standard commercial brand like Jif or Skippy for the best, most stable results.
Whipping the Cream: When whipping your heavy cream, ensure your cream, bowl, and whisk are all very cold. This helps the cream whip up faster and achieve stiffer, more stable peaks, which is vital for holding up the heavy peanut butter mixture. Be careful not to over-whip, or it will turn into butter.
Variations and Customizations
Once you have mastered the base recipe, feel free to make it your own. If you prefer a different crust, a traditional graham cracker crust works beautifully, adding a honeyed note that pairs wonderfully with peanut butter. For an extra salty crunch, substitute half of the cookie crumbs with finely crushed pretzel pieces.
If you want to intensify the chocolate flavor, consider using dark chocolate (60% cacao or higher) for the top ganache layer instead of semi-sweet. You can also fold a cup of mini chocolate chips directly into the peanut butter mousse before pouring it into the pie shell for added texture in every bite. Finally, a drizzle of warm caramel sauce over the top right before serving takes this dessert into uncharted territories of decadence.
How to Store and Freeze
Because of the dairy content, this pie must be stored in the refrigerator. Keep it loosely covered with plastic wrap or in a specialized pie keeper. It will stay fresh and delicious in the fridge for up to 5 days.
This pie also freezes exceptionally well, making it the ultimate make-ahead dessert. To freeze, do not add the final garnishes (the piped rosettes, peanut butter cups, and cookies). Wrap the deeply chilled, ganache-topped pie tightly in a layer of plastic wrap, followed by a layer of aluminum foil. Freeze for up to 2 months. When you are ready to serve, let it thaw in the refrigerator overnight, then add your fresh garnishes before slicing.
Conclusion
The Ultimate Chocolate Peanut Butter pie is more than just a dessert; it is an event. With its thick, buttery cookie crust, hidden layer of fudge, cloud-like peanut butter center, and rich ganache topping, it is guaranteed to leave your family and friends in absolute awe. While it requires a bit of patience during the chilling steps, the actual assembly is accessible to bakers of all skill levels. By following the tips outlined in this guide—using room temperature cream cheese, opting for commercial peanut butter, and taking the time to create distinct layers—you will master this magnificent dessert and become the hero of your next gathering.
Ultimate Chocolate Peanut Butter Pie
Ingredients
Equipment
Method
- Pulse cookies in a food processor until fine crumbs form. Mix with melted butter. Press tightly into the bottom and sides of a 9-inch deep-dish pie plate. Freeze 15 minutes.
- Melt 1/2 cup chocolate chips and 3 tbsp heavy cream in the microwave until smooth. Spread over the bottom of the chilled crust. Return to freezer.
- Whip 1.5 cups of cold heavy cream until stiff peaks form. Set aside in the fridge.
- Beat softened cream cheese and peanut butter until completely smooth. Add powdered sugar and vanilla, beating until fluffy.
- Gently fold the whipped cream into the peanut butter mixture until no white streaks remain. Reserve 1/2 cup of filling in the fridge for garnish. Spread the rest evenly into the pie crust.
- Refrigerate the pie for at least 4 hours, or until very firm.
- Make ganache: Heat 1/2 cup heavy cream until simmering. Pour over 1.5 cups chocolate chips. Let sit 3 mins, then whisk until smooth. Pour over chilled pie.
- Refrigerate 30 minutes to set ganache. Pipe reserved peanut butter filling into rosettes on top. Garnish with chopped peanut butter cups and mini cookies.