Patriotic Ice Cream Sandwiches
Patriotic Ice Cream Sandwiches: The Ultimate Summer Dessert Guide
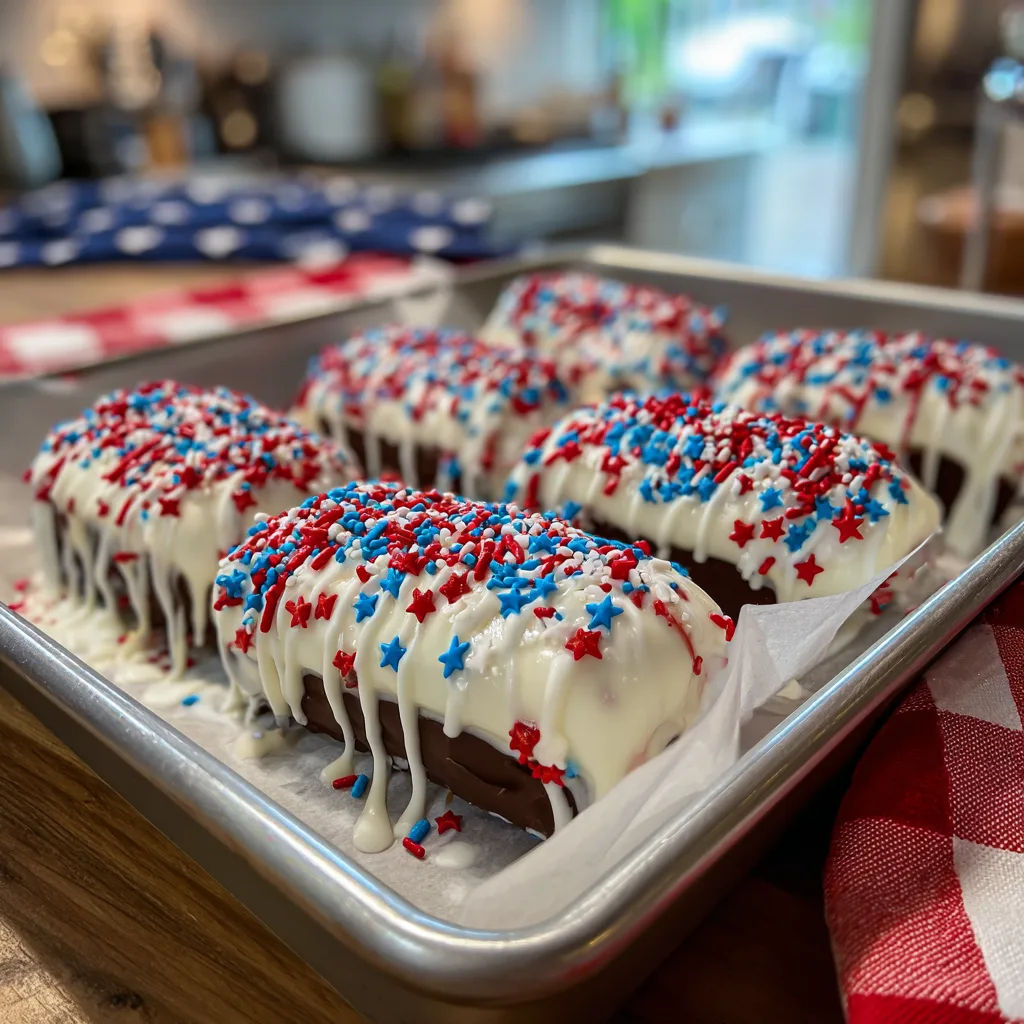
When the summer heat reaches its peak and the festive holidays approach, there is nothing quite as nostalgic, refreshing, and universally beloved as a classic ice cream sandwich. But why settle for the standard store-bought boxes when you can elevate your summer gatherings with homemade Patriotic Ice Cream Sandwiches? These delightful treats, featuring soft, deeply chocolatey rectangular wafers hugging a generous layer of rich vanilla ice cream and bordered by vibrant red, white, and blue star sprinkles, are the ultimate showstopper for any Fourth of July, Memorial Day, or Labor Day celebration. In this comprehensive guide, we are going to dive deep into everything you need to know to master the art of the homemade ice cream sandwich, ensuring your summer desserts are the talk of the town.
The Allure of the Homemade Ice Cream Sandwich
There is a profound difference between unwrapping a commercially produced ice cream sandwich and biting into a lovingly crafted homemade one. Commercially produced sandwiches often rely on stabilizers and artificial flavorings to maintain their shelf life, which can sometimes result in a muted flavor profile and a wafer that tastes more like cardboard than chocolate. When you take the time to bake your own chocolate wafers from scratch, you unlock a world of rich, authentic cocoa flavor and a texture that you can control entirely. The ideal ice cream sandwich wafer needs to strike a delicate balance: it must be firm enough to hold its shape when handled, yet soft enough to yield easily to the bite without causing the precious ice cream filling to squish out the sides.
Creating these Patriotic Ice Cream Sandwiches allows you to customize every single element. You can select a premium, high-butterfat vanilla bean ice cream that melts luxuriously on the tongue, rather than the airy, overrun-heavy ice creams often found in mass-market treats. Furthermore, the visual appeal of homemade sandwiches is unparalleled. By meticulously rolling the edges of the creamy white vanilla filling in bright, festive star sprinkles, you instantly transform a humble dessert into a celebratory centerpiece. The contrast between the dark, almost black cocoa wafers, the pure white ice cream, and the popping red and blue colors creates a feast for the eyes before you even take your first bite.

The Anatomy of the Perfect Chocolate Wafer
The secret to an outstanding ice cream sandwich lies entirely in the wafer. Baking a cookie that is meant to be eaten frozen requires a specific scientific approach. Traditional crunchy cookies become rock-hard and dangerous to your teeth when stored in the freezer. To combat this, our wafer recipe is formulated to remain tender and yielding even at sub-zero temperatures. We achieve this by manipulating the fat and sugar ratios. Using a combination of butter for flavor and a touch of oil for persistent softness ensures the cookie doesn’t freeze solid.
Moreover, the choice of cocoa powder is crucial. For that iconic, nostalgic flavor and deep color reminiscent of childhood favorites, Dutch-processed cocoa powder is highly recommended. Dutch-processed cocoa has been treated with an alkalizing agent to reduce its natural acidity, resulting in a smoother, more mellow chocolate flavor and a significantly darker color. This dark hue provides the perfect visual backdrop to make your patriotic sprinkles truly stand out. The classic rectangular shape, complete with the traditional aeration holes poked on top, not only looks professional but also serves a functional purpose by preventing the wafer from puffing up too much during baking, ensuring a flat, even surface for your ice cream.
Ingredients You Will Need
To embark on this culinary project, you will need to gather high-quality ingredients. Quality matters immensely when there are so few components to a recipe. Let’s break down exactly what you will need for both the chocolate wafers and the ice cream filling.
For the Chocolate Wafers:
- – 2 cups all-purpose flour
- – 3/4 cup Dutch-processed cocoa powder
- – 1/2 teaspoon baking soda
- – 1/4 teaspoon salt
- – 1/2 cup unsalted butter, softened to room temperature
- – 1/2 cup granulated white sugar
- – 1/2 cup packed light brown sugar
- – 1 large egg, at room temperature
- – 1 teaspoon pure vanilla extract
- – 1/2 cup whole milk
For the Filling and Decoration:
- – 1.5 quarts premium vanilla bean ice cream (or your favorite flavor)
- – 1 cup red, white, and blue star-shaped sprinkles
Essential Equipment for Success
While this recipe doesn’t require a professional pastry kitchen, having a few specific tools will make the process infinitely smoother and yield much better aesthetic results. First and foremost, you will need a few large baking sheets and plenty of parchment paper. Parchment paper is non-negotiable, as it prevents the delicate wafers from sticking and breaking. A stand mixer or a reliable hand mixer will make creaming the butter and sugars effortless.
To achieve the perfect rectangular shape, you have two options. You can either roll the dough out and use a rectangular cookie cutter (or a ruler and a sharp knife), or you can use a specialized ice cream sandwich pan if you happen to own one. For getting the ice cream into a perfect, flat slab, a rimmed baking sheet lined with plastic wrap is your best friend. A sharp knife, warmed slightly in hot water and wiped dry, will be necessary for cleanly slicing the ice cream slabs. Finally, a small skewer, toothpick, or the tines of a fork are needed to poke the classic holes into the tops of the unbaked wafers.
Step-by-Step Instructions
Follow these detailed instructions carefully to ensure your Patriotic Ice Cream Sandwiches come out looking and tasting spectacular.
- Prepare the Ice Cream Slab: The first step is to prepare your ice cream. Remove the vanilla ice cream from the freezer and let it soften for about 10-15 minutes until it is easily spreadable, but not entirely melted. Line a 9×13 inch rimmed baking pan with two layers of plastic wrap, leaving plenty of overhang on the sides. Scoop the softened ice cream into the pan and use an offset spatula to spread it into a smooth, even layer. Fold the overhanging plastic wrap over the top to completely seal the ice cream. Place the pan in the freezer for at least 4 hours, or ideally overnight, until it is completely firm and frozen solid.
- Whisk the Dry Ingredients: While the ice cream is freezing, you can prepare the wafer dough. In a medium-sized mixing bowl, vigorously whisk together the all-purpose flour, Dutch-processed cocoa powder, baking soda, and salt. Ensure there are no lumps of cocoa powder remaining. Set this bowl aside.
- Cream the Wet Ingredients: In the bowl of a stand mixer fitted with the paddle attachment, or in a large bowl using a hand mixer, beat the softened unsalted butter, granulated sugar, and brown sugar on medium speed for about 2 to 3 minutes, or until the mixture is light, fluffy, and well combined. Scrape down the sides of the bowl with a rubber spatula as needed.
- Incorporate the Egg and Vanilla: Add the room-temperature egg and the pure vanilla extract to the butter-sugar mixture. Beat on low speed until just combined. Be careful not to overmix at this stage.
- Combine Wet and Dry: With the mixer on low speed, gradually add the dry flour and cocoa mixture to the wet ingredients in three additions, alternating with the whole milk. Begin and end with the dry ingredients. Mix only until the dough just comes together. The dough will be quite soft and slightly sticky.
- Chill the Dough: Turn the dough out onto a piece of plastic wrap, shape it into a flat disc, and wrap it tightly. Refrigerate the dough for at least 1 hour. This chilling step is crucial as it firms up the butter, making the dough easier to roll out and helping the cookies maintain their shape in the oven.
- Preheat and Prepare for Baking: Preheat your oven to 350 degrees Fahrenheit (175 degrees Celsius). Line two large baking sheets with parchment paper.
- Roll and Cut the Wafers: Remove the chilled dough from the refrigerator. On a lightly floured surface, or between two sheets of parchment paper (which is highly recommended to prevent sticking without adding extra flour), roll the dough out to an even thickness of about 1/8 inch. Using a rectangular cookie cutter (approximately 2×3 inches), or a sharp knife and a ruler, cut the dough into rectangles. Carefully transfer the rectangles to the prepared baking sheets, leaving about an inch of space between each. Gather any scraps, re-roll, and repeat until all the dough is used.
- Dock the Wafers: Using a toothpick, the blunt end of a skewer, or a fork, gently poke a pattern of holes into the top of each unbaked wafer. This replicates the classic store-bought look and allows steam to escape, keeping the cookies perfectly flat.
- Bake and Cool: Bake in the preheated oven for 8 to 10 minutes. The cookies will look soft but will firm up as they cool. Do not overbake, or they will become too crunchy when frozen. Allow the cookies to cool on the baking sheet for 5 minutes before transferring them to a wire cooling rack to cool completely. They must be 100% cool before assembly.
- Assemble the Sandwiches: Take the frozen slab of ice cream out of the freezer. Unroll the plastic wrap and lift the ice cream slab onto a cutting board. Using a sharp knife that has been warmed in hot water and wiped dry, quickly cut the ice cream into rectangles that match the size of your cooled chocolate wafers. Place a rectangle of ice cream onto one wafer, and top with a second wafer, pressing down gently to adhere.
- Decorate with Sprinkles: Pour the red, white, and blue star sprinkles onto a shallow plate. Immediately roll the exposed edges of the ice cream sandwich in the sprinkles, pressing gently so they stick to the soft ice cream.
- Final Freeze: As soon as a sandwich is assembled and decorated, place it immediately onto a baking sheet in the freezer. Once all sandwiches are made, let them freeze for at least 2 hours to firm up completely before serving. For long-term storage, wrap each sandwich individually in plastic wrap once fully frozen.
Tips for the Ultimate Ice Cream Sandwich Experience
Making ice cream sandwiches is an incredibly rewarding process, but working with a melting medium requires a bit of strategy. First, speed is your best friend during the assembly phase. Ice cream melts remarkably fast at room temperature, especially during the hot summer months. It is highly recommended to assemble the sandwiches in small batches. Take out only enough wafers and ice cream rectangles to make two or three sandwiches at a time, keeping the rest in the freezer.
When cutting the ice cream slab, cleaning your knife between cuts will give you sharp, professional-looking edges. Simply dip the blade in a tall glass of hot water and wipe it completely dry with a clean towel before making the next slice. If you find your ice cream is melting too quickly while you are trying to apply the sprinkles, pop the assembled (but undecorated) sandwich back into the freezer for 10 minutes to firm up before attempting to roll the edges.
Furthermore, do not skip the individual wrapping if you plan to keep these for more than a day. Wrapping each sandwich tightly in plastic wrap, and then placing them in an airtight freezer bag or container, prevents freezer burn and keeps the cookies from absorbing any off-odors from other items in your freezer. When stored properly, these treats will easily keep for up to a month.
Fun Variations and Customizations
The beauty of this recipe is its incredible versatility. While the patriotic theme is perfect for mid-summer holidays, you can easily adapt this template for any occasion throughout the year. If you aren’t a fan of vanilla, consider using a bright, refreshing strawberry ice cream or a decadent mint chocolate chip. The chocolate wafers pair beautifully with almost any flavor profile. You could even use a dairy-free ice cream alternative for a vegan-friendly option, provided you substitute the butter and milk in the cookie recipe as well.
The decoration possibilities are also endless. If you cannot find star-shaped sprinkles, standard red, white, and blue jimmies or nonpareils work just as well. For a different textural experience, try rolling the edges in mini chocolate chips, crushed graham crackers, toasted shredded coconut, or chopped nuts like pecans or walnuts. You could even dip half of the finished, frozen sandwich into melted dark chocolate for an extra layer of decadence.
The Cultural Significance of Summer Treats
Desserts like the ice cream sandwich hold a special place in culinary history and cultural nostalgia. Originating in the late 19th century in New York City, the earliest versions consisted of a slab of ice cream pressed between two pieces of paper, sold from pushcarts to cool down sweltering city dwellers. The modern version, featuring the chocolate wafer, gained massive popularity in the mid-20th century, becoming a staple of grocery store freezers and neighborhood ice cream trucks across the nation.
Serving these at a Fourth of July barbecue taps into that deep-seated collective memory of endless summer days, running barefoot through the grass, and the simple joy of a cold, sweet treat. Making them from scratch elevates that nostalgia into a gourmet experience, showing your guests that you put thought, care, and a little bit of culinary magic into their holiday meal.
Serving Suggestions
When it comes time to serve, presentation is everything. Arrange your fully frozen Patriotic Ice Cream Sandwiches on a large, chilled platter. If you are serving them outdoors in the heat, consider placing the serving platter over a larger tray filled with crushed ice to keep them from melting too quickly. They make an excellent centerpiece for a dessert table, surrounded by fresh summer berries, sliced watermelon, and perhaps a bowl of extra sprinkles for those who want an extra crunch.
Because they are perfectly portioned and easy to hold, they are the ideal dessert for mingling. Guests can easily grab a sandwich and continue enjoying the party, watching the fireworks, or socializing without needing a plate and fork. Paired with a cold glass of lemonade or a crisp, refreshing iced tea, these homemade ice cream sandwiches are guaranteed to be the highlight of your summer menu.
Conclusion
Creating your own Patriotic Ice Cream Sandwiches from scratch is a labor of love that yields incredibly delicious and visually stunning results. By taking the time to bake tender, richly flavored chocolate wafers and pairing them with high-quality ice cream and festive decorations, you transform a standard grocery store convenience item into a memorable, gourmet dessert. Whether you are hosting a massive neighborhood block party for the Fourth of July or simply enjoying a quiet summer evening with family, this recipe is sure to become a cherished seasonal tradition. So, gather your ingredients, clear some space in your freezer, and get ready to enjoy the ultimate taste of summer.
Patriotic Ice Cream Sandwiches
Ingredients
Equipment
Method
- Spread softened ice cream into a plastic-wrap lined 9×13 inch pan in an even layer. Cover and freeze for at least 4 hours until completely solid.
- Whisk together flour, cocoa powder, baking soda, and salt in a bowl. Set aside.
- In a large bowl, beat the butter, granulated sugar, and brown sugar together until light and fluffy. Beat in the egg and vanilla extract.
- Alternating with the milk, gradually add the dry ingredients to the wet mixture, mixing until just combined. Form dough into a disc, wrap in plastic, and chill for 1 hour.
- Preheat oven to 350°F (175°C). Line two baking sheets with parchment paper.
- Roll the chilled dough out to 1/8-inch thickness. Cut into 2×3 inch rectangles. Place on baking sheets and poke holes in the tops with a toothpick.
- Bake for 8-10 minutes. Let cool on the pan for 5 minutes, then transfer to a wire rack to cool completely.
- Remove the frozen ice cream slab from the pan. Using a hot, dry knife, cut the ice cream into rectangles to match the wafer size.
- Sandwich one rectangle of ice cream between two chocolate wafers. Immediately roll the edges in the star sprinkles.
- Place assembled sandwiches back in the freezer to firm up for at least 2 hours before serving. Individually wrap to store.