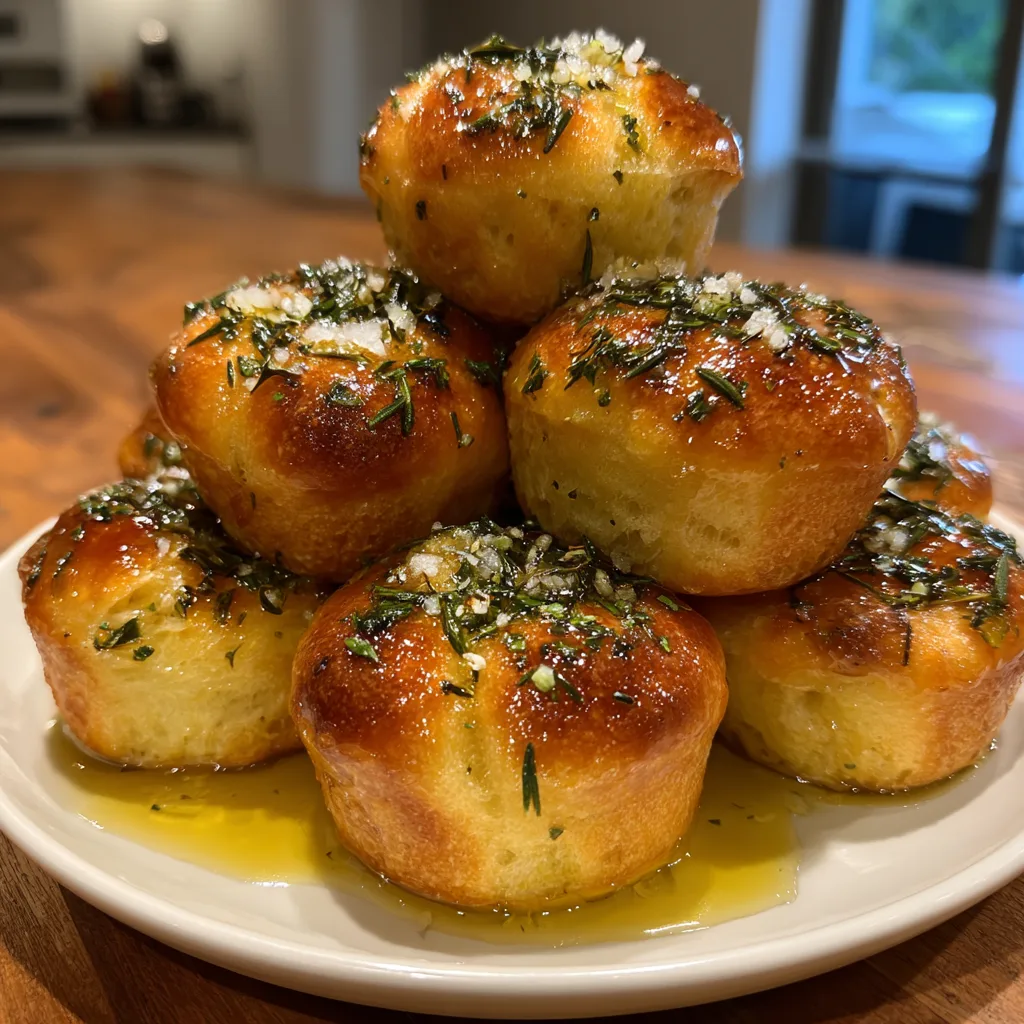
Garlic Focaccia Muffins
Garlic Focaccia Muffins: The Ultimate Easy Bread Recipe
There is an undeniable, universal comfort found in the aroma of freshly baked bread wafting through a home kitchen. When that aroma is intertwined with the savory, pungent notes of roasted garlic, rich olive oil, and fragrant herbs, the resulting experience is nothing short of intoxicating. Enter Garlic Focaccia Muffins, a brilliant, portion-controlled twist on the classic Italian flatbread. These miniature, pillowy delights offer all the incredible texture and flavor of a traditional focaccia—a crisp, golden exterior giving way to a soft, airy, and chewy crumb—but are baked conveniently in a standard muffin tin. Whether you are serving a lavish holiday feast, a cozy weeknight pasta dinner, or simply craving a savory carbohydrate-rich snack, these incredibly aromatic rolls are guaranteed to elevate your meal and leave your family and guests begging for the recipe.
For many home cooks, the prospect of baking yeast bread can seem daunting, conjuring up images of complex kneading techniques, multiple lengthy proofing stages, and the constant fear of the dough failing to rise. However, focaccia is renowned for being one of the most forgiving and approachable breads for beginners, and this muffin-tin method simplifies the process even further. There is no complicated shaping, scoring, or braiding required. In this comprehensive guide, we will dive deep into the art of making these magnificent Garlic Focaccia Muffins. From understanding the role of each essential ingredient to mastering the satisfying “dimpling” technique and exploring mouth-watering flavor variations, you will be equipped with all the knowledge needed to produce bakery-quality bread right in your own oven.

Why You Will Love These Garlic Focaccia Muffins
There are a multitude of reasons why this recipe will quickly become a staple in your culinary repertoire. First and foremost is the textural masterpiece these muffins present. Because they are baked in individual muffin cups, each roll develops a higher ratio of that coveted, crispy, oil-fried crust compared to a standard sheet pan focaccia. Every single bite offers a satisfying crunch that yields to a remarkably soft, hydrated, and bouncy interior. This contrast in textures is a hallmark of excellent bread baking, achieved here with surprisingly minimal effort.
Furthermore, the flavor profile is aggressively, wonderfully savory. The dough itself is enriched with quality olive oil, but the true magic happens after baking, when the hot muffins are generously drenched in a vibrant garlic and herb butter glaze. This glaze seeps into the characteristic dimples on top of the bread, creating tiny, flavor-packed pools of savory goodness. Unlike a large slab of focaccia that must be sliced and can dry out quickly once cut, these individual portions remain incredibly moist. They are also highly customizable, visually stunning with their glistening, herb-speckled tops, and absolutely perfect for tearing apart and dipping into soups, stews, or pasta sauces.
The Beauty of the Muffin Tin Method
Traditionally, focaccia is baked in a large rectangular baking pan or a heavy cast-iron skillet. While these methods produce delicious results, baking the dough in a muffin tin offers several distinct advantages that make it an attractive option for modern home cooks. The most obvious benefit is built-in portion control. Muffin-sized focaccias are the ideal individual serving, making them perfect for dinner parties, buffets, or meal prepping for the week.
Beyond portioning, the muffin tin method drastically increases the surface area exposed to the hot, oiled metal of the pan. This means more crispy edges for everyone—nobody has to fight over the corner piece. The confined space of the muffin cup also encourages the highly hydrated dough to rise upwards rather than spreading outwards, resulting in taller, fluffier rolls with an incredibly light crumb. Additionally, preparation and cleanup are often simpler. There is no need to wrestle with stretching a large, elastic piece of dough across a pan; you simply drop portioned balls of dough into the cups, let them rest, and press your fingers into them to create those signature dimples.
Essential Ingredients for Perfect Focaccia Muffins
The beauty of rustic bread lies in its simplicity. Because the ingredient list is short, the quality of each component directly impacts the final result. Here is what you need to craft these incredible garlic focaccia muffins:
- – 3 cups all-purpose flour (or bread flour for a slightly chewier texture)
- – 1 1/4 cups warm water (between 100°F and 110°F to activate the yeast)
- – 2 1/4 teaspoons active dry yeast (one standard packet)
- – 1 teaspoon granulated sugar or honey (to feed the yeast)
- – 1 1/2 teaspoons fine sea salt (for the dough)
- – 1/4 cup extra-virgin olive oil (divided use, for the dough and greasing the pan)
- – 4 tablespoons unsalted butter, melted
- – 3 cloves garlic, finely minced or grated
- – 2 tablespoons fresh herbs, finely chopped (such as rosemary, thyme, or parsley)
- – 1 teaspoon coarse flaky sea salt (like Maldon, for finishing)
Step-by-Step Instructions
Follow these detailed steps to achieve the perfect balance of a crispy crust and a light, airy crumb. While bread baking takes time, most of it is hands-off resting time.
- Activate the Yeast: In a large mixing bowl or the bowl of a stand mixer, combine the warm water, active dry yeast, and sugar. Stir gently and let the mixture sit for about 5 to 10 minutes. It should become frothy and bubbly. If it does not, your yeast may be dead, and you should start over with fresh yeast.
- Form the Dough: Add the all-purpose flour, fine sea salt, and 2 tablespoons of extra-virgin olive oil to the yeast mixture. If using a stand mixer, attach the dough hook and mix on low speed until a shaggy dough forms. If making by hand, use a sturdy wooden spoon to bring the ingredients together.
- Knead the Dough: Knead the dough for about 5 to 7 minutes in the stand mixer (or 8 to 10 minutes by hand on a lightly floured surface) until it is smooth, elastic, and slightly tacky, but not overly sticky.
- First Proof: Lightly coat a large clean bowl with a drizzle of olive oil. Place the kneaded dough into the bowl, turning it once to coat the top with oil. Cover the bowl tightly with plastic wrap or a damp kitchen towel. Place it in a warm, draft-free spot and let it rise for about 1 to 1.5 hours, or until it has doubled in size.
- Prepare the Muffin Tin: Generously grease a standard 12-cup muffin tin with olive oil. Do not skimp on the oil here; it is essential for creating the crispy crust and preventing sticking.
- Portion the Dough: Once the dough has doubled, gently punch it down to deflate it. Turn it out onto a clean surface and divide it evenly into 12 equal pieces. Roll each piece into a smooth ball and place one ball into each oiled muffin cup.
- Second Proof: Cover the muffin tin loosely with a damp towel or oiled plastic wrap. Let the dough balls rest and rise for another 30 to 45 minutes, until they are puffy and fill the cups.
- Dimple the Dough: Preheat your oven to 400°F (200°C). Drizzle a tiny drop of olive oil over the top of each puffy dough ball. Coat your fingertips lightly with oil, and firmly press your fingers straight down into the dough to create deep dimples. Push all the way down until you almost feel the bottom of the pan.
- Bake: Place the muffin tin in the preheated oven and bake for 15 to 18 minutes, or until the tops are deeply golden brown and crispy.
- Prepare the Garlic Glaze: While the muffins are baking, melt the butter in a small saucepan over medium-low heat. Add the minced garlic and cook for just 1 minute until fragrant (do not let it brown). Remove from heat and stir in the freshly chopped herbs.
- Glaze and Serve: As soon as you remove the baked focaccia muffins from the oven, generously brush or spoon the garlic herb butter over the hot tops, allowing it to pool in the dimples. Immediately sprinkle with coarse flaky sea salt. Let them cool in the pan for 5 minutes before carefully removing them to a wire rack. Serve warm.
Expert Tips for the Best Garlic Butter Bread
To ensure your focaccia muffins turn out exceptionally well every single time, keep these professional tips in mind. Hydration is key in focaccia dough. The dough should feel noticeably softer and wetter than standard sandwich bread dough. It is this high water content that creates the steam during baking, which in turn develops the large, beautiful air pockets inside the crumb. Resist the temptation to add too much extra flour during the kneading process. If the dough is sticking to your hands, lightly oil your hands rather than adding flour.
Another crucial element is the dimpling technique. When you press your fingers into the dough right before baking, you are not just creating decorative craters; you are actually degassing the dough slightly to ensure an even rise, and you are creating essential reservoirs. These dimples catch and hold the olive oil during baking, preventing the bread from drying out, and later, they act as tiny flavor pockets to hold the rich garlic butter glaze. Be bold when dimpling—press down firmly until you feel the bottom of the tin, as the dough will spring back up in the oven. Finally, do not be afraid of color. A pale focaccia lacks flavor. Bake these until they are a deep, rich golden brown to ensure the crust has properly caramelized and developed its characteristic crunch.
Flavor Variations and Customizations
While this garlic and herb butter version is an absolute showstopper, focaccia is inherently a blank canvas, practically begging for culinary creativity. You can easily adapt this recipe to suit different meals, seasons, or flavor cravings. For a cheesy variation, try mixing half a cup of grated Parmesan or sharp cheddar cheese directly into the dough during the final minute of kneading. You can also top the muffins with shredded mozzarella and a pinch of red pepper flakes during the last five minutes of baking for a mini pizza-bread experience.
If you prefer a Mediterranean profile, press halved cherry tomatoes, sliced black olives, and thin slivers of red onion into the dough at the same time you dimple it, before baking. The vegetables will roast beautifully alongside the bread. For a sweeter, autumnal twist, omit the garlic and herbs entirely. Instead, dimple the dough with thin slices of fresh fig or apple, and right out of the oven, brush the hot muffins with melted butter and a drizzle of hot honey or a dusting of cinnamon sugar. The possibilities are truly endless, allowing you to create a unique side dish for any occasion.
Serving Suggestions for Homemade Dinner Rolls
Garlic Focaccia Muffins are incredibly versatile and can accompany almost any savory meal. Their most natural pairing is, of course, with Italian cuisine. Serve them alongside a hearty bowl of spaghetti bolognese, a bubbling pan of baked ziti, or a rich, creamy fettuccine alfredo. The spongy interior and sturdy crust make them the ultimate vessel for sopping up every last drop of pasta sauce from your plate.
Beyond pasta, these muffins are phenomenal alongside a comforting bowl of soup. Imagine dipping a warm, garlic-infused roll into a creamy tomato basil soup, a rustic minestrone, or a smooth butternut squash bisque. They also make excellent upscale slider buns. Slice them in half horizontally and fill them with cured meats, provolone cheese, and roasted red peppers for an incredible Italian sandwich, or use them to hold a juicy mini burger or pulled pork. Even on their own, served warm as an appetizer with a small dish of high-quality balsamic vinegar and olive oil for dipping, they are a guaranteed crowd-pleaser.
Storage and Reheating Instructions
Like most homemade bread, these Garlic Focaccia Muffins are undeniably at their absolute best the day they are baked, specifically within hours of coming out of the oven. However, if you have leftovers, they can be saved. Allow the muffins to cool completely to room temperature, then store them in an airtight container or a large ziplock bag at room temperature for up to 2 days. Do not refrigerate them, as the cold environment will cause the starches in the bread to crystallize, causing it to stale rapidly.
If you want to store them for a longer period, they freeze exceptionally well. Wrap the completely cooled muffins individually in plastic wrap, then place them in a freezer-safe bag for up to 2 months. To revive leftover or frozen focaccia muffins, the oven is your best friend. Microwave reheating will make them chewy and tough. Instead, preheat your oven to 350°F (175°C). Place the muffins on a baking sheet (thaw them first if frozen) and bake for 5 to 8 minutes until they are warmed through and the crust has re-crisped.
A Brief History of Focaccia Bread
Focaccia is one of the oldest and most beloved flatbreads in the world, with roots that trace back thousands of years. The name itself is derived from the Roman words “panis focacius,” which translates roughly to “hearth bread.” In ancient Rome, this simple dough of flour, water, and salt was baked on the hearth of a hot fire, often flattened over the hot stones or cooked under the ashes. It was a rustic, everyday staple, easy to prepare and deeply nourishing.
Over the centuries, as the recipe evolved and spread throughout the Italian peninsula, different regions developed their own distinct variations. The Liguria region, particularly the city of Genoa, is perhaps most famous for its focaccia, characterized by its generous use of local olive oil, dimpled surface, and addition of coarse salt. Historically, focaccia was often eaten by laborers and fishermen as a sustaining morning meal. Today, it has transcended its humble origins to become a celebrated artisan bread enjoyed globally, yet it still retains that rustic, comforting soul that makes it so universally appealing.
Frequently Asked Questions (FAQs)
Can I make the dough ahead of time?
Yes, absolutely! Focaccia actually benefits from a slow, cold fermentation. You can make the dough, let it complete its first rise, then cover the bowl tightly and place it in the refrigerator for up to 48 hours. This cold proof develops incredible, complex flavor in the dough. When ready to bake, portion the cold dough into the muffin tin, and allow extra time (about 1.5 to 2 hours) for the second proof, as the dough needs to come to room temperature and rise before dimpling and baking.
What if I don’t have a muffin tin?
If you do not have a muffin tin, you can still use this recipe to make a small, traditional focaccia. Simply dump the dough (after its first rise) into an intensely oiled 8×8 inch or 9×9 inch square baking pan. Stretch it gently to fill the corners, let it do its second proof, dimple it, and bake. The baking time may increase slightly by 3 to 5 minutes.
Is bread flour better than all-purpose flour for this recipe?
Both will work beautifully. All-purpose flour yields a slightly softer, more tender crumb. Bread flour has a higher protein content, which creates more gluten development, resulting in a slightly chewier texture with a more robust structure. You can use whichever you have on hand, or even do a 50/50 mix.
Conclusion: A Must-Try Bread Recipe
Garlic Focaccia Muffins represent the perfect intersection of impressive, artisan-style baking and approachable, weeknight-friendly preparation. By utilizing the simple muffin tin method, you guarantee an abundance of crispy edges, a fluffy interior, and an incredibly satisfying baking experience. Drenched in savory garlic herb butter, these irresistible mini breads will instantly upgrade your dinners and have everyone reaching for seconds. Gather your flour and yeast, embrace the joy of dimpling the dough, and prepare to fill your home with the most spectacular, mouth-watering aromas.
Garlic Focaccia Muffins
Ingredients
Equipment
Method
- In a large bowl, combine warm water, yeast, and sugar. Let sit for 5-10 minutes until frothy.
- Add flour, fine sea salt, and 2 tablespoons of olive oil. Mix until a shaggy dough forms, then knead for 5-7 minutes until smooth and elastic.
- Place dough in an oiled bowl, cover, and let rise in a warm spot for 1-1.5 hours until doubled in size.
- Generously grease a 12-cup muffin tin with the remaining olive oil.
- Punch down the dough, divide into 12 equal pieces, roll into balls, and place one in each muffin cup.
- Cover loosely and let rise for another 30-45 minutes until puffy.
- Preheat oven to 400°F (200°C). Oil your fingertips and press deeply into each dough ball to create dimples.
- Bake for 15-18 minutes until deeply golden brown and crisp.
- While baking, melt butter in a saucepan, add minced garlic, and cook for 1 minute until fragrant. Remove from heat and stir in fresh herbs.
- Immediately brush the hot muffins with the garlic herb butter, sprinkle with flaky sea salt, cool slightly, and serve warm.