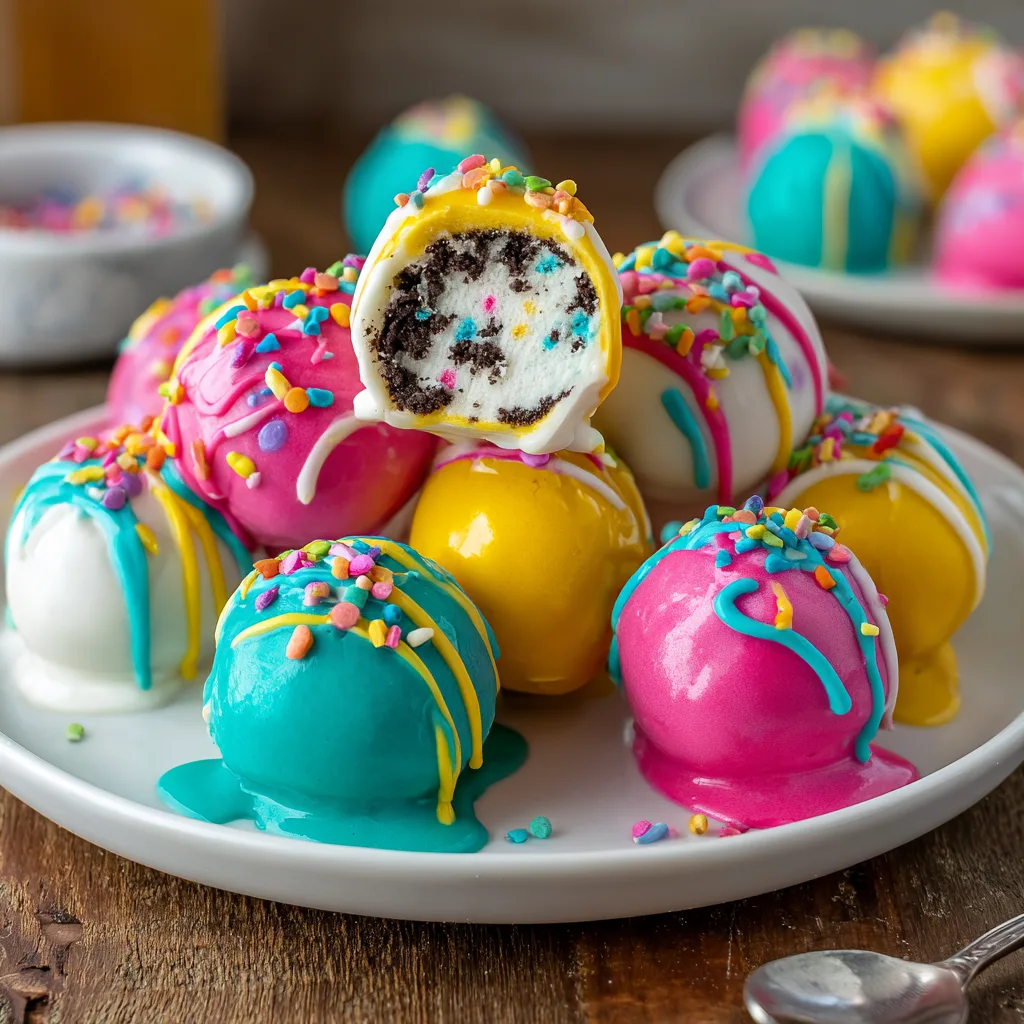
Easter Egg Oreo Balls
Easter Egg Oreo Balls: The Ultimate No-Bake Spring Dessert
When the vibrant colors of spring begin to bloom and the holiday season approaches, there is nothing quite as delightful as preparing a batch of festive, eye-catching treats. Among the myriad of spring desserts, Easter Egg Oreo Balls stand out as a spectacular, crowd-pleasing favorite. These bite-sized confections offer the rich, decadent flavor of a gourmet chocolate truffle but are remarkably simple to make in your own kitchen. Whether you are hosting a large holiday gathering, attending a festive potluck, or simply looking for a fun culinary project to enjoy with your family, this recipe is guaranteed to bring smiles to everyone’s faces.
The beauty of this recipe lies in its simplicity. With just a handful of easily accessible ingredients—classic sandwich cookies, velvety cream cheese, colorful melting wafers, and a generous shower of festive sprinkles—you can create a dessert that looks like it belongs in the display case of a high-end bakery. In this comprehensive guide, we will explore everything you need to know to master the art of making these delightful no-bake treats. From the essential ingredients and detailed step-by-step instructions to expert dipping techniques and creative variations, you will be fully equipped to whip up a batch of these irresistible Easter sweets.
Why You Will Love These Easter Egg Oreo Balls
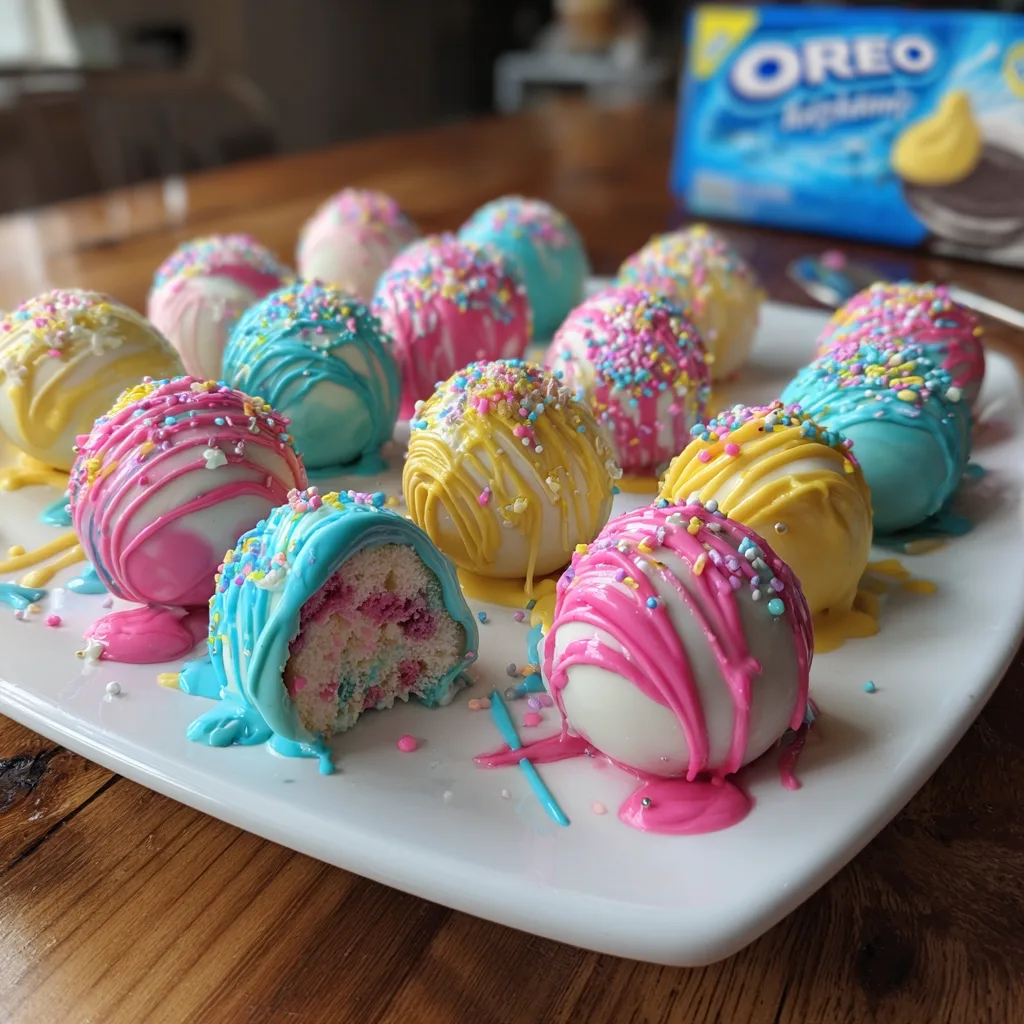
There are countless reasons why these egg-shaped truffles become an instant tradition for anyone who makes them. First and foremost is the incredible flavor profile. The combination of deeply chocolatey, slightly bitter cookie crumbs blended with tangy, rich cream cheese creates a beautifully balanced interior that isn’t overly sweet. This fudge-like center is then encased in a crisp, sweet shell of melted candy coating, providing a satisfying textural contrast with every bite.
Furthermore, these treats are entirely no-bake. As the weather warms up, turning on the oven becomes less appealing. This recipe relies entirely on mixing, shaping, and chilling, keeping your kitchen cool and your stress levels low. It is also an incredibly forgiving recipe, making it perfect for novice bakers or for involving children in the kitchen. Kids will absolutely love helping to crush the cookies, roll the mixture into egg shapes, and, of course, scatter the vibrant sprinkles over the wet candy coating. Finally, these truffles are highly customizable. You can adapt the colors, the flavors, and the decorations to suit any theme or personal preference, making them a versatile addition to your dessert repertoire.
The Magic of No-Bake Desserts for the Holidays
The holiday season can often feel overwhelming, with a seemingly endless list of tasks, from decorating the house to preparing elaborate meals. This is where no-bake desserts truly shine. They offer a convenient, time-saving solution without sacrificing flavor or presentation. By eliminating the need for baking times and cooling racks, you free up valuable oven space for your main courses and side dishes. Moreover, no-bake recipes like these Easter Egg Oreo Balls can easily be prepared ahead of time. You can make the truffle centers days in advance and keep them chilled or frozen until you are ready to dip them. This make-ahead capability is a lifesaver when planning a complex holiday menu, allowing you to space out your preparation and enjoy the festivities alongside your guests.
Essential Ingredients for Easter Egg Oreo Balls
To create these delectable spring treats, you will need a short list of simple, high-quality ingredients. Here is exactly what to gather before you begin:
- – 1 package (14.3 oz) standard Oreo cookies (do not use Double Stuf, as the filling ratio will be off)
- – 1 block (8 oz) full-fat cream cheese, softened to room temperature
- – 2 to 3 packages (12 oz each) of Candy Melts or Almond Bark in various spring colors (such as pink, blue, yellow, and bright white)
- – 1/4 cup assorted Easter-themed sprinkles (pastels, jimmies, nonpareils, or egg-shaped quins)
- – 1 tablespoon coconut oil or vegetable shortening (optional, used only if needed to thin the candy melts)
Step-by-Step Instructions
Follow these detailed steps to ensure your Easter Egg Oreo Balls turn out perfectly shaped, smoothly coated, and utterly delicious.
- Prepare Your Workstation: Begin by lining a large baking sheet with a piece of parchment paper or a silicone baking mat. Ensure the baking sheet can fit easily into your refrigerator or freezer.
- Crush the Cookies: Place the entire package of standard Oreo cookies (including the cream centers) into the bowl of a food processor. Pulse the cookies until they are reduced to fine, even crumbs. If you do not have a food processor, place the cookies in a large, heavy-duty ziplock bag and crush them thoroughly with a rolling pin until fine.
- Blend with Cream Cheese: Transfer the finely crushed cookie crumbs to a large mixing bowl. Add the softened block of cream cheese. Using a hand mixer on medium speed, or simply using a sturdy silicone spatula and some elbow grease, blend the crumbs and cream cheese together until completely combined. The mixture should look like dark, dense, slightly sticky dough with no white streaks of cream cheese remaining.
- Shape the Eggs: Scoop out portions of the dough (about 1 tablespoon each) and roll them between your palms into a smooth ball. Then, gently taper one end of the ball to create a classic egg shape. Place the shaped egg onto your prepared baking sheet. Repeat this process until all the dough has been shaped. You should get approximately 36 to 40 miniature eggs.
- Chill the Truffles: This is a crucial step. Place the baking sheet with the shaped eggs into the freezer for at least 30 minutes, or into the refrigerator for 1 hour. The eggs must be firm and cold before dipping, otherwise, they will fall apart in the warm candy coating or leave dark crumbs in your beautiful pastel colors.
- Melt the Coating: Work with one color of candy melts at a time. Place the candy melts in a microwave-safe bowl. Microwave on 50% power for 1 minute, then stir. Continue to microwave in 30-second intervals at 50% power, stirring thoroughly after each interval, until the candy is completely smooth and fluid. If the melted candy seems too thick for dipping, stir in a tiny amount of coconut oil or solid vegetable shortening (about 1/2 teaspoon at a time) until it reaches a smooth, pourable consistency.
- Dip the Eggs: Remove a few chilled eggs from the freezer at a time (keeping the rest cold). Drop one egg into the melted coating. Use a fork to carefully roll the egg until completely coated. Lift the egg out with the fork, tapping the handle of the fork gently against the edge of the bowl to allow excess coating to drip off. Carefully slide the coated egg back onto the parchment-lined baking sheet using a toothpick to help ease it off the fork.
- Decorate Promptly: The candy coating will begin to set quickly. Before the shell hardens, immediately decorate the egg with your chosen Easter sprinkles. Alternatively, you can wait for the base coat to dry completely, then use a piping bag filled with a contrasting color of melted candy to drizzle zig-zags over the top.
- Set and Serve: Allow the decorated Easter Egg Oreo Balls to sit at room temperature for about 15 minutes, or pop them into the refrigerator for 5 minutes, until the candy shell is completely hard and set. Serve chilled or at room temperature.
Expert Tips for the Perfect Chocolate Coating
Dipping truffles can sometimes be the most intimidating part of the process, but with a few expert tricks, you can achieve a flawless, professional-looking finish. First, temperature control is paramount. If your candy melts are too hot, they will melt the cream cheese filling, causing the truffles to lose their shape and leak oil into the coating. If the truffles are too cold (frozen solid), the sudden temperature change can cause the candy shell to crack as it sets. The sweet spot is chilled but not frozen solid truffles, and warm, fluid, but not scalding hot candy coating.
When melting your candy coating, patience is a virtue. Overheating chocolate or candy melts will cause them to seize, turning into a thick, grainy, unworkable paste. Always use 50% power in the microwave and stir frequently. The residual heat in the bowl will continue to melt the wafers even after you remove them from the microwave. If you find your coating is consistently too thick, adding a touch of shortening or coconut oil will thin it out beautifully without affecting the way it sets. Never add water or water-based food coloring to melted candy wafers, as this will immediately cause them to seize.
Fun Variations and Customizations
While the classic Oreo and cream cheese combination is a proven winner, this recipe serves as a fantastic blank canvas for your culinary creativity. Here are several exciting variations you can try to customize your spring dessert platter:
Flavor Variations: Swap out standard chocolate Oreos for Golden Oreos for a lighter, vanilla-forward truffle. You can also experiment with seasonal cookie flavors like Lemon Oreos or Mint Oreos to give your Easter eggs a refreshing twist. If you want to enhance the filling further, consider mixing in a splash of pure vanilla extract, a pinch of sea salt, or even a tablespoon of instant espresso powder to deepen the chocolate flavor.
Coating Alternatives: If you prefer the taste of real chocolate over candy melts, you can absolutely use high-quality white chocolate baking bars. However, real chocolate requires tempering to achieve that signature snap and glossy finish. Almond bark is a great middle ground, offering a slightly different flavor profile while still melting and setting easily without tempering. You can color white almond bark or white chocolate using oil-based candy colors (avoid water-based liquid food coloring).
Serving Suggestions and Presentation Ideas
The visual appeal of these Easter Egg Oreo Balls is half the fun, so presentation is key. To serve these at a spring brunch or Easter dinner, try creating an “edible Easter basket.” Take a large serving platter and line it with edible green Easter grass or shredded toasted coconut tinted with a little green food coloring. Nestled the brightly colored truffle eggs into the grass for a charming, rustic display. You can also place individual eggs into miniature, brightly colored cupcake liners for easy, mess-free serving.
If you are planning to give these as gifts, they package beautifully. Place a few assorted eggs into clear cellophane treat bags, tie them off with a pastel ribbon, and add a personalized tag. They also look stunning arranged in a clean, empty egg carton (perhaps one that has been painted or decorated on the outside) to really play up the Easter egg theme. Because they are rich and satisfying, serving two to three eggs per person is generally a perfect portion.
Storage and Make-Ahead Instructions
Because these truffles contain fresh cream cheese, proper storage is important for both food safety and maintaining optimal texture. Once the candy coating has completely hardened, transfer the Easter Egg Oreo Balls to an airtight container. If you need to stack them, place a layer of wax paper or parchment paper between each layer to prevent any sticking or scuffing of the smooth shells.
They will keep perfectly in the refrigerator for up to 3 weeks. They actually taste fantastic when served straight from the fridge, as the chilling keeps the center firm and fudge-like. If you want to make them further in advance, you can freeze the completed truffles in an airtight, freezer-safe container for up to 2 months. When you are ready to enjoy them, simply transfer the container to the refrigerator overnight to thaw. Avoid thawing them at room temperature, as the sudden change in temperature can cause condensation to form on the candy shell, making them sticky and ruining the appearance of your sprinkles.
A Brief History of Cookie Truffles and Easter Treats
The concept of the cookie truffle—mixing crushed commercially baked cookies with a binder like cream cheese to create a rich, dense center—is a brilliant modern culinary invention. It gained massive popularity in the early 2000s alongside the rise of food blogs and internet recipe sharing. The genius of the recipe is its mimicry of traditional chocolate ganache truffles, but utilizing pantry staples to skip the complex steps of heating cream and tempering chocolate.
Shaping these truffles into eggs for Easter taps into centuries-old traditions. Eggs have been a symbol of rebirth, fertility, and new beginnings since ancient times, long predating their association with the Christian holiday of Easter. In the 19th century, European chocolatiers began creating chocolate eggs as luxury gifts, a tradition that eventually evolved into the hollow chocolate bunnies and candy-coated chocolate eggs we know today. By taking the modern, accessible cookie truffle and shaping it into this ancient springtime symbol, home cooks create a dessert that is both contemporary and deeply rooted in holiday tradition.
Frequently Asked Questions (FAQs)
Can I use a low-fat or fat-free cream cheese?
It is highly recommended to use full-fat brick-style cream cheese. Low-fat or whipped cream cheese spreads contain a higher water content and air, which will make your truffle filling too soft, sticky, and difficult to shape and dip properly.
Why is my truffle mixture too dry/crumbly?
This usually happens if the cookies were not crushed finely enough, or if you accidentally purchased “Family Size” or “Double Stuf” cookies which alters the ratio. If your mixture won’t hold together when squeezed, you can add an extra tablespoon of softened cream cheese until the desired consistency is reached.
How do I stop my chocolate from pooling at the bottom?
Pooling, or creating a “foot” at the base of the truffle, is common. To minimize this, ensure you tap the fork firmly against the bowl to remove as much excess coating as possible before placing the egg on the parchment. If a small pool still forms, you can easily trim it away with a sharp paring knife once the chocolate has completely hardened.
Conclusion: A Must-Try Easter Delight
Easter Egg Oreo Balls are the quintessential spring dessert: brightly colored, joyfully festive, exceptionally easy to make, and undeniably delicious. By combining the beloved flavors of cookies and cream with the satisfying crunch of a candy shell, you create a treat that appeals to both children and adults alike. Whether you follow the classic recipe or venture into your own creative flavor profiles and decorations, these delightful little eggs are sure to become a cherished part of your holiday celebrations year after year. Gather your ingredients, roll up your sleeves, and enjoy the sweet, simple magic of no-bake holiday baking.
Easter Egg Oreo Balls
Ingredients
Equipment
Method
- Prepare a baking sheet by lining it with parchment paper.
- Place entire package of Oreos in a food processor and pulse until fine crumbs form. Alternatively, crush in a heavy-duty bag with a rolling pin.
- Transfer cookie crumbs to a large bowl. Add softened cream cheese and mix thoroughly until no white streaks remain and a dough forms.
- Scoop about 1 tablespoon of the mixture, roll into a ball, and then gently taper one end to form an egg shape. Place on prepared baking sheet.
- Chill the shaped eggs in the freezer for 30 minutes or in the refrigerator for 1 hour until firm.
- Melt candy melts in microwave-safe bowls in 30-second intervals at 50% power, stirring until smooth. Add a little coconut oil if too thick.
- Dip chilled eggs one at a time into the melted coating using a fork, tapping off excess, and place back on parchment paper.
- Immediately decorate with sprinkles before the coating sets, or allow to dry and add drizzles with contrasting colored candy melts.
- Allow coating to harden completely (about 15 mins at room temp or 5 mins in fridge) before serving or storing in an airtight container in the refrigerator.