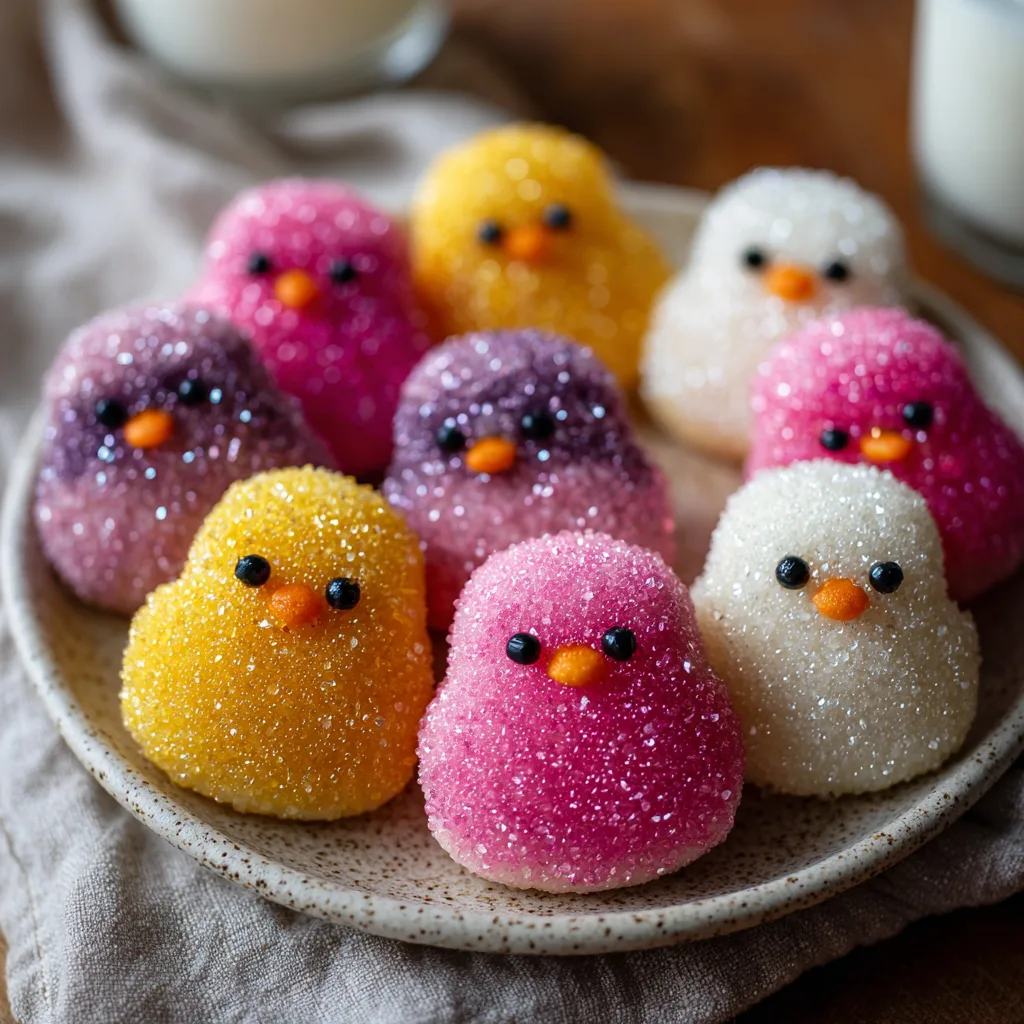
Easter Chick Sugar Cookies
The Ultimate Peeps-Inspired Easter Chick Sugar Cookies: A Springtime Baking Guide
Welcome to the most comprehensive, detailed, and joyful guide to creating the ultimate Peeps-inspired Easter Chick Sugar Cookies. When spring rolls around, bakery windows and supermarket aisles are flooded with pastel colors, blooming flowers, and, of course, the iconic marshmallow Peeps. While those fluffy, sugar-coated marshmallow treats are a nostalgic staple of Easter baskets everywhere, not everyone loves the texture of marshmallows. But what if you could capture that adorable, brightly colored, sugar-crusted aesthetic and pair it with the rich, buttery, melt-in-your-mouth flavor of a perfect homemade sugar cookie? That is exactly what this recipe achieves.
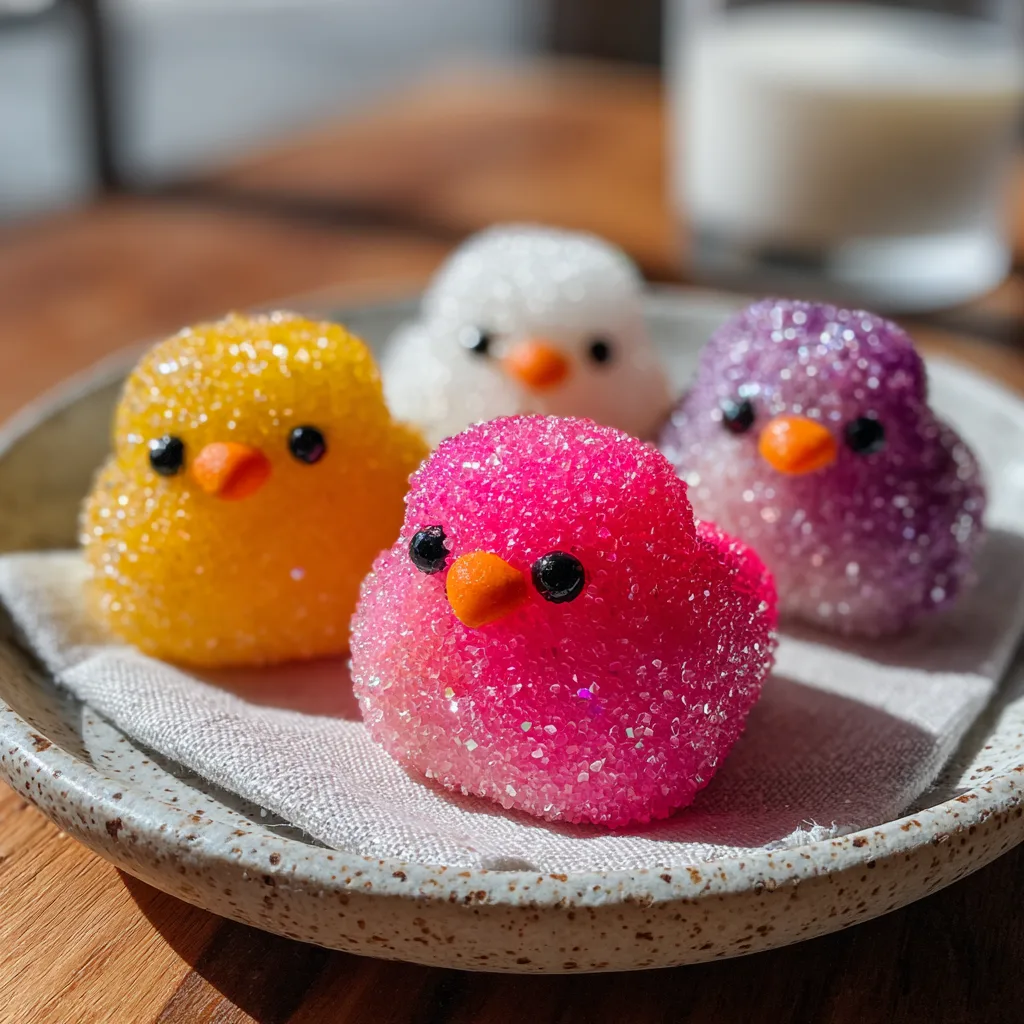
These chick-shaped sugar cookies are an absolute triumph of home baking. They feature a tender, vanilla-infused shortbread-style base that holds its shape perfectly in the oven, meaning your little chicks will not spread out and lose their adorable silhouettes. They are then brushed with a thin layer of sweet royal icing and generously dunked into vibrant, sparkling colored sanding sugars—yielding a stunning pink, yellow, purple, and white flock of sweet treats. Finished with tiny black piping for the eyes and a little orange peak for the beak, these cookies are guaranteed to be the star of your spring brunch, school bake sale, or family gathering.
The Inspiration Behind the Chick Cookie
The inspiration for this recipe comes directly from the classic Easter candy, but we are elevating the experience significantly. The beauty of this recipe lies in the contrast of textures. The exterior offers a delightful, slightly crunchy bite thanks to the sparkling sanding sugar. As you bite through that crystalline outer layer, you are met with a soft, dense, and deeply buttery cookie interior. It is a sophisticated upgrade to a childhood favorite.
Baking these cookies is also an incredibly fun and interactive project, making it perfect for involving children or friends. The process of dipping the icing-covered cookies into bowls of brightly colored sugar is wonderfully tactile and rewarding. In this extensive guide, we will walk you through every single step of the process, from mastering the science of no-spread cookie dough to achieving the perfect icing consistency for both the sugar “glue” and the fine facial details.
The Science of the Perfect No-Spread Sugar Cookie
The foundation of this entire project is the cookie dough. If your dough spreads in the oven, your cute chicks will emerge looking like indistinguishable blobs. To prevent this, we must rely on baking science. This recipe has been meticulously formulated to prioritize structure while maintaining a tender crumb.
The Importance of Butter Temperature
The state of your butter dictates the structure of your cookie. For this recipe, your butter must be at true room temperature—which is actually cooler than most people think. It should be around 65°F (18°C). It should yield slightly when you press it with your finger, but it should not be greasy, shiny, or melting. If your butter is too warm, it will melt too rapidly in the oven, causing the cookies to spread before the flour has a chance to set their structure.
Creaming: How Long is Too Long?
When you cream the butter and sugar together, you are doing more than just combining ingredients; you are aerating the dough. The sharp edges of the sugar crystals carve microscopic air pockets into the butter. While we want some aeration for a tender bite, over-creaming will incorporate too much air. In the oven, this air expands, causing the cookie to puff up and then collapse, losing its crisp edges. Cream your butter and sugar on medium speed for exactly two minutes—no longer.
Leavening Agents: The Baking Powder Debate
You will notice this recipe calls for a very small amount of baking powder and absolutely no baking soda. Baking soda causes cookies to spread outward, which is the enemy of a cut-out cookie. A tiny pinch of baking powder gives the dough just enough lift so that it isn’t overly dense, but not enough to distort the shape of the chick cookie cutter.
The Magic of Colored Sanding Sugar
To achieve the authentic “Peep” look, the type of sugar you use is paramount. You cannot simply use regular granulated table sugar; the crystals are too small, and it will melt into the icing rather than sitting beautifully on the surface.
Sanding Sugar vs. Sparkling Sugar
You want to look for “sanding sugar” or “sparkling sugar.” Sanding sugar has a slightly larger crystal than table sugar and is polished, meaning it reflects light beautifully and holds its color without bleeding. Sparkling sugar has an even larger, coarser crystal. Either will work wonderfully for this recipe. You can purchase these pre-colored in the baking aisle of craft stores, or you can easily make your own.
How to Dye Your Own Sugar
If you cannot find the specific pastel pink, bright yellow, or soft purple you desire, you can make your own colored sugar at home. Place one cup of sanding sugar or coarse sugar into a zip-top plastic bag. Add one to two drops of gel food coloring (do not use liquid food coloring, as it will dissolve the sugar). Seal the bag, leaving some air inside, and aggressively shake and massage the bag until the color is evenly distributed. Spread the colored sugar out on a baking sheet lined with parchment paper and let it air dry for an hour before using.
Ingredients You Will Need
For the Cut-Out Cookie Dough:
- – 1 cup (226g) unsalted butter, softened to 65°F
- – 1 cup (200g) granulated white sugar
- – 1 large egg, at room temperature
- – 1.5 teaspoons pure vanilla extract
- – 1/2 teaspoon almond extract (optional, but highly recommended for flavor)
- – 3 cups (360g) all-purpose flour, spooned and leveled
- – 1/2 teaspoon baking powder
- – 1/2 teaspoon kosher salt
For the Royal Icing (The Sugar Glue & Details):
- – 3 cups (360g) powdered sugar, sifted
- – 2 tablespoons meringue powder
- – 1/4 cup warm water (plus more for thinning)
- – 1/2 teaspoon clear vanilla extract
- – Black gel food coloring
- – Orange gel food coloring
For the Coating:
- – 1/2 cup pink sanding sugar
- – 1/2 cup yellow sanding sugar
- – 1/2 cup purple sanding sugar
- – 1/2 cup white sparkling sugar
Step-by-Step Instructions
Step 1: Master the Cookie Dough
- Whisk the Dry Ingredients: In a medium mixing bowl, whisk together the all-purpose flour, baking powder, and kosher salt. Ensure these are thoroughly combined so you do not have pockets of baking powder in your final dough. Set this aside.
- Cream the Butter and Sugar: In the bowl of a stand mixer fitted with the paddle attachment, or using a large bowl with a hand mixer, beat the softened butter and granulated sugar on medium speed for exactly two minutes. The mixture should look slightly lighter in color but should not be overly fluffy.
- Add the Wet Ingredients: Scrape down the sides and bottom of the bowl with a rubber spatula. Add the room temperature egg, pure vanilla extract, and almond extract. Beat on low speed just until the egg is completely incorporated. The mixture may look slightly separated; this is normal.
- Incorporate the Flour: With the mixer on the lowest possible speed, gradually add the dry flour mixture in three batches. Mix just until the last streak of flour disappears. Do not overmix, or your cookies will be tough. The dough should pull away from the sides of the bowl and clump together around the paddle.
Step 2: Roll and Chill the Dough
- Divide and Roll: Turn the dough out onto a clean work surface. Divide it into two equal halves. Place one half onto a large sheet of parchment paper. Place another sheet of parchment paper directly on top of the dough. Using a rolling pin, roll the dough out between the parchment papers to an even thickness of exactly 1/4 inch. Repeat with the second half of the dough.
- Chill the Sheets: Slide the rolled-out dough (still between the parchment papers) onto a baking sheet. Place the baking sheet in the refrigerator for at least 1 hour, or in the freezer for 20 minutes. The dough must be completely firm and cold before cutting.
Step 3: Cut and Bake to Perfection
- Preheat the Oven: Preheat your oven to 350°F (175°C). Line two heavy-bottomed baking sheets with fresh parchment paper or silicone baking mats.
- Cut the Chicks: Remove one sheet of chilled dough from the fridge. Peel off the top layer of parchment. Using your chick-shaped cookie cutter, press firmly into the dough. Maximize your cuts to get as many chicks as possible. Transfer the cut shapes to the prepared baking sheets, leaving about 1 inch of space between each cookie.
- Re-roll Scraps: Gather the scraps, press them together, re-roll between parchment, and chill again before cutting more shapes.
- Bake: Bake the cookies for 9 to 11 minutes. You want to pull them out of the oven just before the edges start to turn golden brown. They should look pale but set in the center. Allow them to cool on the baking sheet for 5 minutes before transferring them to a wire rack to cool completely. They must be 100% cool before decorating.
Step 4: The Royal Icing “Glue”
- Whip the Icing: In a meticulously clean, grease-free bowl of a stand mixer fitted with the whisk attachment, combine the sifted powdered sugar and the meringue powder. Turn the mixer on low and slowly stream in the warm water and clear vanilla extract. Once combined, increase the speed to medium-high and whip for 4 to 5 minutes until the icing forms stiff, glossy peaks.
- Separate for Details: Remove about 1/4 cup of the stiff icing and place it in a small bowl. Dye this orange for the beaks. Remove another 1/4 cup of the stiff icing and place it in another small bowl. Dye this black for the eyes. Cover both bowls with a damp paper towel so they do not dry out.
- Thin the Coating Icing: To the remaining icing in the mixer bowl, add water 1/2 teaspoon at a time, mixing gently with a spoon, until you reach a “flood” consistency. When you lift the spoon and let the icing fall back into the bowl, the ribbon should disappear seamlessly into the rest of the icing within 10 to 12 seconds. If it is too thick, the sugar won’t stick well; if it is too thin, it will run off the cookie.
Step 5: Sugar Coating and Decorating
- Set Up Your Station: Place your pink, yellow, purple, and white sanding sugars into four separate shallow bowls. Have your thinned royal icing ready with a clean, food-safe paintbrush.
- Apply the Glue: Take a cooled chick cookie and use the paintbrush to brush a smooth, even, thin layer of the white flood icing over the entire top surface of the cookie. Ensure you get all the way to the edges.
- Dunk in Sugar: Immediately flip the iced cookie upside down and gently press it directly into one of the bowls of colored sanding sugar. Ensure the entire surface makes contact. Lift the cookie straight up and gently tap the edge to shake off any loose, excess sugar. Place the sugar-coated cookie back on the wire rack. Repeat with all cookies, alternating colors as desired.
- Pipe the Details: Let the sugar-coated cookies sit for about 30 minutes so the base icing sets slightly. Transfer your black stiff icing and orange stiff icing into two separate piping bags fitted with very small round piping tips (like a Wilton #1 or #2). Pipe two small black dots for the eyes, and a small orange triangle for the beak on each chick.
- Dry Completely: Allow the decorated cookies to sit at room temperature, uncovered, for at least 8 to 12 hours (or overnight) so the royal icing can dry and harden completely.
Pro Tips for Flawless Chick Cookies
Prevent Color Bleeding: The biggest risk when making these cookies is that the black icing from the eyes will bleed into the white or yellow sugar coating. To absolutely guarantee this does not happen, you must use stiff consistency royal icing for the eyes, and you must let the sugar-coated base dry for a little while before applying the details. Furthermore, avoid storing the finished cookies in the refrigerator, as the humidity can cause the colors to run.
Rolling Technique: Rolling the dough between two sheets of parchment paper is a game-changer. It eliminates the need to dust your counter with extra flour, which can dry out the dough and make the cookies tough. It also makes transferring the delicate cut-out shapes to the baking sheet much easier.
The Paintbrush Method: Many recipes suggest dipping the entire cookie surface into a bowl of icing. While fast, this often results in icing dripping down the sides of the cookie, which looks messy. Using a food-safe paintbrush gives you total control, ensuring the icing stays strictly on the top surface, resulting in crisp, bakery-perfect edges.
Creative Variations to Try
While the classic Peeps colors of bright yellow and vibrant pink are stunning, you are not limited to them!
- Flavor Infusions: Instead of almond extract, try adding a teaspoon of lemon zest or orange extract to the cookie dough for a bright, citrusy springtime flavor that pairs beautifully with the sweet sugar topping.
- Speckled Egg Cookies: Use the same dough and icing technique, but cut the cookies into egg shapes. After coating them in pastel sugars, use a stiff brush to flick a tiny bit of watered-down brown food coloring over the top to create a realistic “speckled robin’s egg” effect.
- Chocolate Chicks: Swap out 1/2 cup of the flour for Dutch-process cocoa powder to create a rich chocolate sugar cookie base that looks striking against the bright sugar coatings.
Storage and Freezing Instructions
Because these cookies are so labor-intensive, they are the perfect candidate for making ahead of time.
Storing Baked and Decorated Cookies: Once the royal icing is 100% completely dry and hard to the touch (usually after 12 hours), the cookies can be stacked between layers of parchment paper in an airtight container. Store them at room temperature in a cool, dry place. They will remain fresh and crisp for up to two weeks.
Freezing the Dough: You can make the cookie dough, roll it out between parchment paper, and freeze the flat sheets for up to 3 months. When you are ready to bake, you can cut the shapes directly from the frozen dough and pop them right into the oven (you may need to add 1-2 minutes to the baking time).
Freezing Decorated Cookies: Yes, you can freeze the fully decorated cookies! Place them in an airtight container with parchment paper between the layers. When thawing, it is critical that you take the container out of the freezer and let it sit on the counter at room temperature for several hours before opening the lid. Opening the container while they are still cold will cause condensation to form on the cookies, which will melt the sugar and ruin the icing.
Conclusion
Creating these Peeps-Inspired Easter Chick Sugar Cookies is a delightful baking project that brings the joy and color of spring directly into your kitchen. By following the precise dough science, mastering the royal icing consistencies, and taking your time with the sugar coating process, you will produce cookies that look incredibly professional and taste phenomenally better than store-bought treats. Gather your sanding sugars, dust off your rolling pin, and enjoy the process of bringing these sweet little chicks to life!
Peeps-Inspired Easter Chick Cookies
Ingredients
Equipment
Method
- Whisk together the flour, baking powder, and salt in a bowl.
- Cream the butter and sugar on medium speed for 2 minutes. Add the egg, vanilla, and almond extract, mixing until incorporated.
- Gradually add the dry ingredients on low speed, mixing just until combined.
- Divide dough in half, roll out between sheets of parchment paper to 1/4-inch thickness, and chill for 1 hour.
- Preheat oven to 350°F (175°C). Cut out chick shapes and bake on lined baking sheets for 9-11 minutes until just set. Cool completely.
- Whip powdered sugar, meringue powder, vanilla, and warm water until stiff peaks form. Color small amounts black and orange for the eyes and beak.
- Thin the remaining icing with water until it reaches flood consistency.
- Brush a thin layer of the flood icing onto a cookie, then immediately press it face down into a bowl of colored sanding sugar. Repeat.
- Use the stiff black and orange icing to pipe eyes and beaks onto the sugar-coated chicks. Let dry completely (8-12 hours) before storing.