Japanese Cheesecake Cupcakes
The Ultimate Guide to Fluffy Japanese Cotton Cheesecake Cupcakes
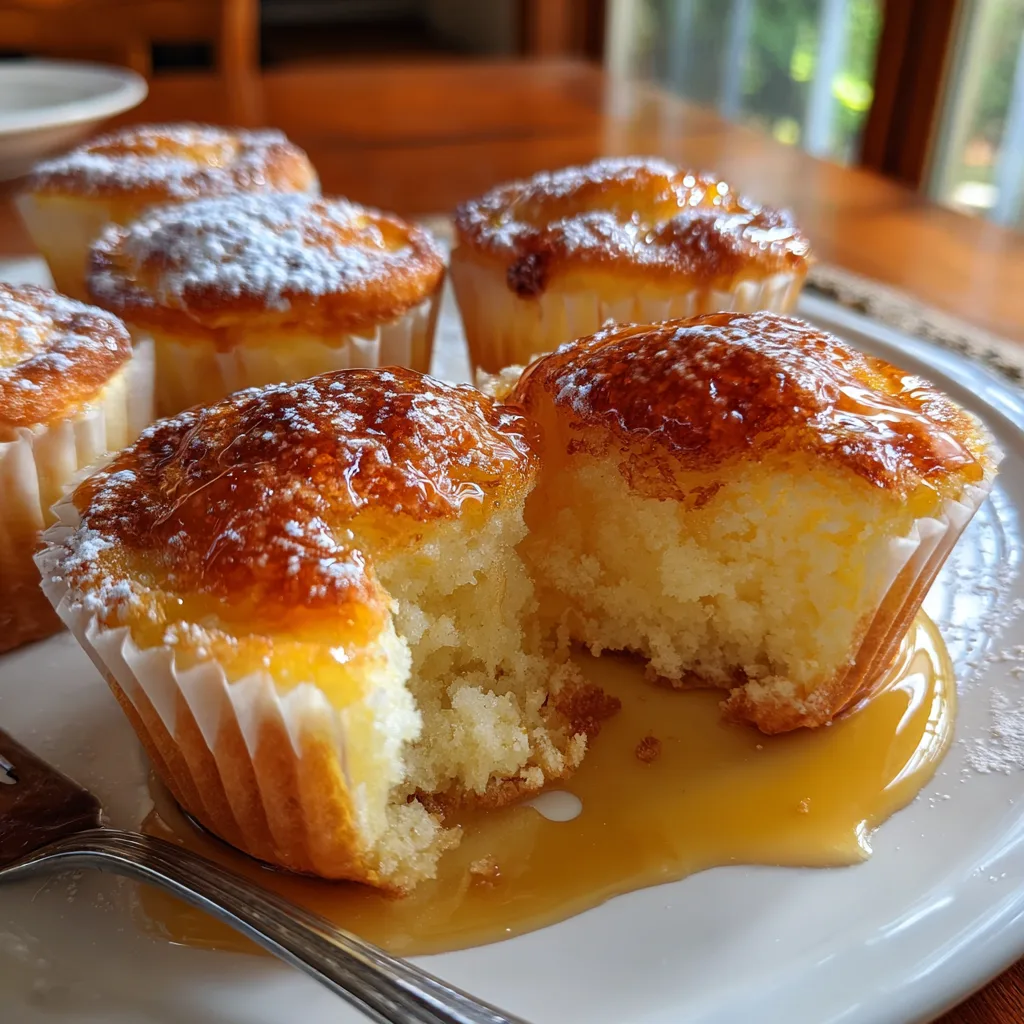
If there is one dessert that has taken the culinary world by storm over the last decade, it is the Japanese Cotton Cheesecake. Famous for its signature “jiggle,” its impossibly light, airy texture, and its delicate balance of rich cream cheese flavor without the heaviness of a traditional New York-style cheesecake, it is a true marvel of baking. Today, we are taking this beloved classic and miniaturizing it into Fluffy Japanese Cotton Cheesecake Cupcakes. These individual, bite-sized clouds of perfection offer all the joy of a full-sized soufflé cheesecake but bake faster, are easier to share, and look absolutely stunning dusted with a snowy layer of powdered sugar.
In this comprehensive, 1500+ word guide, we will walk you through every single step, science-backed tip, and historical tidbit you need to master these jiggly, melt-in-your-mouth cupcakes. Whether you are a seasoned baker or attempting a meringue-based cake for the first time, this article will be your ultimate resource for achieving bakery-quality Japanese cotton cheesecake cupcakes right in your own kitchen.
What is Japanese Cotton Cheesecake?
To understand the magic of these cupcakes, we first need to look at the origins of the Japanese Cotton Cheesecake. Also known as “soufflé cheesecake” or “jiggly cake,” this dessert was popularized in Japan in the late 20th century. Unlike Western cheesecakes, which rely heavily on massive amounts of cream cheese, heavy cream, and eggs baked into a dense, rich custard, the Japanese iteration combines a cream cheese batter with a French meringue (egg whites whipped with sugar).
The result is a hybrid dessert: it has the tangy, comforting flavor profile of a cheesecake, but the structural integrity and cloud-like texture of a chiffon cake or a soufflé. When baked perfectly, it literally melts on the tongue. The “cotton” in the name refers to this precise texture—soft, yielding, and completely weightless.
Why Make Them As Cupcakes?
You might be wondering, why mess with the classic 8-inch round cake? Why make them into cupcakes? There are several brilliant reasons for this adaptation:
- Portion Control: Traditional Japanese cheesecake is so light that it is dangerously easy to eat half a cake in one sitting. Individual cupcakes provide the perfect built-in portion.
- Shorter Baking Time: A full-sized cotton cheesecake requires a low-and-slow bake in a water bath, often taking up to 80-90 minutes, plus cooling time inside the oven. Cupcakes reduce this baking time to just 25-30 minutes.
- Less Intimidating: One of the biggest fears when baking a full cotton cheesecake is that the center will collapse or the top will crack massively. Cupcakes are much more forgiving. Even if they shrink slightly as they cool, they retain a beautiful, rustic dome shape.
- Perfect for Gifting: Wrapped in delicate white liners and dusted with powdered sugar, these make stunning additions to a high tea tray, a bake sale, or a gift box for friends and family.
The Science Behind the Fluff: Mastering the Meringue
The entire success of your Fluffy Japanese Cotton Cheesecake Cupcakes hinges on one crucial element: the meringue. Meringue is simply egg whites beaten with sugar until they trap air, creating a stable foam. In this recipe, the meringue acts as the primary leavening agent. There is no baking powder or baking soda here; the rise comes entirely from the air bubbles trapped inside the egg whites expanding under the heat of the oven.
The Golden Rule of Meringue: Soft Peaks, Not Stiff Peaks
In western baking (like for macarons or lemon meringue pie), recipes often call for “stiff peaks”—where the egg whites stand straight up like a bird’s beak without drooping. For a Japanese cotton cheesecake, stiff peaks are your worst enemy. If you overwhip the egg whites, the protein structure becomes too rigid and tightly bound. When folded into the cream cheese batter and baked, these rigid air bubbles will expand rapidly, causing the cupcakes to dome aggressively and crack, before completely collapsing as they cool.
Instead, you are aiming for soft to medium peaks. When you lift your whisk out of the bowl, the meringue should form a peak that gently droops or folds over at the top. It should look glossy and smooth like shaving cream. This allows the batter to expand gently and evenly in the oven, giving you that beautiful, crack-free, jiggly texture.
The Importance of the Water Bath (Bain-Marie)
Even though we are making cupcakes, a water bath is still absolutely essential. A water bath (or bain-marie) involves placing your baking vessel (in this case, your muffin tin) inside a larger roasting pan filled with an inch of hot water. The water regulates the temperature of the oven, ensuring the heat is gentle and moist.
Because these cupcakes are essentially baked custards mixed with meringue, a dry, harsh oven will cause the eggs to curdle and the top to burn before the inside is cooked. The steam generated by the hot water bath keeps the surface of the cupcakes soft, allowing them to rise without cracking, and yields a moist, creamy interior.
Essential Ingredients and Substitutions
Before you begin, let us break down the ingredients you will need. Precision is key in this recipe, so a kitchen scale is highly recommended for measuring.
- – Cream Cheese: Use full-fat brick-style cream cheese. Do not use whipped cream cheese or low-fat spreads, as they contain too much water and will ruin the texture of the batter. The cream cheese must be softened to room temperature so it blends smoothly without lumps.
- – Unsalted Butter: Butter adds richness and a tender crumb. Unsalted is best so you can control the sodium level.
- – Whole Milk: Milk thins out the heavy cream cheese and butter mixture, creating a smooth, silky base for the meringue to fold into.
- – Eggs: You will need to separate your eggs into yolks and whites. It is easiest to separate eggs when they are cold, but egg whites whip up to maximum volume when they are at room temperature. Therefore, separate them straight out of the fridge, then let the whites sit on the counter for 30 minutes.
- – Cake Flour: This is non-negotiable! Cake flour has a lower protein content (around 7-8%) compared to all-purpose flour (10-12%). Lower protein means less gluten development, which guarantees a tender, soft, melt-in-your-mouth crumb.
- – Cornstarch: A small amount of cornstarch acts as a stabilizer for the batter, preventing it from weeping or collapsing.
- – Granulated Sugar: You need superfine or standard granulated sugar. It will be divided—a small amount goes into the cream cheese mixture, and the rest is slowly added to the egg whites to stabilize the meringue.
- – Cream of Tartar: This is an acidic powder that helps stabilize the egg whites, preventing them from deflating while you fold them into the batter. If you don’t have cream of tartar, you can substitute a few drops of fresh lemon juice or white vinegar.
- – Vanilla Extract: Use pure vanilla extract for the best flavor.
- – Powdered Sugar: For that beautiful, snowy garnish at the very end.
Step-by-Step Instructions
Now, let’s get baking. Follow these steps meticulously for the best Fluffy Japanese Cotton Cheesecake Cupcakes.
- Prepare your equipment: Preheat your oven to 320°F (160°C). Line a standard 12-cup muffin tin with high-quality paper or foil liners. Find a roasting pan or a large baking dish that is wide enough to hold your muffin tin flat inside it. Boil a kettle of water and keep it hot.
- Melt the dairy: Set up a double boiler by bringing a small pot of water to a gentle simmer. Place a large heatproof glass or metal bowl over the pot (ensure the bottom of the bowl does not touch the water). Add the cream cheese, unsalted butter, and milk into the bowl. Gently whisk the mixture until it is completely melted, smooth, and lump-free. Remove from the heat and let it cool for 5 minutes.
- Add yolks and dry ingredients: Once the cream cheese mixture has cooled slightly (it should be warm, not hot), whisk in the egg yolks one at a time. Stir in the vanilla extract. Sift the cake flour and cornstarch directly over the bowl and whisk gently just until incorporated. Do not overmix. Strain this batter through a fine-mesh sieve into a clean bowl to ensure absolute silkiness. Set aside.
- Whip the meringue: In a clean, grease-free bowl of a stand mixer (or using a hand mixer), beat the room-temperature egg whites on medium-low speed until they become frothy. Add the cream of tartar. Increase the speed to medium and gradually add the granulated sugar, about one tablespoon at a time. Continue whipping until you reach soft to medium peaks. The meringue should look glossy and hold a drooping peak when the whisk is lifted.
- Fold the batters together: This is the critical step. Take one-third of the meringue and add it to the cream cheese batter. Using a rubber spatula, gently fold it in to lighten the base. Then, pour this mixture back into the remaining meringue. Fold very gently, scraping the bottom and sides of the bowl, until no white streaks remain. Be careful not to deflate the air bubbles you worked so hard to create.
- Fill the liners: Divide the airy batter evenly among the 12 muffin cups. They should be filled almost to the top, as they will not rise as dramatically as a standard cake. Tap the muffin tin gently on the counter twice to release any large trapped air bubbles.
- Prepare the water bath: Place the muffin tin inside your large roasting pan. Carefully pour the boiling water from your kettle into the roasting pan until it reaches about halfway up the sides of the muffin tin. Do not splash water onto the cupcakes.
- Bake: Carefully transfer the whole setup to the middle rack of your oven. Bake at 320°F (160°C) for 25 minutes. Then, reduce the oven temperature to 280°F (140°C) and bake for another 10 to 15 minutes, or until the tops are golden brown and a toothpick inserted into the center comes out clean.
- Cool gently: Do not remove them from the oven immediately! The shock of cold air will cause them to collapse. Turn off the oven, prop the door open slightly with a wooden spoon, and let the cupcakes sit inside for 15 minutes. Afterward, remove the tin from the water bath and let them cool completely on a wire rack.
- Garnish and serve: Once completely cooled, dust the tops generously with powdered sugar. Serve immediately or chill for a denser texture.
Expert Tips for Perfection and Troubleshooting
Even with the best instructions, baking Japanese cheesecake requires practice. Here are some expert tips and troubleshooting answers to guarantee success:
- Why did my cupcakes crack? Cracking is almost always caused by an oven temperature that is too high, or a meringue that was whipped too stiff. Make sure you are using an oven thermometer to verify your temperature, and remember: soft peaks only!
- Why did my cupcakes sink in the middle? Deflation occurs if the batter was overmixed during the folding stage, knocking out the air. It can also happen if they were underbaked (the internal structure was not set) or if they were subjected to a sudden draft of cold air when removed from the oven.
- Why is my texture dense and gummy? A dense layer at the bottom usually means the meringue and the cream cheese batter were not fully incorporated. Because the cream cheese mixture is heavier, it sinks to the bottom if not folded properly. Ensure you scrape the bottom of the bowl thoroughly when folding.
- Ensure a grease-free bowl: When whipping egg whites, even a speck of egg yolk or a greasy residue on your bowl will prevent the whites from whipping up. Wipe your bowl and whisk with a little lemon juice or white vinegar on a paper towel before starting.
Exciting Flavor Variations
Once you have mastered the classic vanilla and cream cheese base, you can start experimenting with delightful flavor profiles:
- Matcha Green Tea: Sift 1 tablespoon of high-quality culinary grade matcha powder into the batter along with the cake flour. This gives the cupcakes a beautiful vibrant green color and an earthy flavor.
- Chocolate: Substitute 2 tablespoons of the cake flour with high-quality unsweetened cocoa powder. Fold in some mini chocolate chips for an extra treat.
- Lemon Zest: Add the zest of one whole lemon and 1 tablespoon of fresh lemon juice to the cream cheese mixture for a bright, citrusy lift.
- Earl Grey: Steep an Earl Grey tea bag in the milk while you are warming the dairy. Squeeze out the liquid before adding it to the cream cheese. The subtle bergamot flavor pairs wonderfully with the tang of the cheese.
Serving and Storage Suggestions
Japanese Cotton Cheesecake Cupcakes offer two entirely different eating experiences depending on how you serve them.
Warm: If you eat them slightly warm, right after they have finished their gradual cooling process, they are incredibly airy, jiggly, and literally dissolve in your mouth like sweet cream foam.
Chilled: If you place them in an airtight container in the refrigerator overnight, the texture transforms. The cream cheese firms up, and they become denser, creamier, and much closer in texture to a traditional New York cheesecake, albeit still distinctly lighter. Both ways are phenomenal!

To store, keep them in an airtight container in the refrigerator for up to 4 days. You can also freeze them! Wrap each cupcake individually in plastic wrap, then place them in a freezer-safe bag for up to 2 months. Thaw overnight in the fridge before eating.
Conclusion
Creating these Fluffy Japanese Cotton Cheesecake Cupcakes is a deeply rewarding baking project. They are visually stunning with their puffed, golden tops and snowy sugar dusting, and their texture is a genuine culinary triumph. By respecting the temperature, being gentle with your meringue, and understanding the science behind the bake, you can bring a touch of Japanese bakery magic into your own home. Enjoy the process, watch them jiggle, and prepare to amaze anyone lucky enough to try one!
Fluffy Japanese Cotton Cheesecake Cupcakes
Ingredients
Equipment
Method
- Preheat oven to 320°F (160°C). Line a 12-cup muffin tin with paper liners. Boil water for a water bath.
- In a double boiler over simmering water, melt the cream cheese, butter, and milk together until smooth. Remove from heat.
- Whisk the egg yolks and vanilla into the slightly cooled cream cheese mixture. Sift in the cake flour and cornstarch, whisking gently until just combined.
- In a separate clean bowl, beat egg whites until frothy. Add cream of tartar. Gradually add granulated sugar while beating on medium speed until soft peaks form.
- Gently fold one-third of the meringue into the cream cheese batter to lighten it. Then, fold this mixture back into the remaining meringue until no white streaks remain. Do not overmix.
- Divide the batter evenly among the muffin liners. Tap the tin gently on the counter to release air bubbles.
- Place the muffin tin inside a larger roasting pan. Carefully pour boiling water into the roasting pan until halfway up the sides of the muffin tin.
- Bake at 320°F (160°C) for 25 minutes. Reduce temperature to 280°F (140°C) and bake for another 10-15 minutes until golden.
- Turn off the oven, prop the door open slightly, and let cool inside for 15 minutes to prevent sinking. Remove from water bath and cool completely.
- Dust generously with powdered sugar before serving.