Japanese Cotton Cheesecake Cupcakes
Fluffy Japanese Cotton Cheesecake Cupcakes: A Cloud-Like Dessert Experience
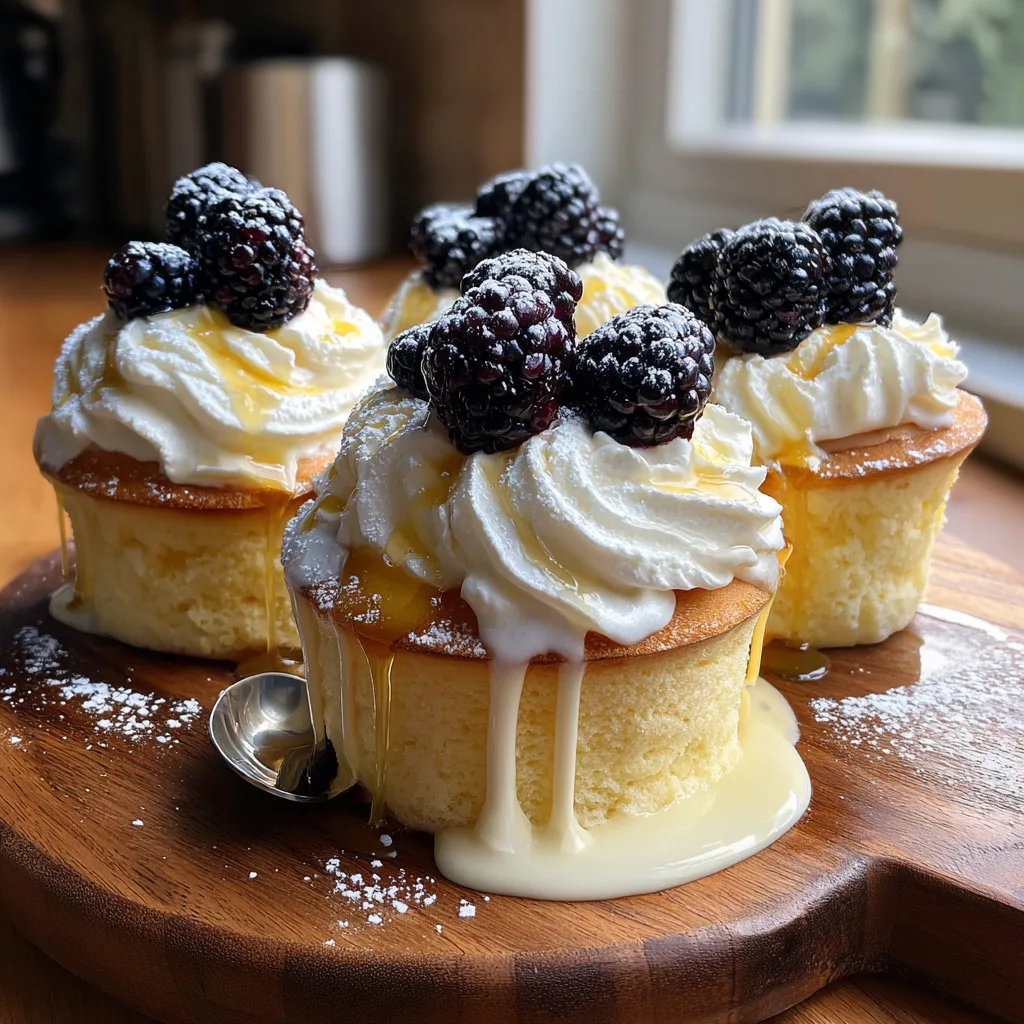
Welcome to the ultimate guide on creating one of the most ethereal, delicate, and universally beloved desserts in the baking world: Fluffy Japanese Cotton Cheesecake Cupcakes. If you have ever scrolled through social media and been mesmerized by videos of jiggly, cloud-like cakes that seem to defy gravity, you are already familiar with the magic of Japanese cotton cheesecake. Today, we are taking that classic, towering souffle-style cake and transforming it into elegant, individual-sized cupcake portions. Crowned with a generous swirl of freshly whipped cream, a dusting of powdered snow-like sugar, and a single, jewel-toned blackberry, these cupcakes are nothing short of a culinary masterpiece.
Traditional dense, New York-style cheesecakes are rich, heavy, and intensely decadent. Japanese cotton cheesecake, on the other hand, is a brilliant hybrid. It marries the tangy, creamy flavor profile of a traditional cream cheese dessert with the feather-light, airy, and porous texture of a French chiffon cake or souffle. Baking them in a cupcake or muffin tin not only cuts down on the intimidating baking time of a full-sized cake, but it also creates the perfect built-in portion control. In this comprehensive, step-by-step article, we will uncover all the scientific baking secrets, ingredient nuances, and expert techniques required to achieve that signature “jiggle” and melt-in-your-mouth texture right in your own home kitchen.
Why You Will Fall in Love with This Cotton Cheesecake Cupcake Recipe
There are a multitude of reasons why this specific recipe will become your new obsession and a staple in your dessert repertoire. First and foremost is the textural experience. When you take a bite of these Japanese cotton cheesecake cupcakes, the crumb literally dissolves on your tongue. It is an incredibly sophisticated texture that feels light and refreshing, making it the perfect ending to a heavy meal. Because they are not overly sweetened, you can comfortably enjoy an entire cupcake without feeling weighed down.
Secondly, the presentation is absolutely breathtaking. Baking these in individual portions allows the sides to develop a beautiful, pale golden sponge texture, while the tops puff up and brown slightly. By skipping traditional paper liners (or using parchment strips that are carefully peeled away), you reveal the gorgeous, porous sides of the cake. Topped with stark white, softly whipped cream and a dark, contrasting blackberry, these cupcakes look like they belong in the display case of a high-end Tokyo patisserie.
Furthermore, baking cotton cheesecake as cupcakes mitigates one of the biggest fears home bakers have with this dessert: the dreaded center collapse. Full-sized cotton cheesecakes are notorious for deflating or cracking wildly if the oven temperature is even slightly off. Because these cupcakes have a much smaller surface area and volume, the structure sets much faster, making them significantly more forgiving and less prone to dramatic sinking. It is the perfect entry point for beginners wanting to conquer the souffle cheesecake technique.
The Essential Ingredients for Japanese Cotton Cheesecake
Achieving the perfect fluffy texture relies heavily on the quality and temperature of your ingredients, as well as the specific ratios. Every single component here serves a vital structural purpose. Let’s break down exactly what you need.
- – 1 block (8 ounces) full-fat cream cheese: This must be softened to room temperature. Full-fat is absolutely necessary for the correct mouthfeel and flavor. Do not use whipped cream cheese or low-fat varieties, as the water content will ruin the batter.
- – 3 tablespoons unsalted butter: Also softened. Butter adds richness and helps create a tender crumb.
- – 1/4 cup whole milk: Used to thin out the cream cheese and butter mixture into a smooth, liquid base.
- – 4 large eggs (separated into yolks and whites): The absolute backbone of this recipe. The yolks provide richness and color, while the whites will be whipped into a meringue to physically lift the batter and create the fluffy texture. They must be at room temperature.
- – 1/4 cup cake flour: Cake flour has a lower protein content than all-purpose flour, which means less gluten development. Less gluten equals a softer, more delicate cake.
- – 1 tablespoon cornstarch: Works in tandem with the cake flour to further soften the flour’s proteins and add structure to the delicate crumb.
- – 1/2 cup finely granulated sugar (divided): You will use a small amount in the cheese mixture and the majority to stabilize the egg white meringue. Superfine or caster sugar is best because it dissolves quickly.
- – 1 teaspoon pure vanilla extract: For a warm, aromatic flavor that complements the tang of the cheese.
- – 1/4 teaspoon cream of tartar: An acid that stabilizes the egg whites, ensuring your meringue reaches the proper volume and doesn’t collapse during folding.
- – 1 tablespoon fresh lemon juice: Adds a bright, subtle citrus note that enhances the cream cheese flavor.
- – 1 cup heavy whipping cream (for topping): Whipped to soft peaks for the garnish.
- – 2 tablespoons powdered sugar (for topping and dusting): Sweetens the cream and provides a snowy finish.
- – 12 fresh blackberries: For the perfect tart, juicy, and elegant garnish.
Step-by-Step Instructions: Mastering the Technique
The secret to Japanese cotton cheesecake lies almost entirely in the technique: creating a smooth cheese base, whipping a flawless meringue, and marrying the two together without knocking out the air. Follow these numbered steps meticulously.
- Prepare the Equipment and Water Bath: Preheat your oven to 320°F (160°C). Grease a standard 12-cup muffin tin very thoroughly with butter, or line it with parchment paper strips (avoid standard corrugated paper liners if you want smooth sides). Find a large roasting pan that the muffin tin can sit inside—this will be for your water bath (bain-marie). Boil a kettle of water.
- Melt the Base: Create a double boiler by placing a heatproof bowl over a pot of gently simmering water. Add the cream cheese, butter, and whole milk to the bowl. Whisk constantly until the ingredients are completely melted together, velvety smooth, and free of any lumps. Remove from the heat and let it cool for 5 minutes.
- Incorporate Yolks and Dry Ingredients: Once the cheese mixture has cooled slightly (so it doesn’t scramble the eggs), whisk in the 4 egg yolks one at a time until fully incorporated. Whisk in the vanilla extract and lemon juice. Sift the cake flour, cornstarch, and 2 tablespoons of the granulated sugar into the bowl. Whisk gently just until no dry streaks remain. Set this batter aside.
- Whip the Meringue: In a separate, impeccably clean metal or glass bowl, use an electric hand mixer to beat the 4 egg whites on medium speed until they become frothy. Add the cream of tartar. Gradually stream in the remaining granulated sugar, about a tablespoon at a time, while continuing to whip. Whip until you reach soft to medium peaks. The meringue should flop over gently at the tip when you lift the beaters. Do not overwhip to stiff peaks, or the batter will be difficult to fold and will crack in the oven.
- The Folding Process: This is the most crucial step. Take one-third of the meringue and add it to the cream cheese batter. Use a whisk to gently mix it in—this lightens the base and prepares it for the rest of the whites. Next, add the remaining meringue in two batches, using a rubber spatula to carefully fold it in. Scrape the bottom of the bowl and fold the batter over itself. Stop the moment no white streaks remain. Do not overmix!
- Portion the Batter: Divide the airy batter evenly among the prepared muffin cups, filling them nearly to the top. Tap the muffin tin gently on the counter twice to release any large trapped air bubbles.
- Bake in a Water Bath: Place the muffin tin inside the large roasting pan. Carefully pour the boiling water from your kettle into the roasting pan until it reaches halfway up the sides of the muffin tin. Carefully transfer the whole setup to the oven.
- The Baking Schedule: Bake at 320°F (160°C) for 20 minutes. Then, reduce the oven temperature to 280°F (140°C) and bake for an additional 15 minutes. The tops should be a light golden brown and puffed up beautifully.
- Gradual Cooling: Do not remove the cupcakes immediately! Turn the oven off and crack the oven door open slightly (you can prop it with a wooden spoon). Let the cupcakes sit in the cooling oven for 15-20 minutes. This gradual temperature change prevents them from collapsing drastically.
- Chill and Top: Remove the tin from the water bath and let the cupcakes cool completely to room temperature. Carefully remove them from the tin. Refrigerate them for at least 2 hours to set the crumb. Before serving, whip the heavy cream with powdered sugar to stiff peaks. Pipe a generous swirl onto each cupcake, top with a blackberry, and dust with extra powdered sugar.
The Science of the Water Bath (Bain-Marie)
You might be wondering if the water bath is truly necessary for cupcakes. The answer is an emphatic yes. A water bath serves two critical functions in baking a souffle cheesecake. First, water cannot exceed 212°F (100°C). By surrounding the muffin tin with water, you insulate the delicate batter from the harsh, direct heat of the oven elements. This ensures a slow, even, and gentle bake, preventing the outer edges from overcooking and becoming rubbery before the center has time to set.
Secondly, the steaming water creates a highly humid environment inside the oven. This ambient moisture prevents the top crust of the cupcakes from drying out and setting too quickly. If the top crust sets while the inside is still trying to expand, the pressure will cause the top to rupture and crack. The steam keeps the surface elastic, allowing the cupcakes to rise beautifully and smoothly.
Expert Troubleshooting: Why Did My Cheesecake Deflate?
Making Japanese cotton cheesecake is a learning process, and even experienced bakers encounter hiccups. The most common issue is the cupcakes puffing up beautifully in the oven, only to shrivel and deflate into dense pucks once removed. While a slight deflation is totally normal for any souffle-based dessert, a complete collapse points to a few specific culprits.
1. The Meringue Was Over-Whipped or Under-Whipped: If you whip the egg whites to stiff, rigid peaks, they lose their elasticity. When they try to expand in the oven, they break, causing the structure to fall. If they are under-whipped, they lack the structural integrity to hold the batter up. You are looking for the “bird’s beak”—a soft, drooping peak.
2. Aggressive Folding: If you mix the meringue into the heavy cream cheese base too vigorously, you will knock out all the microscopic air bubbles you just spent time whipping into the egg whites. Use a large spatula, cut down the middle, and fold the bottom over the top gently.
3. Thermal Shock: Pulling the cupcakes straight from a hot oven into a cool kitchen causes the air pockets inside the cake to contract rapidly, collapsing the structure. The gradual cooling method (leaving them in the turned-off oven with the door cracked) is non-negotiable for maintaining that fluffy height.
Flavor Variations and Creative Toppings
Once you have mastered the foundational vanilla and lemon recipe, you can easily alter the flavor profile to suit different seasons and palates. For an authentic Asian bakery experience, try making Matcha Cotton Cheesecake Cupcakes. Sift 1 tablespoon of high-quality culinary grade matcha powder in with your cake flour and cornstarch. The earthy, slightly bitter green tea flavor pairs magnificently with the sweet cream cheese.
If you are a chocolate lover, you can substitute 2 tablespoons of the cake flour with high-quality Dutch-processed cocoa powder. You can also melt 2 ounces of dark chocolate into the butter and cream cheese mixture during the first step. Top the chocolate versions with a dusting of cocoa powder and a fresh raspberry.
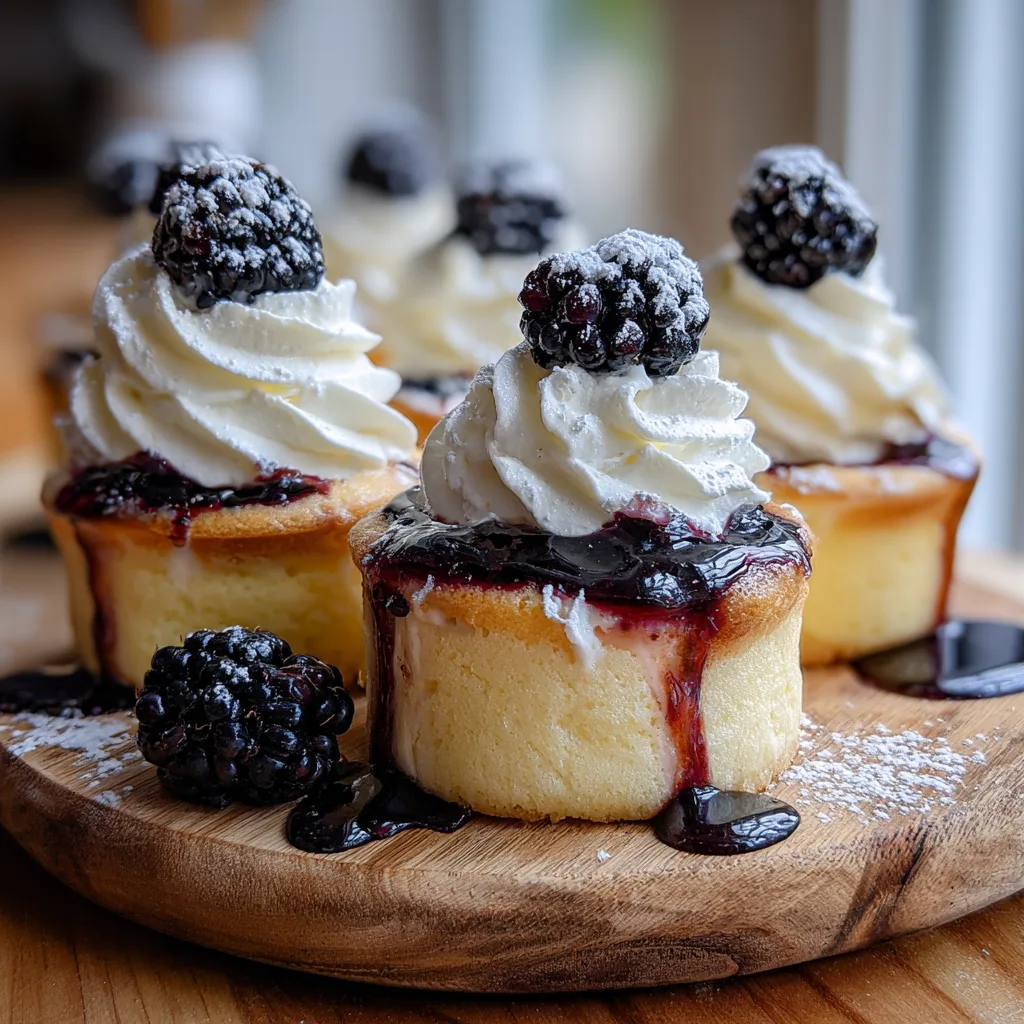
As for toppings, the whipped cream and blackberry are classic, but the possibilities are endless. You can top them with a dollop of tangy lemon curd, a drizzle of salted caramel sauce, or a spoonful of fresh strawberry compote. Because the base cake is relatively low in sugar, it can handle a sweeter topping without becoming cloying.
Storage and Serving Suggestions
Unlike standard cupcakes which are best served at room temperature, Japanese cotton cheesecake cupcakes are exponentially better when served chilled. After baking and cooling, place them in an airtight container in the refrigerator for at least 4 hours, or ideally overnight. The chilling process allows the cream cheese flavor to mature and deepen, and it helps the sponge texture firm up into that signature melt-in-the-mouth consistency.
If you have leftovers, they can be stored in the refrigerator for up to 4 days. Wait to pipe the whipped cream and add the fresh fruit until right before serving, as the whipped cream can weep and the berry juices can bleed into the cake if left sitting in the fridge for multiple days. Enjoy these delicate treats alongside a hot cup of Earl Grey tea or a dark roast coffee for an unforgettable dessert experience!
Fluffy Japanese Cotton Cheesecake Cupcakes
Ingredients
Equipment
Method
- Preheat oven to 320°F (160°C). Grease a 12-cup muffin tin well. Place a large roasting pan in the oven and boil water for a water bath.
- Over a double boiler, melt the cream cheese, butter, and milk together, whisking until smooth and lump-free. Remove from heat and cool slightly.
- Whisk the egg yolks, vanilla, and lemon juice into the warm cheese mixture. Sift in the cake flour, cornstarch, and 2 tbsp sugar. Whisk gently until just combined.
- In a clean bowl, whip egg whites until frothy. Add cream of tartar. Gradually add the 6 tbsp of sugar, whipping until soft to medium peaks form.
- Gently fold the meringue into the cream cheese batter in three additions, using a spatula to carefully fold until no white streaks remain. Do not overmix.
- Divide the batter evenly into the prepared muffin tin.
- Place the muffin tin into the roasting pan in the oven. Carefully pour boiling water into the roasting pan until halfway up the muffin tin sides.
- Bake at 320°F for 20 minutes, then lower the temperature to 280°F and bake for 15 more minutes until golden on top.
- Turn the oven off, crack the door slightly, and let the cupcakes cool inside for 15 minutes to prevent sinking.
- Remove from water bath, cool completely, and chill in the fridge for 2 hours. Whip heavy cream with powdered sugar, pipe onto cupcakes, top with a blackberry, and dust with powdered sugar.