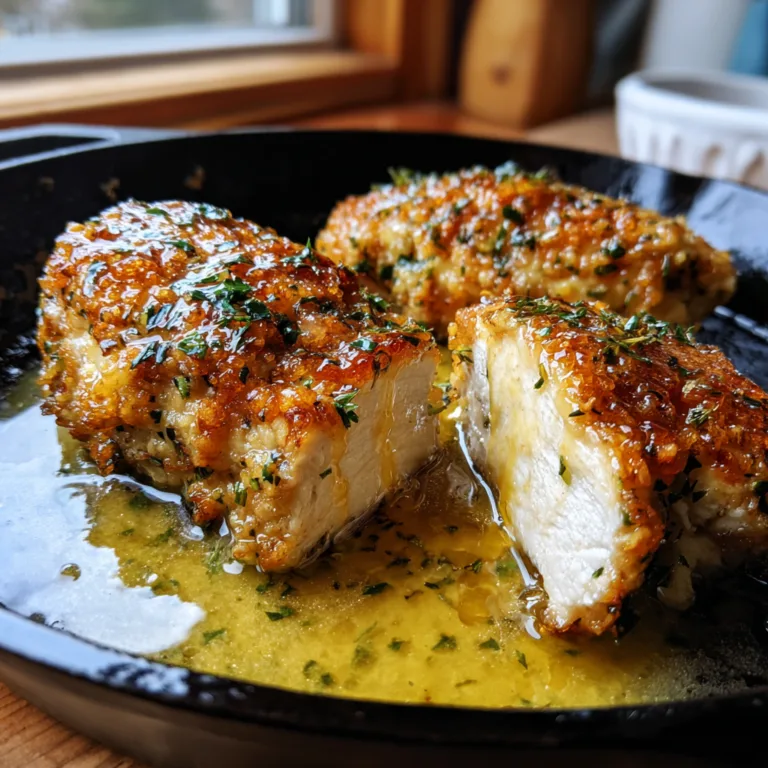
Dill Pickle Parmesan Chicken
Crispy Dill Pickle Parmesan Chicken: The Ultimate Tangy Comfort Food
If you have ever found yourself craving something that is equally savory, crispy, and wonderfully tangy, then this Crispy Dill Pickle Parmesan Chicken is about to become a permanent fixture in your weekly dinner rotation. Melding the classic comfort of a perfectly golden, parmesan-crusted chicken breast with the bright, zesty, and unmistakable flavor of dill pickles, this dish is a masterclass in flavor and texture contrast. There is a reason why pickle-flavored everything has taken the culinary world by storm; the acidity of the pickle juice cuts through rich, fried, or breaded foods flawlessly, creating a balanced bite that keeps you coming back for more.
This comprehensive guide will take you through every single step required to master this recipe, from understanding why a pickle juice brine is the secret to the most tender poultry you will ever eat, to achieving that elusive, shatteringly crisp parmesan crust. We will also dive deep into the creamy, herbaceous dill sauce that crowns this masterpiece, tying the whole dish together. Whether you are cooking for a family of pickle enthusiasts or simply looking to elevate your standard chicken breast routine, this detailed recipe is everything you need.
Why You Will Fall in Love With This Recipe
It is easy to get stuck in a rut when it comes to cooking chicken. Baked, grilled, or pan-fried with basic seasonings can only remain exciting for so long. Here is why this Crispy Dill Pickle Parmesan Chicken stands out from the crowd:
- Incredible Texture Contrast: The exterior features a heavy crunch from a combination of panko breadcrumbs and grated Parmesan cheese, while the interior remains incredibly juicy thanks to the brining process. The creamy sauce on top adds a luxurious, velvety finish.
- Bold, Unapologetic Flavor: Forget bland poultry. The pickle juice infuses the meat from the inside out, while the fresh dill and tangy pickles on top double down on that signature zesty profile.
- Pantry-Friendly Ingredients: Despite its gourmet appearance, this recipe relies on everyday staples. If you have chicken, a jar of pickles, mayonnaise, and some basic breading ingredients, you are already halfway there.
- Crowd-Pleasing Appeal: Kids love the crispy chicken, and adults appreciate the nuanced, tangy flavor profile. It is a versatile dish that works just as well for a casual weeknight dinner as it does for a weekend gathering.

The Magic of the Pickle Juice Brine
Before we even discuss the breading or the sauce, we must talk about the most crucial step of this recipe: the pickle juice brine. Brining chicken is a well-known culinary technique used to introduce moisture and flavor into lean meats. Traditionally, a brine is a solution of salt, water, and perhaps some sugar and aromatics. However, when you buy a jar of dill pickles, you are purchasing a ready-made, highly flavorful brining liquid.
Pickle juice contains water, vinegar, salt, garlic, dill, and various spices. When you submerge chicken breasts in this liquid, the salt works to break down the muscle proteins, allowing the meat to absorb and retain more moisture during the cooking process. Simultaneously, the vinegar tenderizes the meat, and the dill and garlic infuse it with a deep, savory tang. Even a brief 30-minute soak can drastically improve the texture and taste of your chicken, making it virtually foolproof against drying out in the pan.
Ingredients You Will Need
To ensure your dish turns out perfectly, gather the following ingredients. Quality matters, especially when dealing with a recipe that relies heavily on a specific flavor profile like dill pickles.
For the Chicken and Breading:
- – 2 large boneless, skinless chicken breasts (sliced in half horizontally to make 4 cutlets)
- – 1 cup dill pickle juice (reserved from your favorite jar of pickles)
- – 1 cup Panko breadcrumbs (Panko provides a lighter, crispier texture than standard breadcrumbs)
- – 1/2 cup grated Parmesan cheese (freshly grated is best for melting and flavor)
- – 1/2 cup all-purpose flour
- – 2 large eggs
- – 1 teaspoon garlic powder
- – 1/2 teaspoon black pepper
- – 3 tablespoons olive oil or neutral frying oil (for pan-frying)
For the Creamy Dill Topping:
- – 1/3 cup mayonnaise
- – 1/3 cup sour cream (or plain Greek yogurt for a lighter option)
- – 2 tablespoons fresh dill, finely chopped (do not substitute with dried dill here; fresh is essential)
- – 1 tablespoon pickle juice
- – 1/2 cup sliced dill pickles (crinkle-cut or standard chips work perfectly)
- – 1/4 teaspoon garlic powder
- – Salt and pepper to taste
Step-by-Step Instructions
Achieving the perfect crispy chicken requires setting up a proper breading station and managing your heat. Follow these numbered steps for flawless execution.
- Brine the Chicken: Place the chicken cutlets into a large bowl or a resealable plastic bag. Pour the 1 cup of dill pickle juice over the chicken, ensuring all pieces are submerged. Cover or seal, and refrigerate for at least 30 minutes, or up to 4 hours. Do not exceed 4 hours, or the vinegar may begin to break down the meat too much, resulting in a mushy texture.
- Prepare the Creamy Dill Sauce: While the chicken is brining, make your sauce so the flavors have time to meld. In a small bowl, whisk together the mayonnaise, sour cream, fresh dill, 1 tablespoon of pickle juice, and garlic powder. Taste and season with a pinch of salt and pepper. Cover and store in the refrigerator until ready to serve.
- Set Up the Breading Station: You will need three shallow dishes. In the first dish, place the all-purpose flour. In the second dish, beat the two eggs thoroughly. In the third dish, combine the Panko breadcrumbs, grated Parmesan cheese, garlic powder, and black pepper. Mix the dry ingredients well.
- Bread the Chicken: Remove the chicken from the brine and pat each cutlet completely dry with paper towels. This step is crucial; if the chicken is wet, the flour will turn into a paste and the breading will fall off. Dredge a chicken cutlet in the flour, shaking off the excess. Dip it into the beaten eggs, letting the excess drip off. Finally, press the chicken firmly into the Panko-Parmesan mixture, ensuring an even, thick coating on both sides. Place the breaded cutlet on a wire rack or clean plate, and repeat with the remaining pieces.
- Fry to Golden Perfection: Heat the olive oil in a large skillet over medium-high heat. You want the oil hot enough to sizzle when a breadcrumb is dropped in, but not so hot that it smokes. Carefully lay the breaded chicken cutlets in the skillet. Cook for about 4 to 5 minutes per side, or until the crust is a deep golden brown and the internal temperature of the chicken reaches 165 degrees Fahrenheit (74 degrees Celsius).
- Rest and Top: Transfer the cooked chicken to a paper towel-lined plate or a clean wire rack to drain any excess oil. Let the meat rest for 3 minutes. To serve, dollop a generous spoonful of the chilled creamy dill sauce over each hot, crispy chicken breast. Garnish with an overlapping layer of dill pickle slices and an extra sprinkle of fresh dill. Serve immediately.
Tips for the Ultimate Crispy Chicken
Cooking breaded chicken can sometimes be tricky. The breading might fall off, or the crust might burn before the center is cooked. Here are professional tips to ensure success every time:
- Even Thickness is Key: Always slice large chicken breasts in half horizontally, or use a meat mallet to pound them to an even thickness. This ensures that the chicken cooks quickly and evenly, preventing the Parmesan crust from burning while waiting for a thick center to cook through.
- Press the Breading: When coating the chicken in the Panko-Parmesan mixture, use your hands to firmly press the crumbs into the meat. This physical pressure helps the breading adhere tightly to the egg wash.
- Do Not Crowd the Pan: If you put too many chicken breasts in the skillet at once, the temperature of the oil will drop rapidly. Instead of frying and getting crispy, the chicken will steam and absorb the oil, becoming greasy and soggy. Cook in batches if necessary.
- Use a Wire Rack: Letting your breaded chicken rest on a wire rack before cooking, and placing it on a wire rack after cooking, allows air to circulate around the entire piece of meat. This prevents the underside from getting soggy from trapped steam.
Variations and Customizations
One of the best things about this recipe is its versatility. Here are a few ways to tweak the dish to suit your specific dietary needs or flavor preferences:
- Spicy Dill Pickle Chicken: If you love a kick of heat, add a teaspoon of cayenne pepper or hot paprika to the flour dredge. You can also use spicy dill pickles instead of traditional ones, and mix a dash of your favorite hot sauce into the creamy dill topping.
- Air Fryer Method: To make a lighter version of this dish, you can cook the breaded chicken in an air fryer. Spray the breaded cutlets generously with cooking spray. Air fry at 380 degrees Fahrenheit for 12-15 minutes, flipping halfway through, until golden and cooked through.
- Gluten-Free Option: Swap out the all-purpose flour for a gluten-free 1-to-1 baking flour, and use gluten-free Panko breadcrumbs. The recipe works flawlessly with these simple substitutions.
- The Ultimate Pickle Sandwich: Turn this entrée into an incredible chicken sandwich. Place the crispy, sauce-topped chicken breast on a toasted brioche bun with some crisp butter lettuce. It rivals any fast-food chicken sandwich on the market.
Serving Suggestions
Because this chicken dish is so boldly flavored and rich, it pairs best with sides that offer balance. Here are some excellent accompaniments:
- Roasted Baby Potatoes: Toss some halved baby potatoes in olive oil, salt, and pepper, and roast them until crispy. They are perfect for swiping through any extra creamy dill sauce left on your plate.
- Light Side Salad: A simple mixed greens salad with a light lemon vinaigrette cuts through the richness of the fried chicken and creamy sauce.
- Garlic Butter Asparagus: Pan-seared or roasted asparagus adds a vibrant green element to the plate and pairs beautifully with the Parmesan cheese in the chicken’s crust.
- Coleslaw: A vinegar-based coleslaw (rather than a heavy mayo-based one) complements the tangy pickle theme perfectly.
Storage and Reheating
If you have leftovers, store the cooked chicken and the creamy dill sauce in separate airtight containers in the refrigerator for up to 3 days.
To reheat, avoid the microwave, as it will make the breading rubbery and soggy. Instead, preheat your oven or air fryer to 375 degrees Fahrenheit. Place the chicken on a wire rack over a baking sheet and heat for 10-15 minutes until warmed through and re-crisped. Add the cold sauce and pickles only after the chicken has been fully reheated.
Fun Facts and Cultural Context: The Rise of Pickle Mania
Pickling is one of the oldest methods of food preservation, dating back thousands of years to ancient Mesopotamia. Historically, pickling was a necessity for surviving long winters when fresh produce was unavailable. The distinct sour flavor comes from lacto-fermentation or vinegar brines.

In recent years, the humble dill pickle has experienced a massive cultural renaissance. No longer relegated to being a mere side dish or burger topping, dill pickle flavor has been infused into everything from potato chips and popcorn to vodka and ice cream. This obsession makes total culinary sense. Humans are biologically wired to crave foods that hit multiple taste receptors simultaneously—in this case, salt, fat, and acid.
This Crispy Dill Pickle Parmesan Chicken is a celebration of that modern culinary trend, paying homage to the classic Southern technique of brining poultry in leftover pickle juice (a secret long held by famous fast-food chains) while elevating it with a refined, Italian-inspired Parmesan crust. It bridges the gap between casual comfort food and a thoughtfully composed dinner. Enjoy the ultimate tangy crunch!
Crispy Dill Pickle Parmesan Chicken
Ingredients
Equipment
Method
- Place chicken cutlets in a bowl and pour 1 cup of pickle juice over them. Marinate in the fridge for 30 minutes.
- In a small bowl, whisk together mayonnaise, sour cream, fresh dill, 1 tbsp pickle juice, and garlic powder. Refrigerate sauce until needed.
- Set up a breading station: flour in one bowl, beaten eggs in a second, and a mix of panko, parmesan, garlic powder, and pepper in a third.
- Remove chicken from brine and pat completely dry. Dredge in flour, dip in egg, and coat thoroughly in the panko-parmesan mixture.
- Heat olive oil in a large skillet over medium-high heat. Fry chicken for 4-5 minutes per side until golden brown and cooked through (165°F).
- Let chicken rest on a wire rack for 3 minutes. Top with the creamy dill sauce and fresh pickle slices before serving.