📖 B. INTRODUCTION
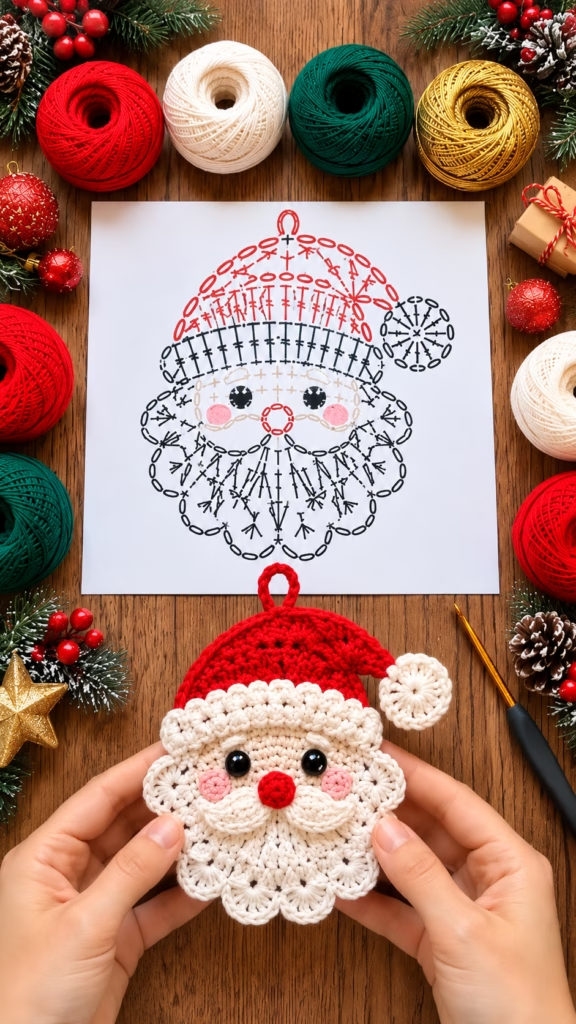
Bring a little handmade magic to your holiday season with this crochet Santa face ornament pattern! With its classic red Santa hat, soft cream-colored face, fluffy white beard, and cheerful rosy cheeks, this festive crochet project is a delightful addition to your Christmas crafting collection.
The finished ornament features a rounded Santa face framed by a scalloped beard, a curved mustache, a textured hat, and a fluffy pom-pom. Black eyes and a bright red nose bring the face to life, while a small hanging loop makes it easy to display on a Christmas tree, decorate a gift, or incorporate into a handmade holiday garland.
This project is especially suitable for crocheters who enjoy working with small decorative pieces, combining basic stitches with simple shaping and surface details. Although the finished design has several layers, most components are crocheted separately and assembled afterward, making it easier to control the shape and placement of each feature.
You can personalize your crochet Santa ornament by changing the hat color, using metallic yarn for festive accents, making the beard longer, or adding a small embroidered smile. Create several ornaments in coordinating colors for a handmade Christmas collection, or attach one to a gift package for a thoughtful seasonal finishing touch.
The instructions below describe an original construction method based on the visible design. Stitch counts, dimensions, and yarn quantities are practical pattern estimates rather than details recovered from the reference image.
🔍 C. MAIN PATTERN OVERVIEW
🎅 What You Will Make
This pattern creates one flat crochet Santa Claus face ornament with a layered, textured appearance.
The main components are:
- 🎩 Santa hat: A red triangular cap with a rounded top and white brim.
- 🤍 Face: A cream-colored circular foundation that supports the facial features.
- 🧔 Beard: A white scalloped section surrounding the lower face.
- 👨 Mustache: Two overlapping cream-white sections positioned around the nose.
- 👀 Eyes: Two black safety eyes or embroidered black eyes.
- 🔴 Nose: A small, raised red crochet circle.
- 🌸 Cheeks: Two small pink crochet circles.
- ⚪ Pom-pom: A white textured circle attached to the end of the hat.
- 🧵 Hanging loop: A short chain loop at the top of the ornament.
The ornament is assembled in layers, with the face acting as the central foundation. The beard and mustache are positioned to create the recognizable Santa silhouette, while the hat and pom-pom complete the festive appearance.
Construction method
The face is crocheted in joined rounds. The hat and beard are worked separately in rows, and the smaller facial details are made individually before being sewn into place.
The finished ornament is not intended to be stuffed like a traditional amigurumi doll. Its layered construction gives it dimension while keeping it lightweight enough for hanging.
🎯 D. SKILL LEVEL
Skill level: Easy to Intermediate
A confident beginner can complete this project after becoming familiar with basic crochet stitches and simple increases. The more challenging parts are shaping the hat, creating an even scalloped beard, and arranging the facial details symmetrically.
Techniques used
- 🧶 Magic ring and chain stitches.
- 🪡 Single crochet and double crochet.
- 🔄 Increasing and decreasing stitches.
- 📐 Crocheting in joined rounds and flat rows.
- 🎨 Changing yarn colors.
- 🧵 Sewing small crochet pieces together.
- ✨ Creating scalloped edges and layered facial details.
- 🪢 Making a hanging loop.
Helpful recommendation: Beginners may replace the magic ring with chain 2 and work the first round into the second chain from the hook.
📏 E. FINISHED SIZE
Using the recommended yarn and hook, the finished ornament should measure approximately:
| Measurement | Approximate size |
|---|---|
| Total height, including hanging loop | 15–17 cm (6–6.7 in) |
| Face and beard width | 11–13 cm (4.3–5.1 in) |
| Face height | 7–8 cm (2.8–3.1 in) |
| Hat height | 5–6 cm (2–2.4 in) |
| Beard depth below face | 3–4 cm (1.2–1.6 in) |
These measurements are estimates. The finished size will vary with yarn thickness, hook size, individual tension, and the amount of overlap between the components.
For a smaller Christmas tree ornament, use finer cotton yarn and a smaller hook. For a larger wall decoration or gift topper, choose thicker yarn and adjust the hook accordingly.
🧮 F. GAUGE
Gauge is not critical for this decorative ornament, but consistent stitches are important for creating a neat face and evenly shaped beard.
With lightweight DK cotton yarn and a 3.0 mm crochet hook, aim for approximately:
- 22 single crochet stitches across 10 cm (4 in).
- 24 rounds of single crochet across 10 cm (4 in) in height.
Work a small swatch if you want to check your tension before beginning.
Important: If your stitches are very loose, the face may look uneven and the stuffing-free ornament may curl. If your stitches are too tight, the fabric may become stiff and difficult to shape.
A slightly firm fabric is ideal because the ornament should hold its shape without stuffing.
🧶 G. REQUIRED YARN AMOUNTS
Use a smooth cotton or cotton-blend yarn that clearly displays stitch definition.
The following quantities are approximate for one ornament.
| Color | Purpose | Estimated amount |
|---|---|---|
| Cream or ivory | Face, mustache, and beard | 20–25 g |
| Christmas red | Hat, nose, and hanging loop | 10–15 g |
| White | Hat brim and pom-pom | 8–12 g |
| Black | Eyes, if embroidered | Less than 1 g |
| Pink | Cheeks | 1–2 g |
Total estimated yarn: Approximately 40–55 g, excluding small differences caused by yarn weight and tension.
Color notes
- 🤍 Use warm ivory for the face and beard if you want a softer appearance than pure white.
- 🔴 Choose a rich Christmas red for the hat and nose.
- ⚪ Use bright white for the hat trim and pom-pom to make them stand out.
- 🌸 Soft pink creates gentle, rosy cheeks.
- ⚫ Black provides a strong contrast for the eyes.
Small leftover yarn pieces are sufficient for the eyes, cheeks, and nose if you prefer to minimize waste.
🧰 H. MATERIALS
Gather the following supplies before beginning.
Crochet supplies
- 🧶 DK-weight cotton yarn in cream, red, white, black, and pink.
- 🪡 3.0 mm crochet hook, or a size that produces firm stitches.
- ✂️ Sharp scissors.
- 🧵 Tapestry needle for sewing components together.
- 📍 Stitch markers.
- 📏 Measuring tape or ruler.
- 🧷 Sewing pins for positioning facial details.
Optional supplies
- 👀 Two 6 mm black safety eyes.
- 🧵 Black embroidery floss if you prefer embroidered eyes.
- 🪢 A small amount of matching yarn for a reinforced hanging loop.
- 🧼 A clean cloth for spot cleaning the finished ornament.
Safety note: Safety eyes contain small parts and are not suitable for young children. If the ornament will be handled by children, embroider the eyes securely instead. Keep loose yarn tails and small components away from babies and pets.
🔤 I. ABBREVIATIONS — US TERMS
The pattern uses standard US crochet terminology.
| Abbreviation | Meaning |
|---|---|
| ch | Chain |
| sl st | Slip stitch |
| sc | Single crochet |
| hdc | Half double crochet |
| dc | Double crochet |
| inc | Increase: work 2 stitches in the same stitch |
| dec | Decrease: work 2 stitches together |
| st / sts | Stitch / stitches |
| MR | Magic ring |
| R | Round |
| RS | Right side |
| rep | Repeat |
| FO | Fasten off |
| x | Repeat the preceding instruction the indicated number of times |
Example: (2 sc, inc) x6 (24) means repeat 2 single crochet stitches followed by an increase six times, producing 24 stitches.
📝 J. NOTES BEFORE YOU BEGIN
1. Work with consistent tension
Keep your stitches firm but comfortable. The ornament should lie reasonably flat without feeling rigid.
2. Mark the beginning of each round
Use a stitch marker to identify the first stitch of the face, nose, cheeks, and pom-pom. This is particularly helpful when working increases.
3. Understand the construction
The face, hat, beard, mustache, and smaller facial pieces are made separately. You will sew them together after checking their positions.
4. Use the right side
Place the most attractive side of every crocheted component facing outward. Keep yarn tails on the back whenever possible.
5. Check the proportions before sewing
Lay all the pieces together before attaching anything permanently. Adjust the hat height, beard depth, and facial details until the design looks balanced.
6. Keep the ornament flat
This is a decorative applique-style project, not a stuffed toy. Avoid adding stuffing unless you intentionally want to modify the design.
7. Make color changes neatly
When changing colors in a round, complete the final yarn-over of the previous stitch with the new color. This creates a cleaner transition.
8. Secure all yarn tails
Weave the ends through several stitches on the back of the ornament. Avoid bulky knots that may create visible bumps.
🪡 K. COMPLETE PATTERN
🤍 1. FACE FOUNDATION
Purpose: The face forms the central foundation of the ornament and supports the eyes, nose, cheeks, mustache, beard, and hat.
Yarn: Cream or ivory.
Quantity: Make 1.
Construction: Crochet in joined rounds.
Face instructions
R1: With cream yarn, make MR and work 6 sc into the ring. Join with a sl st to the first sc. (6)
R2: Ch 1, inc in each st around. Join. (12)
R3: Ch 1, (1 sc, inc) x6. Join. (18)
R4: Ch 1, (2 sc, inc) x6. Join. (24)
R5: Ch 1, (3 sc, inc) x6. Join. (30)
R6: Ch 1, (4 sc, inc) x6. Join. (36)
R7: Ch 1, (5 sc, inc) x6. Join. (42)
R8: Ch 1, (6 sc, inc) x6. Join. (48)
R9: Ch 1, (7 sc, inc) x6. Join. (54)
R10: Ch 1, sc in each st around. Join. (54)
FO, leaving a long sewing tail.
Face finishing
Lay the face flat and gently shape it into a rounded oval if needed. The upper section will be partially covered by the hat, while the lower section will sit behind the beard.
The face should remain relatively flat. Do not add stuffing.
🎩 2. RED SANTA HAT
Purpose: The hat creates the distinctive red triangular cap above Santa’s face.
Yarn: Christmas red.
Quantity: Make 1.
Construction: Work in rows from the top of the hat toward its wider lower edge.
Hat instructions
Ch 2.
Row 1: Work 2 sc in the second ch from the hook. Turn. (2)
Row 2: Ch 1, inc in each st. Turn. (4)
Row 3: Ch 1, inc, 2 sc, inc. Turn. (6)
Row 4: Ch 1, inc, 4 sc, inc. Turn. (8)
Row 5: Ch 1, inc, 6 sc, inc. Turn. (10)
Row 6: Ch 1, inc, 8 sc, inc. Turn. (12)
Row 7: Ch 1, inc, 10 sc, inc. Turn. (14)
Row 8: Ch 1, inc, 12 sc, inc. Turn. (16)
Row 9: Ch 1, inc, 14 sc, inc. Turn. (18)
Row 10: Ch 1, inc, 16 sc, inc. Turn. (20)
Row 11: Ch 1, inc, 18 sc, inc. Turn. (22)
Row 12: Ch 1, inc, 20 sc, inc. Turn. (24)
Row 13: Ch 1, inc, 22 sc, inc. Turn. (26)
Row 14: Ch 1, inc, 24 sc, inc. Turn. (28)
Row 15: Ch 1, inc, 26 sc, inc. Turn. (30)
Row 16: Ch 1, inc, 28 sc, inc. Turn. (32)
FO, leaving a sewing tail.
Hat shaping
The hat should resemble a broad triangular cap with a slightly rounded tip. Lightly block it if necessary, taking care not to stretch the stitches excessively.
Place the narrow end toward the top center of the face. The wide lower edge will be covered by the white brim.
If your hat is too narrow for the face, add additional increase rows, increasing once at the beginning and once at the end of each row.
⚪ 3. WHITE HAT BRIM
Purpose: The brim creates the fluffy white band across the lower edge of the red hat.
Yarn: White.
Quantity: Make 1.
Brim instructions
Ch 33.
Row 1: Sc in the second ch from the hook and in each remaining ch. Turn. (32)
Row 2: Ch 1, sc in each st across. Turn. (32)
Row 3: Ch 1, (3 dc in next st, sl st in next st) x16. (64 dc stitches grouped into 16 scallops, plus 16 slip stitches)
FO, leaving a sewing tail.
Brim placement
Position the brim along the entire lower edge of the red hat. The scalloped edge should face downward, toward Santa’s face.
Sew the straight edge to the hat. Keep the lower scallops visible and avoid pulling the yarn too tightly.
The finished brim should look soft and textured rather than like a flat strip.
🧔 4. WHITE SCALLOPED BEARD
Purpose: The beard frames Santa’s face and creates the rounded, fluffy silhouette seen in the reference.
Yarn: Cream or ivory.
Quantity: Make 1.
Construction: Work in rows, then add scallops along the lower edge.
Beard foundation
Ch 37.
Row 1: Sc in the second ch from the hook and in each remaining ch. Turn. (36)
Row 2: Ch 1, sc in each st across. Turn. (36)
Row 3: Ch 1, (4 sc, inc) x7, sc in last st. Turn. (43)
Row 4: Ch 1, sc in each st across. Turn. (43)
Row 5: Ch 1, (5 sc, inc) x7, sc in last st. Turn. (50)
Row 6: Ch 1, sc in each st across. Turn. (50)
FO, leaving a long sewing tail.
Scalloped lower edge
Join cream yarn at one lower corner.
Border: (3 dc in next st, sl st in next st) across the lower edge, adjusting the final repeat to finish neatly at the opposite corner.
The foundation has 50 stitches, so work 25 scallops, each using 2 foundation stitches.
FO and weave in the short border tail.
Beard placement
Position the beard beneath the face so that it extends beyond the lower and side edges of the face.
The upper edge should sit behind the face, while the scalloped lower edge remains fully visible.
Pin the beard in place before sewing. Check that the left and right sides have a similar amount of overhang.
👨 5. CURLY MUSTACHE
Purpose: The mustache creates the white curls on either side of Santa’s nose.
Yarn: Cream or ivory.
Quantity: Make 2 mirrored pieces.
Mustache piece instructions
Make a magic ring.
R1: Work 6 sc into the ring. Join with a sl st. (6)
R2: Ch 1, inc in each st around. Join. (12)
R3: Ch 1, (1 sc, inc) x6. Join. (18)
FO, leaving a long sewing tail.
Shape each curl
Flatten each small circle and fold it slightly so that it forms a curved, rounded lobe rather than a complete disk.
Using the sewing tail, take a few small stitches through the inner edge to hold the curved shape.
Make two pieces. Position them symmetrically beneath the eyes, with their inner edges almost touching in the center.
The mustache pieces should overlap the upper portion of the beard slightly. Leave enough space between them for the red nose.
👃 6. RED CROCHET NOSE
Purpose: A small raised nose provides the main red accent on Santa’s face.
Yarn: Christmas red.
Quantity: Make 1.
Nose instructions
R1: Make MR and work 6 sc into the ring. Join. (6)
R2: Ch 1, inc in each st around. Join. (12)
FO, leaving a long sewing tail.
Nose finishing
Pull the magic ring closed firmly. The nose should remain a small rounded disk.
Position it centrally between the two mustache pieces. Sew around the outer edge, keeping the stitches secure and the nose slightly raised.
Do not add stuffing; the yarn texture itself provides sufficient dimension for this small decorative feature.
👀 7. BLACK EYES
Purpose: The eyes give Santa a cheerful expression.
Yarn: Black, if embroidering.
Quantity: Make 2.
Option A: Safety eyes
Use two 6 mm black safety eyes.
Before attaching them, mark their positions on the face. They should sit at approximately the same height and be separated by about 2.5–3 cm (1–1.2 in), depending on your tension and finished face size.
Install the eyes according to the manufacturer’s instructions before sewing the face to the beard.
Option B: Embroidered eyes
Using black embroidery yarn, create two small, solid oval eyes with closely spaced satin stitches.
Work several passes in the same direction to form each oval. Secure the yarn firmly on the back.
Placement notes
Position the eyes above the mustache and on either side of the face’s vertical centerline.
Use pins to compare the distance from each eye to the edge of the face. Make adjustments before securing embroidered eyes permanently.
🌸 8. PINK CHEEKS
Purpose: The cheeks add a soft, rosy color to Santa’s face.
Yarn: Pink.
Quantity: Make 2.
Cheek instructions
R1: Make MR and work 6 sc into the ring. Join. (6)
R2: Ch 1, inc in each st around. Join. (12)
FO, leaving a sewing tail.
Cheek placement
Sew one cheek beneath each eye and slightly outward from the nose.
Keep both cheeks at the same height. The top edge of each cheek should remain below the eye, while the inner edge should sit near the outer edge of the mustache.
The pink circles should be visible without being so large that they dominate the face.
⚪ 9. WHITE HAT POM-POM
Purpose: The pom-pom completes the Santa hat.
Yarn: White.
Quantity: Make 1.
Pom-pom instructions
R1: Make MR and work 6 sc into the ring. Join. (6)
R2: Ch 1, inc in each st around. Join. (12)
R3: Ch 1, (1 sc, inc) x6. Join. (18)
FO, leaving a long sewing tail.
Create the textured finish
For a simple flat pom-pom, use the crocheted circle as it is.
For a fuller appearance, make two identical circles, place them together, and join around the edge with white slip stitches. Add a tiny amount of stuffing before closing if desired.
This second option creates a thicker pom-pom and requires an additional piece of yarn and a small amount of stuffing.
Placement
Attach the pom-pom to one lower corner of the hat. Position it so that it rests beside the white brim rather than covering the entire brim.
A slight downward tilt creates the familiar floppy Santa-hat appearance.
🪢 10. HANGING LOOP
Purpose: The loop allows the finished ornament to hang on a Christmas tree, hook, or decorative garland.
Yarn: Christmas red.
Quantity: Make 1.
Loop instructions
Ch 14.
Sl st into the first ch to form a loop, taking care not to twist the chain.
FO, leaving long tails at both ends.
Attachment
Position the loop at the top center of the hat. Sew both ends securely to the back of the ornament, using several reinforcing stitches.
Test the loop gently before hanging the ornament. If it will support a heavier decoration, use a longer yarn tail and reinforce the attachment over a wider area.
🎨 L. STYLING / ASSEMBLY / STABILITY / FINAL SHAPING
🧵 1. Recommended assembly order
Follow this sequence to avoid having to remove pieces later.
- Prepare the face. Finish the cream face foundation and weave in all unnecessary tails.
- Attach the eyes. Install safety eyes or embroider them while the face is easy to handle.
- Position the hat. Place the red cap at the top of the face, ensuring that its center aligns with the face’s centerline.
- Attach the brim. Sew the white brim to the lower edge of the hat, keeping the scallops visible.
- Add the beard. Place the beard behind the face and sew the upper edge securely.
- Attach the cheeks. Match their height and distance from the eyes.
- Sew on the mustache. Place the two cream curls below the eyes, leaving a central space for the nose.
- Attach the nose. Position it between the mustache pieces.
- Add the pom-pom. Secure it to the end of the hat.
- Attach the hanging loop. Reinforce the connection at the back of the hat.
- Finish the back. Weave in loose ends and inspect the ornament for uneven edges.
🎯 2. Achieving the correct Santa silhouette
The appearance of this project depends on the relationship between the hat, face, and beard.
- 🎩 The red hat should be wider at the bottom than at the top.
- ⚪ The white brim should run across the full lower edge of the hat.
- 🤍 The face should remain visible between the hat and the mustache.
- 🧔 The beard should extend beyond the cheeks and create a scalloped lower edge.
- 👨 The mustache should frame the nose without completely covering the cheeks.
- ⚪ The pom-pom should sit beside the brim and remain clearly visible.
Avoid pulling the sewing yarn too tightly, especially when attaching the face to the beard. Excessive tension can distort the circular face and make the beard curl inward.
📐 3. Stability and structure
Because the ornament is flat, it does not need internal support or a structural insert.
To keep it flat:
- Sew the main components evenly around their attachment edges.
- Avoid bulky knots behind the face.
- Secure the hanging loop at two points.
- Smooth the beard and hat with your fingers before finishing.
- If the ornament curls, gently reshape it on a flat surface.
For cotton yarn, light blocking may help even out the shape. Follow the yarn manufacturer’s care guidance and avoid excessive heat.
✅ 4. Final shaping checklist
Before displaying your ornament, check the following:
- ✅ The red hat is centered over the face.
- ✅ The white brim covers the full lower edge of the hat.
- ✅ The beard has a neat, rounded silhouette.
- ✅ Both eyes are aligned and securely attached.
- ✅ The pink cheeks are positioned symmetrically.
- ✅ The mustache curls frame the red nose.
- ✅ The nose sits in the center of the face.
- ✅ The pom-pom is securely attached.
- ✅ The hanging loop is reinforced.
- ✅ All loose ends are hidden on the back.
- ✅ No component has been pulled out of shape during sewing.
- ✅ The ornament hangs without twisting excessively.
🎨 5. Personalization ideas
Once you are comfortable with the basic pattern, you can adapt it for different Christmas decorations.
Classic Santa: Use red, white, cream, pink, and black for the traditional festive appearance.
Snowy Santa: Use bright white yarn for the beard and brim, paired with a deep burgundy hat.
Rustic Christmas: Choose natural ivory cotton, dark red yarn, and a jute-style hanging cord.
Sparkling Santa: Add a strand of metallic gold yarn to the hat brim or pom-pom.
Mini gift ornament: Use finer yarn and a smaller hook to create a compact Santa face for gift wrapping.
Garland decoration: Make several Santa faces in different sizes and attach them to a long crocheted chain.
💡 M. HELPFUL CROCHET TIPS
💡 1. Keep the face flat
The face is the foundation of the entire ornament. If it curls or becomes uneven, check your tension and confirm that each increase round has the correct stitch count.
💡 2. Use stitch markers for symmetry
Mark the top center and lower center of the face before assembling the hat, nose, and beard. These reference points make it easier to position the features evenly.
💡 3. Pin everything before sewing
Arrange the hat, brim, beard, mustache, and cheeks on the face before attaching them. Take a photograph of the arrangement if you need to move the pieces around.
💡 4. Choose the right yarn texture
Smooth cotton yarn produces clearly defined stitches and a neat decorative surface. Very fuzzy yarn may hide the details of the beard and brim.
💡 5. Avoid bulky facial features
The mustache and cheeks should be slightly raised but not heavily stuffed. Keeping them relatively flat helps preserve the applique-style appearance.
💡 6. Make the nose stand out
Use a slightly thicker yarn or a smaller hook for firm stitches if your nose looks too flat. Secure the outer edge carefully to maintain its rounded shape.
💡 7. Keep the beard scallops consistent
Work the same number of stitches into each scallop. If the border looks uneven, check that you have placed one slip stitch between each group of three double crochet stitches.
💡 8. Secure the hanging loop properly
Do not rely on a single loose stitch. Sew both ends into the back of the hat with several passes of yarn, then test the loop gently.
💡 9. Use embroidered eyes for child-friendly decor
Embroidered eyes eliminate detachable plastic parts. Make several tight passes and secure both ends on the reverse side.
💡 10. Check the back before finishing
A tidy back is particularly important for a flat ornament. Weave in tails neatly and avoid sewing through the front layer unless the stitches will be concealed by another component.
🧼 N. CARE INSTRUCTIONS
Proper care helps maintain the ornament’s shape and keeps its colors looking fresh throughout the holiday season.
🧽 Cleaning
Spot-clean the ornament with a soft cloth lightly dampened with cool water and mild detergent. Avoid rubbing the facial details vigorously.
If you used safety eyes, decorative inserts, or metallic yarn, follow the care recommendations for those materials as well.
🌬️ Drying
Allow the ornament to air-dry completely on a flat surface. Gently reshape the beard and hat while damp, if necessary.
Do not hang the ornament while it is wet, as its weight may stretch the hanging loop or distort the crocheted components.
📦 Storage
At the end of the holiday season, store the ornament in a clean, dry container away from direct sunlight, moisture, and sharp objects.
Place it flat rather than folding or compressing the beard and pom-pom. Tissue paper can help preserve the shape of the smaller decorative details.
🎄 Final thoughts
Your handmade crochet Santa face is a festive little project that combines simple crochet shapes with carefully placed details to create a recognizable Christmas character. Whether you make one for your tree, several for a holiday garland, or a collection to give as handmade gifts, you can personalize every ornament with your favorite yarn colors and finishing touches.
Enjoy the process, experiment with the design, and share your finished Santa ornament with fellow crochet lovers!
❓ R. FAQ
❓ 1. Is this crochet Santa ornament suitable for beginners?
Yes, an adventurous beginner can complete it with basic knowledge of single crochet, increases, chains, and sewing crochet pieces together. The most challenging parts are shaping the hat and arranging the facial features evenly.
❓ 2. Can I use a different yarn weight?
Yes. You can use finer cotton yarn for a smaller ornament or thicker yarn for a larger decoration. Adjust the hook to match the yarn and keep your stitches firm enough to maintain the shape.
❓ 3. Do I need to stuff the Santa face?
No. The face, beard, hat, and facial details are designed as flat or lightly layered crochet components. Stuffing is optional for the pom-pom if you want a fuller appearance.
❓ 4. Can I make this ornament without safety eyes?
Absolutely. Embroidered black eyes are an excellent alternative. They also avoid the detachable small parts associated with safety eyes.
❓ 5. How can I make the beard look fluffier?
Use a soft, smooth yarn in cream or white and keep the scallops consistent. You can also add an additional scalloped row along the lower edge, provided you adjust the attachment and finished dimensions accordingly.
❓ 6. Why does my face curl at the edges?
Curling may result from tight tension, an unsuitable hook size, or uneven increases. Check your stitch counts, try a slightly larger hook, and gently reshape the piece on a flat surface.
❓ 7. Can I use this Santa face as a Christmas tree ornament?
Yes. The hanging loop is designed for that purpose. Reinforce its attachment carefully and ensure the ornament is appropriate for the age of anyone who will handle it.
❓ 8. Can I change the hat and beard colors?
Yes. The pattern is easy to personalize. Try burgundy, forest green, or a snowy white hat, or use ivory for a softer beard. Keep the facial details in contrasting colors so Santa’s expression remains clear.