Recette de tarte brownie fondante
The Ultimate Decadent Fudgy Brownie Pie: A Chocoholic’s Dream Come True
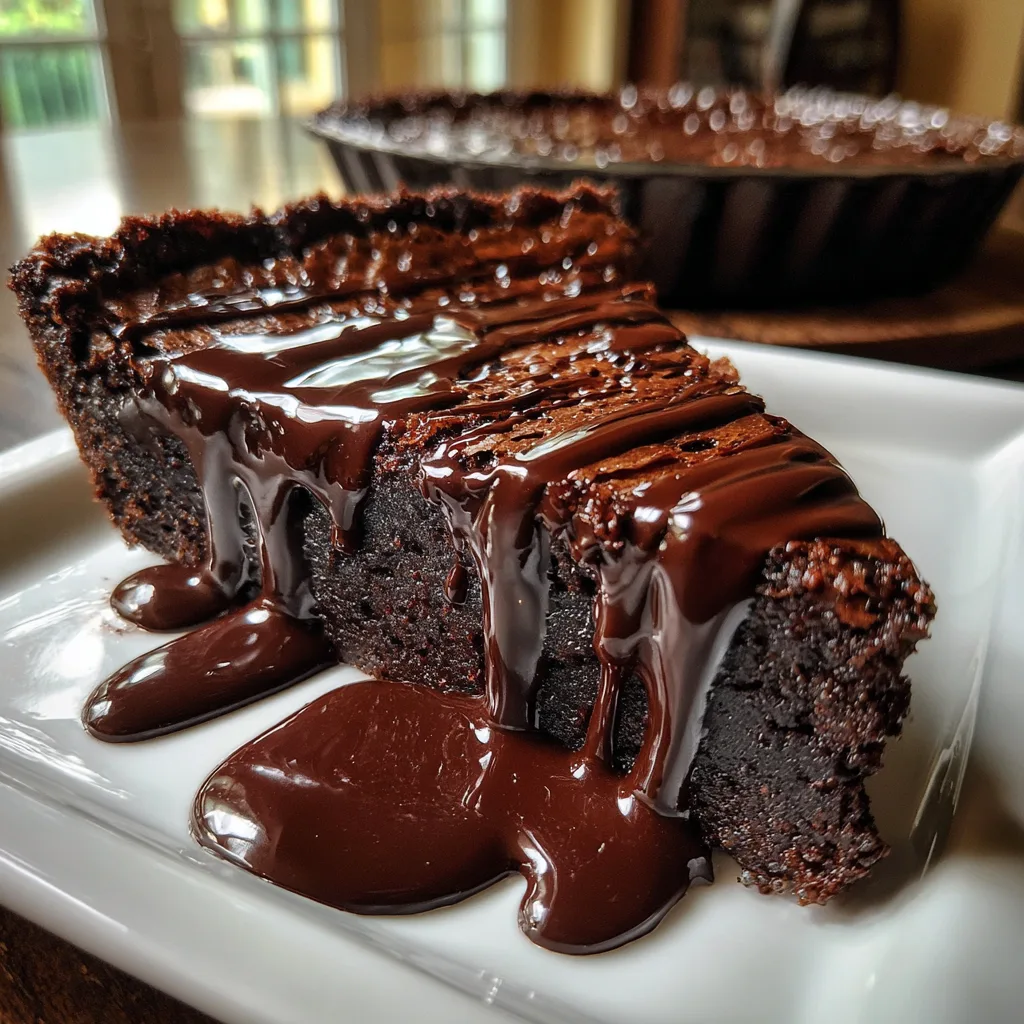
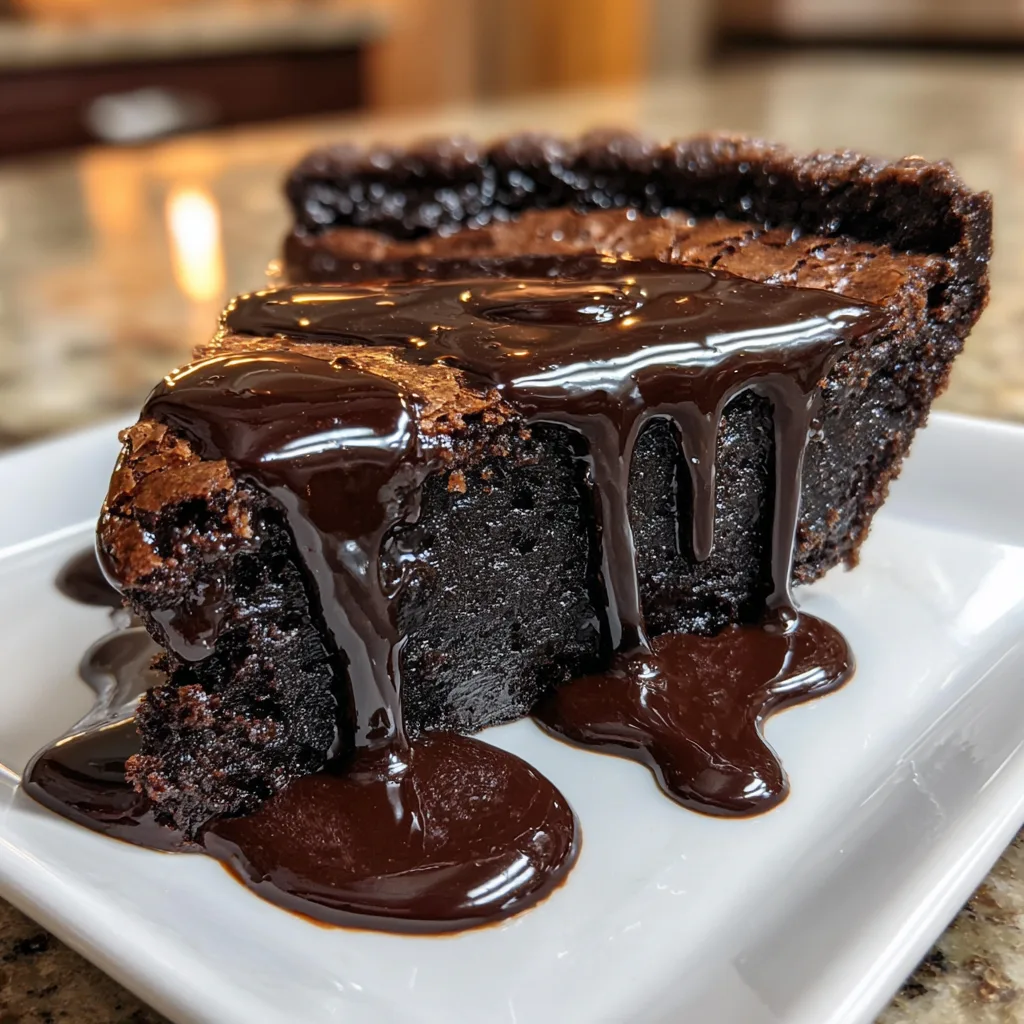
There are chocolate desserts, and then there are chocolate experiences. This ultimate decadent Fudgy Brownie Pie falls strictly into the latter category. Imagine the absolute best, most dense, intensely chocolatey brownie you have ever tasted in your life, complete with that iconic, delicate, crinkly top. Now, imagine that brownie baked into the shape of a deep-dish pie or tart, sliced into generous wedges, and absolutely drenched in a thick, warm, mirror-glossy hot fudge sauce. It is a dessert so rich, so gooey, and so unapologetically indulgent that it demands the attention of everyone at the table.
When it comes to comfort food, chocolate universally reigns supreme. But finding the perfect balance of texture and flavor can sometimes be a challenge. Cakes can be too dry, standard brownies can sometimes lack that “wow” factor for a dinner party, and traditional chocolate cream pies often lean too far into pudding territory without offering a satisfying bite. This Fudgy Brownie Pie bridges the gap between all your favorite chocolate cravings. It delivers the chewy, dense satisfaction of a corner-piece brownie with the elegant presentation of a bakery-style tart. In this comprehensive guide, we are going to dive deep into the chocolate-making process, ensuring your pie comes out perfectly glossy, incredibly fudgy, and utterly unforgettable.
Why You Will Fall in Love with This Fudgy Brownie Pie
If the sight of a warm slice of dense chocolate pie dripping with hot fudge isn’t enough to convince you, there are several practical reasons why this recipe will quickly become your go-to dessert for special occasions, holidays, or just a Tuesday night when the chocolate craving strikes.
First, it is incredibly straightforward to make. Unlike delicate soufflés or complex layered mousse cakes that require gelatin, precise temperature control, and hours of chilling, a brownie pie is delightfully rustic and forgiving. The batter comes together in just a couple of bowls with standard baking ingredients you likely already have in your pantry. There is no blind-baking a crust required because the “pie” forms its own crispy edges as it bakes in the tart pan!
Second, it is a textural masterpiece. A great dessert plays with contrasting textures to keep the palate interested. Here, you get the slight, sugary crunch of the crinkly brownie top, the dense, almost truffle-like chewiness of the dark center, and the silky, velvety smoothness of the hot fudge sauce poured over the top. When paired with a scoop of cold vanilla bean ice cream, the hot-and-cold contrast elevates the entire dish to a restaurant-quality level.
Finally, this dessert is exceptionally customizable. You can play with different types of chocolate, fold in nuts or chocolate chips, or even add a splash of espresso or bourbon to the batter for a more mature flavor profile. It is a brilliant canvas for your culinary creativity.
The Science of the Perfect Fudgy Texture
Baking is fundamentally chemistry, and the science behind a fudgy brownie versus a cakey brownie all comes down to the ratio of fat to flour. To achieve the incredibly dense, gooey center seen in this Brownie Pie, we rely on a very high ratio of fat (butter and chocolate) and sugar to a relatively small amount of flour.
Flour provides structure through gluten development. In a cake, you want plenty of structure to hold in air bubbles created by leavening agents (like baking powder or baking soda), resulting in a light, fluffy crumb. However, for a fudgy pie, we want the exact opposite. We use only enough flour to barely hold the wet ingredients together. We also omit chemical leaveners entirely. Without baking powder or baking soda to puff up the batter, the pie stays incredibly dense and rich.
Another crucial element in achieving that fudge-like consistency is the baking time. A brownie pie must be removed from the oven while the center still appears slightly underbaked. It will continue to cook and set up from the residual heat of the pan as it cools on the counter. Overbaking is the enemy of a fudgy texture; even five extra minutes can turn a gooey masterpiece into a dry, crumbly disappointment.
Choosing the Right Cocoa and Chocolate
Because there are so few ingredients in this recipe, the quality of the chocolate you use is paramount. This recipe utilizes two forms of chocolate to build a complex, deep flavor profile: melted semi-sweet chocolate and Dutch-processed cocoa powder.
Melted Chocolate: Using real, chopped chocolate bars rather than chocolate chips is highly recommended for the base. Chocolate chips often contain stabilizers (like soy lecithin) designed to help them hold their shape in the oven, which can prevent them from melting into the perfectly smooth, homogenous pool required for the best brownie batter. A good quality semi-sweet or bittersweet baking bar (around 60% to 70% cacao) will provide a rich cocoa butter content that contributes to the pie’s fudgy texture.
Cocoa Powder: Why Dutch-processed? Dutch-processed cocoa powder has been treated with an alkalizing agent to neutralize its natural acidity. This process darkens the cocoa powder, giving your pie that beautiful, deep, almost black color, and it mellows the flavor, resulting in a smoother, earthier, and less astringent chocolate taste. If you only have natural unsweetened cocoa powder (like standard Hershey’s), you can use it, but the flavor will be slightly sharper and the color lighter.
Ingredients You Will Need
Prepare your kitchen by gathering these high-quality ingredients for the ultimate baking experience:
- – 1/2 cup (1 stick) unsalted butter, cut into cubes
- – 6 oz high-quality semi-sweet or bittersweet chocolate, chopped
- – 1 cup granulated white sugar
- – 1/2 cup packed light brown sugar
- – 3 large eggs, at room temperature
- – 1 tablespoon pure vanilla extract
- – 1/2 cup Dutch-processed cocoa powder
- – 3/4 cup all-purpose flour
- – 1/2 teaspoon kosher salt
- – 1 cup hot fudge sauce or homemade chocolate ganache (for serving)
Step-by-Step Instructions
Follow these detailed steps to guarantee a perfectly baked, beautifully textured Brownie Pie every single time.
- Prep the Pan and Oven: Preheat your oven to 350°F (175°C). Generously grease a 9-inch tart pan with a removable bottom, or a standard 9-inch pie dish, with non-stick baking spray or butter. If using a standard pie dish, you can line the bottom with a circle of parchment paper for extra insurance.
- Melt the Chocolate and Butter: In a medium microwave-safe bowl, combine the chopped chocolate and cubed butter. Microwave in 30-second bursts, stirring well after each interval, until the mixture is completely melted, glossy, and smooth. Alternatively, you can do this over a double boiler on the stove. Set aside to cool slightly.
- Whisk the Eggs and Sugars: In a large mixing bowl, aggressively whisk together the granulated sugar, brown sugar, eggs, and vanilla extract. You want to whisk this vigorously by hand for at least 2 to 3 minutes, or until the mixture becomes pale, slightly thickened, and ribbon-like. This step is the secret to achieving that coveted papery, crinkly crust on top of your pie!
- Combine Wet Ingredients: Slowly pour the slightly cooled melted chocolate and butter mixture into the egg and sugar mixture, gently folding it in with a rubber spatula until just combined.
- Add the Dry Ingredients: Sift the cocoa powder, all-purpose flour, and kosher salt directly into the bowl with the wet ingredients. Gently fold the dry ingredients into the batter using the rubber spatula. Stop folding as soon as you no longer see any streaks of dry flour. Do not overmix, or you will activate the gluten and create a tough pie.
- Pour and Bake: Scrape the thick batter into your prepared tart pan or pie dish, smoothing the top into an even layer. Bake in the preheated oven for 25 to 30 minutes. The edges should look set and slightly puffed, but the very center should still exhibit a slight jiggle when you gently shake the pan. A toothpick inserted about an inch from the edge should come out with moist crumbs attached, not wet batter, but not completely clean either.
- Cool Completely: Remove the pie from the oven and place it on a wire cooling rack. This is the hardest part: you must let it cool completely (at least 2 hours) before slicing. As it cools, the center will sink slightly and solidify into that perfectly dense, fudgy texture.
- Drench and Serve: Once cooled, slice into generous wedges. Heat up your hot fudge sauce or ganache until it is warm and pourable. Place a slice on a plate and generously pour the warm fudge over the top, letting it cascade down the sides.
Tips and Tricks for a Flawless Bake
Even a simple recipe can benefit from a few expert techniques. Keep these tips in mind:
Room Temperature Eggs: Always use room temperature eggs. Cold eggs will cause the melted butter and chocolate mixture to seize up and harden when they are introduced, leading to a lumpy batter and uneven baking.
The Ribbon Stage: Do not skip vigorously whisking the eggs and sugar. You are dissolving the sugar crystals into the egg, which eventually rises to the surface during baking to create that shiny, delicate meringue-like crust.
The Toothpick Test: Because ovens vary wildly, rely on visual cues rather than just the clock. If you wait until a toothpick comes out completely clean from the center, your pie will be dry. You want moist, sticky crumbs.
Serving Suggestions
While this Brownie Pie is spectacular on its own, it practically begs for accompaniments. The intense richness of the dark chocolate pairs beautifully with contrasting flavors and temperatures.
The absolute classic pairing is a generous scoop of premium vanilla bean ice cream. As the ice cream melts into the warm hot fudge sauce, it creates a creamy, dreamy puddle that you will want to mop up with every bite of the pie.
If you prefer a lighter touch, a dollop of freshly whipped cream with a hint of espresso powder folded in cuts through the sweetness nicely. For a fruity contrast, serve the pie with macerated strawberries or a tart raspberry coulis. The acidity of the berries balances the heavy, buttery chocolate notes perfectly.
Proper Storage Guidelines
If you somehow find yourself with leftovers of this incredible dessert, storing it correctly will ensure it stays fudgy for days.
Store the un-sauced brownie pie tightly wrapped in plastic wrap or in an airtight container at room temperature for up to 3 days, or in the refrigerator for up to a week. If you store it in the fridge, the pie will become incredibly dense and chewy—almost like a piece of fudge candy. Many people actually prefer it cold! However, if you want that fresh-baked gooeyness, simply microwave an individual slice for about 15-20 seconds before adding your warm hot fudge sauce.
You can also freeze the baked pie. Wrap the entire pie (or individual slices) tightly in plastic wrap, then in aluminum foil. Freeze for up to 3 months. Thaw overnight in the refrigerator before serving.
Frequently Asked Questions
Can I make this pie gluten-free?
Yes, this recipe adapts very well to a gluten-free diet. Simply substitute the 3/4 cup of all-purpose flour with a high-quality 1:1 gluten-free baking blend that contains xanthan gum. Because brownies don’t rely heavily on gluten for structure, the texture will remain wonderfully fudgy.
Why did my pie sink in the middle?
A slight sinking in the middle is completely normal and actually desired for a brownie pie! Because there are no chemical leaveners (like baking powder), the air whisked into the eggs expands in the oven and then deflates as it cools, resulting in that dense center. If it sank dramatically to form a crater, it may have been slightly underbaked.
Can I use a store-bought crust?
You do not need a crust for this recipe! The brownie batter acts as its own crust, creating a chewy edge where it meets the pan. However, if you really want a crust, you can bake this filling inside a pre-baked graham cracker or Oreo cookie crust for an extra layer of texture.
Conclusion
This Fudgy Brownie Pie is the ultimate testament to the magic of chocolate. By focusing on a few high-quality ingredients and utilizing simple but effective techniques—like thoroughly whisking the eggs and sugar, and pulling the pan from the oven at precisely the right moment—you can create a dessert that rivals the finest bakeries. Drenched in a glossy cascade of hot fudge, it is a striking, mouth-watering showstopper that will satisfy even the most intense chocolate cravings. Roll up your sleeves, preheat that oven, and get ready to bake your new favorite dessert!
Decadent Fudgy Brownie Pie
Ingredients
Equipment
Method
- Preheat your oven to 350°F (175°C). Generously grease a 9-inch tart pan with a removable bottom or a standard pie dish.
- In a microwave-safe bowl, melt the chopped chocolate and cubed butter in 30-second increments until smooth and glossy. Set aside to cool slightly.
- In a large bowl, aggressively whisk together the granulated sugar, brown sugar, eggs, and vanilla extract for 2 to 3 minutes until pale and thickened.
- Gently fold the cooled melted chocolate mixture into the egg and sugar mixture until just combined.
- Sift the cocoa powder, flour, and salt into the wet ingredients. Fold gently until no dry streaks of flour remain. Do not overmix.
- Pour the batter into the prepared pan and smooth the top. Bake for 25-30 minutes, or until the edges are set but the center still has a slight jiggle.
- Allow the pie to cool completely on a wire rack for at least 2 hours to set into a fudgy texture.
- Slice into wedges and serve drenched generously in warm hot fudge sauce.