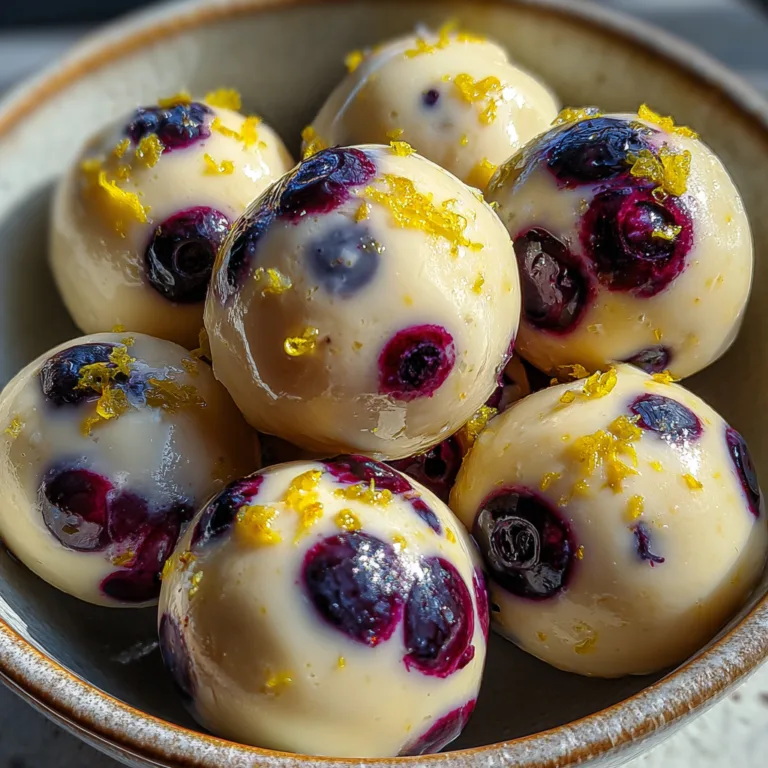
Crispy Cotton Candy Cheesecake Bombs Recipe
Crispy Cotton Candy Cheesecake Bombs: A Whimsical Explosion of Flavor
If you could capture the essence of a summer carnival and wrap it into a bite-sized, sophisticated dessert, it would look exactly like these Crispy Cotton Candy Cheesecake Bombs. Visually stunning with their vibrant pink, textured exterior and hiding a luxuriously creamy center, these treats are the ultimate showstopper for birthday parties, baby showers, or just a Tuesday night when you need a little magic.
Imagine the nostalgic, sugary scent of spun sugar combined with the tangy, rich depth of a classic New York cheesecake. These “bombs” are essentially oversized, decadent cheesecake truffles sitting atop a buttery cookie crust, coated in a crispy, cotton-candy-flavored shell. They offer a perfect interplay of textures: the crunch of the outer coating, the snap of the white chocolate shell, and the velvety smoothness of the filling.
This recipe is entirely no-bake, making it a stress-free option for warmer months or busy holidays. Plus, they are incredibly customizable. While we are leaning into the classic pink cotton candy aesthetic here, you can easily swap colors to match any theme. Prepare to become the most popular baker in your circle with this fun, drool-worthy recipe.

Why You Will Love This Recipe
- Nostalgic Flavor: Uses real cotton candy extract to mimic that unique, toasted sugar taste we all loved as kids.
- Texture Heaven: The contrast between the “crispy” sugary coating and the dense, cool cheesecake interior is addictive.
- No Oven Required: Save energy and keep the kitchen cool; these set in the fridge and freezer.
- Make-Ahead Friendly: These actually taste better after sitting for a bit, making them perfect for prepping days in advance.
- Insta-Worthy: The bright pink color and fluffy texture make for incredible photos.
Ingredients Needed
To achieve the perfect “bomb,” we break this down into the crust, the filling, and the crispy coating. Here is what you will need:
The Base & Filling
- Cream Cheese: 2 blocks (8 oz each), softened to room temperature. Full fat is a must for the right consistency.
- Unsalted Butter: 1/2 cup, softened. This helps stabilize the cheesecake filling so it holds its shape.
- Powdered Sugar: 1 1/2 cups. It dissolves instantly into the cream cheese for a grit-free texture.
- Cotton Candy Extract: 1-2 teaspoons. This is the secret weapon. Don’t rely on sugar alone; the extract gives it that authentic carnival flavor.
- Vanilla Extract: 1 teaspoon, to round out the flavors.
- Graham Crackers or Golden Oreos: About 12 cookies, crushed fine. This acts as the binder inside the cheesecake and the base.
The Crispy Coating
- White Chocolate Chips: 2 cups. High-quality melting wafers work best (like Ghirardelli) for a smooth dip.
- Coconut Oil: 1 tablespoon. To thin the chocolate for easier dipping.
- Pink Cotton Candy Crunch: You can buy “cotton candy crunch” toppings, or make your own by crushing pink frosted animal cookies mixed with pink sanding sugar.
- Pink Gel Food Coloring: Optional, if you want to tint the white chocolate itself.
Step-by-Step Instructions
Step 1: Prepare the Cheesecake Filling
In a large mixing bowl, beat the softened cream cheese and butter together using a hand mixer or stand mixer on medium-high speed. You want this mixture to be completely smooth and free of lumps. Scrape down the sides of the bowl frequently. Add the vanilla extract and cotton candy extract. Mix until combined.
Step 2: Sweeten and Thicken
Turn the mixer to low speed and gradually add the powdered sugar. Once incorporated, increase the speed to medium and beat for 2 minutes until fluffy. Fold in about 1/2 cup of your finely crushed cookie crumbs (Golden Oreos or Grahams). This adds structure so the bomb doesn’t collapse.
Step 3: Shape and Chill
Line a baking sheet with parchment paper. Using a medium cookie scoop (about 1.5 to 2 tablespoons), scoop mounds of the cheesecake mixture. If you want a distinct crust bottom like the photo, press a whole vanilla wafer or a small circle of graham cracker crust onto the bottom of each scoop. Place the baking sheet in the freezer for at least 1 to 2 hours. The balls must be frozen solid to withstand the dipping process.
Step 4: Prepare the Coating Station
While the cheesecake balls are freezing, prepare your coating. In a microwave-safe bowl, melt the white chocolate chips and coconut oil in 30-second intervals, stirring in between until liquid glass smooth. If desired, add a drop of pink food coloring to the chocolate. In a separate shallow bowl, pour your pink crispy topping (crushed cookies/sugar mix).
Step 5: Dip and Coat
Remove 2-3 cheesecake balls from the freezer at a time (keep the rest frozen). Using a fork, dip a ball into the melted white chocolate, letting the excess drip off. Immediately—before the chocolate sets—roll it or sprinkle it generously with the pink crispy mixture. You want a thick, textured layer like the photo.
Step 6: Final Set
Place the coated bomb back onto the parchment paper. Repeat with the remaining cheesecake balls. Refrigerate the finished bombs for at least 30 minutes before serving to allow the filling to soften slightly to a creamy, mousse-like texture.
Expert Tips for the Perfect Bomb
The Temperature Balance: The most common mistake is dipping soft cheesecake. If the balls aren’t frozen rock-hard, they will melt into the warm chocolate and create a mess. Do not rush the freezing step.
The “Crispy” Factor: To replicate the “crispy” texture shown in the image, avoid using actual real cotton candy (spun sugar) on the outside, as it dissolves instantly when it touches moisture. Instead, use crushed freeze-dried strawberries mixed with sugar crystals, or pink wafer cookie crumbs. This maintains the crunch.
Clean Dipping: Use a toothpick inserted into the top of the frozen ball to dunk it, rather than rolling it around with a fork. You can cover the toothpick hole with the crumb topping later.
Variations and Serving Suggestions
Blue Raspberry Version: Simply swap the pink food coloring for blue and use blue raspberry flavoring instead of cotton candy. This creates a fun “boy vs. girl” theme for gender reveal parties.
Inside Surprise: Press a small piece of strawberry or a maraschino cherry into the center of the cheesecake ball before freezing for a fruity burst when bitten.
Serving: Serve these in mini cupcake liners for easy handling. They pair wonderfully with a glass of cold milk or a tart lemonade to cut through the sweetness.
Storage and Freezing
Refrigerator: Store leftovers in an airtight container in the fridge for up to 5 days. The coating may soften slightly over time due to the moisture from the cheesecake.
Freezer: These freeze beautifully! Place them in a freezer-safe container separated by parchment paper. They will last for up to 3 months. Thaw in the fridge for an hour before eating, or eat them frozen for an ice-cream-treat experience.

Frequently Asked Questions
Can I use low-fat cream cheese?
It is not recommended. Low-fat cream cheese has a higher water content and may prevent the bombs from setting properly, leading to a runny filling.
Where can I find cotton candy extract?
Most craft supply stores with a baking section carry it, or it is easily available online. If you can’t find it, a mix of vanilla and raspberry extract is a close substitute.
Why is my chocolate seizing?
Water is the enemy of melting chocolate. Ensure your bowl and utensils are completely dry. If the frozen cheesecake has condensation on it, pat it dry with a paper towel before dipping.
Dive into these Crispy Cotton Candy Cheesecake Bombs and enjoy a sweet escape to childhood carnival memories!
Crispy Cotton Candy Cheesecake Bomb
Ingredients
Equipment
Method
- Line a baking sheet with parchment paper and set aside.
- In a large bowl, beat softened cream cheese and butter until completely smooth and lump-free.
- Add powdered sugar, cotton candy extract, and vanilla. Mix on low until incorporated, then beat on high for 2 minutes until fluffy.
- Fold in the crushed cookie crumbs to stiffen the mixture slightly.
- Scoop the mixture into balls (approx 2 tbsp each). If using a cookie base, place the scoop onto a vanilla wafer.
- Place baking sheet in the freezer for 1-2 hours. Balls must be frozen solid.
- Melt white chocolate and coconut oil in the microwave in 30-second intervals until smooth.
- Dip frozen balls quickly into chocolate, let excess drip, then immediately roll in pink crispy topping.
- Return to fridge for 30 minutes to set before serving.