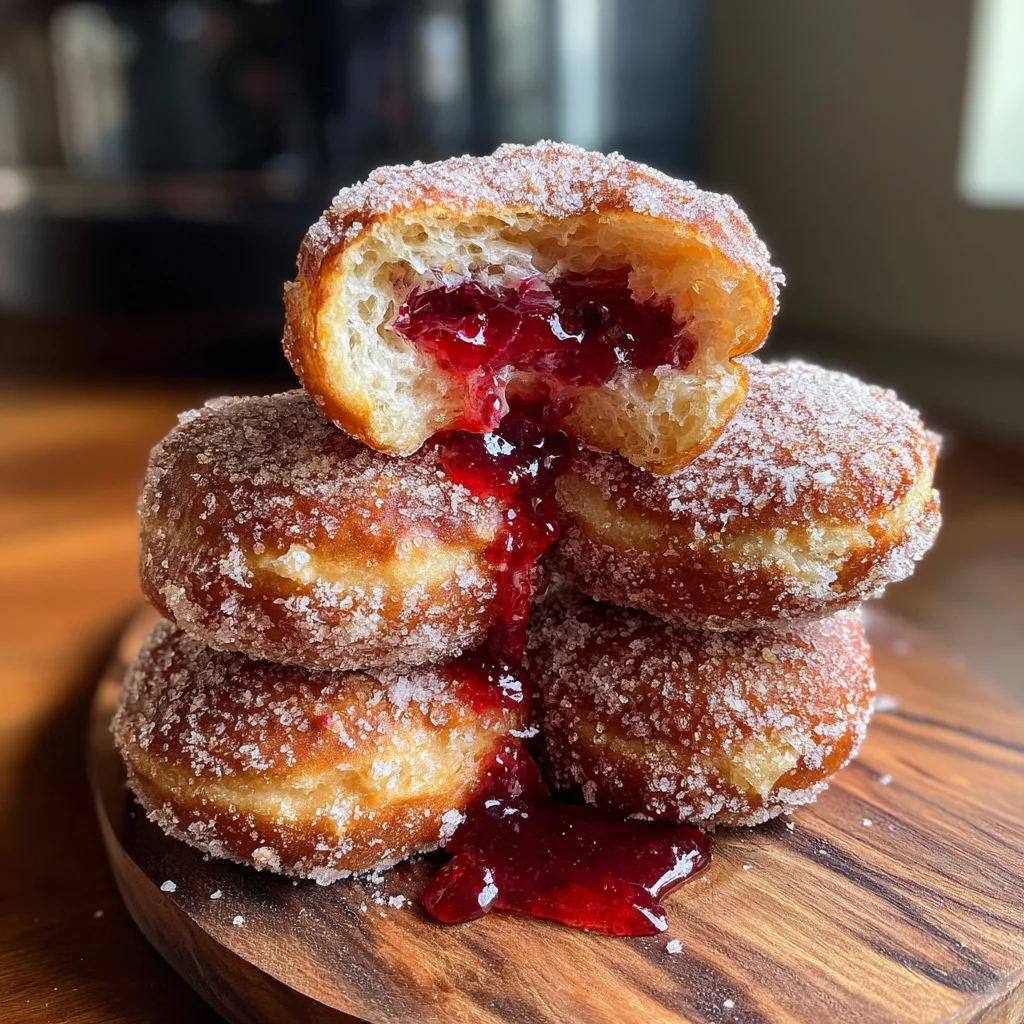
Homemade Raspberry Jelly Donuts
There is a universal truth in the world of baking: nothing quite compares to the absolute joy of a freshly made, still-warm jelly donut. If you have ever bitten into a bakery-fresh donut, felt the crunch of the sugar-coated exterior give way to a cloud-like, pillowy dough, and experienced that delightful burst of sweet, tart fruit jam, you know exactly what I mean. Today, we are bringing that quintessential bakery experience right into your own kitchen. These Ultimate Homemade Raspberry Jelly Donuts—often known globally as Berliners, Sufganiyot, or Bismarks—are a labor of love that yields the most magnificent, show-stopping dessert imaginable. This comprehensive guide will take you through the science of yeast doughs, the art of perfect frying, and the secret to getting that generous, oozing jelly center just right.
✨ The Irresistible Allure of the Classic Jelly Donut
The jelly donut holds a special place in the pantheon of comfort foods. It is a pastry with a rich history, celebrated across different cultures during various holidays and festivals, most notably during Hanukkah as the beloved Sufganiyah, or in Germany as the traditional New Year’s Eve Berliner Pfannkuchen. But you certainly do not need a holiday as an excuse to make them.
What makes this specific pastry so captivating is the brilliant study in contrasts. You have the exterior, which is quickly fried at a high temperature to create a thin, crispy, golden-brown shell. That shell is immediately rolled in coarse granulated sugar, providing a satisfying, granular crunch that dances on your teeth. Beneath that crust lies an incredibly tender, airy, and rich yeast-leavened dough that practically melts in your mouth. Finally, the grand prize: the center. A bright, acidic, fruity jam cuts straight through the richness of the fried dough and the sweetness of the sugar coating, providing a perfectly balanced, vibrant finish. It is a masterpiece of texture and flavor engineering.
🧪 The Science of a Perfectly Fluffy Yeast Dough
The foundation of any spectacular jelly donut is the dough. Unlike quick, cake-style donuts that rely on baking powder or baking soda, these are raised using active yeast. This enriched yeast dough requires a bit of patience, but the resulting texture is impossible to replicate any other way.
An enriched dough means that in addition to flour, water, and yeast, we are introducing fats and proteins in the form of whole milk, butter, and eggs. These enriching ingredients do a few crucial things. First, they tenderize the crumb. The fat from the butter and egg yolks coats the flour’s gluten strands, preventing them from becoming too tough and chewy. Second, they add a magnificent, brioche-like flavor and a beautiful golden-yellow hue to the inside of the donut.
However, because the dough is heavy with these rich ingredients, the yeast has to work extra hard to lift it. This is why we must ensure our milk is at the perfect lukewarm temperature (around 105°F to 110°F) to wake the yeast up without killing it. Furthermore, kneading the dough until it passes the “windowpane test”—where you can stretch a small piece of dough until it is translucent without tearing—is non-negotiable. This ensures the gluten network is strong enough to trap the yeast’s carbon dioxide bubbles, creating those beautifully large, airy pockets inside the donut that will eventually hold our glorious jelly filling.
🍓 Choosing the Ultimate Filling: Not All Jams are Created Equal
While the dough is the foundation, the filling is the star of the show. You can technically fill these donuts with anything from chocolate ganache to vanilla pastry cream, but a classic red fruit jam is traditional for a reason. The acidity of berries is vital to balance the deep-fried, sugar-coated dough.
When selecting a jam for filling, texture is paramount. You want a jam or jelly that is smooth enough to pipe through a pastry tip, but thick enough that it won’t completely turn to liquid and seep into the dough, making it soggy. A high-quality raspberry or strawberry preserve works beautifully. If your jam has very large chunks of fruit or seeds, it is highly recommended that you pulse it a few times in a food processor or push it through a fine-mesh sieve. A blocked piping tip while you are trying to fill a delicate donut can lead to a messy blowout!
🛠️ Essential Equipment for Frying Bakery-Quality Donuts
Frying dough at home might sound intimidating, but setting yourself up for success is simply a matter of gathering the right tools. Proper equipment ensures safety and guarantees a professional-looking final product.
- Heavy-Bottomed Dutch Oven: A cast-iron Dutch oven is ideal because it holds heat exceptionally well, preventing massive temperature drops when you add the raw dough.
- Digital Deep-Fry Thermometer: This is your most important tool. Frying blindly is a recipe for disaster. You need to maintain a steady 350°F (175°C) to ensure the donuts cook fully in the center without burning on the outside.
- Spider Skimmer: For safely gently flipping the donuts and removing them from the hot oil.
- Piping Bag with a Long Bismark Tip: A standard piping tip is too short. A specialized, elongated Bismark tip allows you to inject the jam deep into the very center of the donut so every bite has filling.
- Parchment Paper Squares: Proofing your cut donuts on individual squares of parchment paper means you can drop them into the oil (paper and all, then remove the paper with tongs) without touching and deflating the delicate risen dough.
🥣 Ingredients
For the Yeast Dough:
- – 3 and 1/4 cups all-purpose flour (plus extra for dusting)
- – 1/4 cup granulated sugar
- – 2 and 1/4 teaspoons active dry yeast (one 1/4 oz packet)
- – 1/2 teaspoon kosher salt
- – 3/4 cup whole milk, warmed to 110°F
- – 2 large eggs, room temperature
- – 1 teaspoon vanilla extract
- – 4 tablespoons unsalted butter, softened to room temperature
- – 6 cups neutral oil for frying (vegetable, canola, or peanut)
For the Coating and Filling:
- – 1 and 1/2 cups granulated sugar (for rolling)
- – 1 and 1/2 cups high-quality raspberry or strawberry jam
📝 Instructions
- Activate the yeast: In the bowl of a stand mixer, combine the warm milk, active dry yeast, and 1 tablespoon of the granulated sugar. Stir gently and let it sit for 5 to 10 minutes until the mixture becomes frothy and smells distinctly yeasty.
- Mix the wet ingredients: Once the yeast is bubbly, whisk in the remaining granulated sugar, the room temperature eggs, and the vanilla extract until well combined.
- Form the dough: Attach the dough hook to your stand mixer. Add the all-purpose flour and kosher salt. Mix on low speed until a shaggy dough begins to form.
- Incorporate the butter: With the mixer running on medium-low, add the softened butter one tablespoon at a time, waiting until each piece is incorporated before adding the next.
- Knead to perfection: Once all the butter is added, increase the speed to medium and knead for 5 to 8 minutes. The dough should eventually pull away from the sides of the bowl, becoming smooth, elastic, and slightly tacky (but not overly sticky).
- First proof: Form the dough into a smooth ball and place it in a lightly oiled bowl. Cover tightly with plastic wrap or a warm, damp kitchen towel. Let it rise in a warm, draft-free spot for 1 to 1.5 hours, or until it has doubled in size.
- Roll and cut: Gently punch down the risen dough to release the air. Turn it out onto a lightly floured surface. Using a rolling pin, roll the dough out to about 1/2-inch thickness. Use a 3-inch round biscuit or cookie cutter to cut out circles. Re-roll the scraps once to get more donuts.
- Second proof: Place each cut dough circle onto its own small square of parchment paper (this prevents deflation later). Transfer them to a baking sheet, cover loosely with a towel, and let them rise for another 45 minutes to 1 hour, until puffy and airy.
- Prepare your fry station: Heat 2 to 3 inches of neutral oil in your heavy Dutch oven until your deep-fry thermometer registers exactly 350°F (175°C). Place the 1 1/2 cups of granulated sugar in a wide, shallow bowl. Set up a wire cooling rack lined with paper towels nearby.
- Fry the donuts: Carefully drop 2 to 3 donuts into the hot oil at a time, using the parchment paper to lower them in (remove the paper with tongs immediately). Fry for about 1.5 to 2 minutes per side until deeply golden brown.
- Drain and coat: Remove the donuts with a spider skimmer, letting excess oil drip off for just 15 to 30 seconds. While they are still hot, toss them generously in the bowl of granulated sugar until fully coated. Transfer to the wire rack to cool completely.
- Fill with jelly: Once the donuts are completely cool to the touch (do not fill them warm or the jam will melt!), place your jam in a piping bag fitted with a long Bismark tip. Use a small knife or chopstick to poke a hole in the side of each donut, wiggling it around slightly to create a cavity inside. Insert the piping tip and squeeze gently until the donut feels heavy and a little bit of jam oozes out of the hole.
- Serve and enjoy: Stack them high on a beautiful wooden board, just like the photo, and prepare to get delightfully messy!
💡 Pro Tips for Foolproof Frying and Filling
Frying can be a fickle beast, but mastering it is incredibly rewarding. The most critical tip is constant temperature monitoring. If your oil is too hot (above 365°F), the outside of the donut will brown incredibly fast, leaving the inside completely raw and doughy. If the oil is too cool (below 330°F), the dough will act like a sponge, soaking up the oil and becoming heavy and greasy. Adjust your heat slightly between batches to keep it hovering right at that 350°F mark.
When it comes to rolling the donuts in sugar, timing is everything. If you pull the donut out of the oil and drop it straight into the sugar, it will clump and melt. If you wait until the donut is completely cold, the sugar will not stick at all. A 15 to 30-second resting period on a wire rack is the sweet spot; the donut is still warm enough, with just enough residual surface oil, to grab onto the sugar perfectly.
Finally, regarding the filling: be generous, but careful! It is easy to overfill and have the donut burst at the seams. When piping, feel the weight of the donut in your hand. As you squeeze the piping bag, you will feel the donut expand and get heavier. As soon as you feel a slight pressure pushing back against the tip, stop squeezing and pull the tip out. A little dollop peeking out of the entry hole is the perfect visual cue that it is properly filled.
🥡 Storing, Reheating, and Serving Suggestions
Let’s be completely transparent: like all fried foods, jelly donuts are infinitely better when eaten on the exact same day they are made. The textural contrast between the crunchy sugar, the delicate crust, and the soft interior begins to fade within hours as the moisture from the filling and the air softens the exterior.
However, if you must store them, place them in an airtight container at room temperature for up to 24 hours. Do not refrigerate them, as the cold environment will cause the bread to stale rapidly and the sugar coating to weep and become a syrupy mess.
To serve these at their absolute best, pair them with a beverage that complements their sweetness. A strong, bitter espresso, a robust black tea, or even a glass of ice-cold whole milk works wonders. If you are serving these for a festive gathering or brunch, consider offering a DIY filling station! Fry and sugar the donuts, but leave them unfilled. Set out piping bags filled with different options—raspberry jam, lemon curd, chocolate hazelnut spread, and vanilla custard—so guests can customize their own ultimate pastry.
🎉 Conclusion: A Labor of Love Worth Every Bite
Making jelly donuts from scratch is undeniably a project. It requires waiting for dough to rise, managing a pot of hot oil, and getting your hands a little sticky with sugar and jam. But the moment you tear into that warm, sugary crust and watch the vibrant red jelly cascade out, every single minute of effort instantly validates itself. You are not just making a dessert; you are crafting an experience, a memory, and a show-stopping treat that will have your friends and family begging for the recipe. Roll up your sleeves, embrace the flour on your countertops, and enjoy the magical, messy, delicious process of making the ultimate homemade jelly donuts!
Classic Raspberry Jelly Donuts
Ingredients
Equipment
Method
- In a stand mixer, dissolve yeast and 1 tbsp sugar in warm milk. Let sit 5-10 minutes until frothy.
- Whisk in remaining sugar, eggs, and vanilla extract.
- Add flour and salt. Mix with a dough hook on low until a shaggy dough forms.
- Add softened butter one tablespoon at a time, mixing until incorporated.
- Knead on medium speed for 5-8 minutes until dough is smooth, elastic, and clears the bowl.
- Place dough in an oiled bowl, cover, and let rise in a warm place for 1-1.5 hours until doubled in size.
- Roll dough out to 1/2-inch thickness. Cut into 3-inch circles and place each on a small square of parchment paper.
- Cover and let rise again for 45-60 minutes until puffy.
- Heat 2-3 inches of oil in a Dutch oven to 350°F (175°C).
- Fry donuts in small batches, 1.5 to 2 minutes per side until golden brown. Drain for 30 seconds.
- Toss the warm donuts in granulated sugar until completely coated. Let cool completely on a wire rack.
- Using a piping bag with a Bismark tip, poke a hole in the side of each cooled donut and inject generously with raspberry jam.