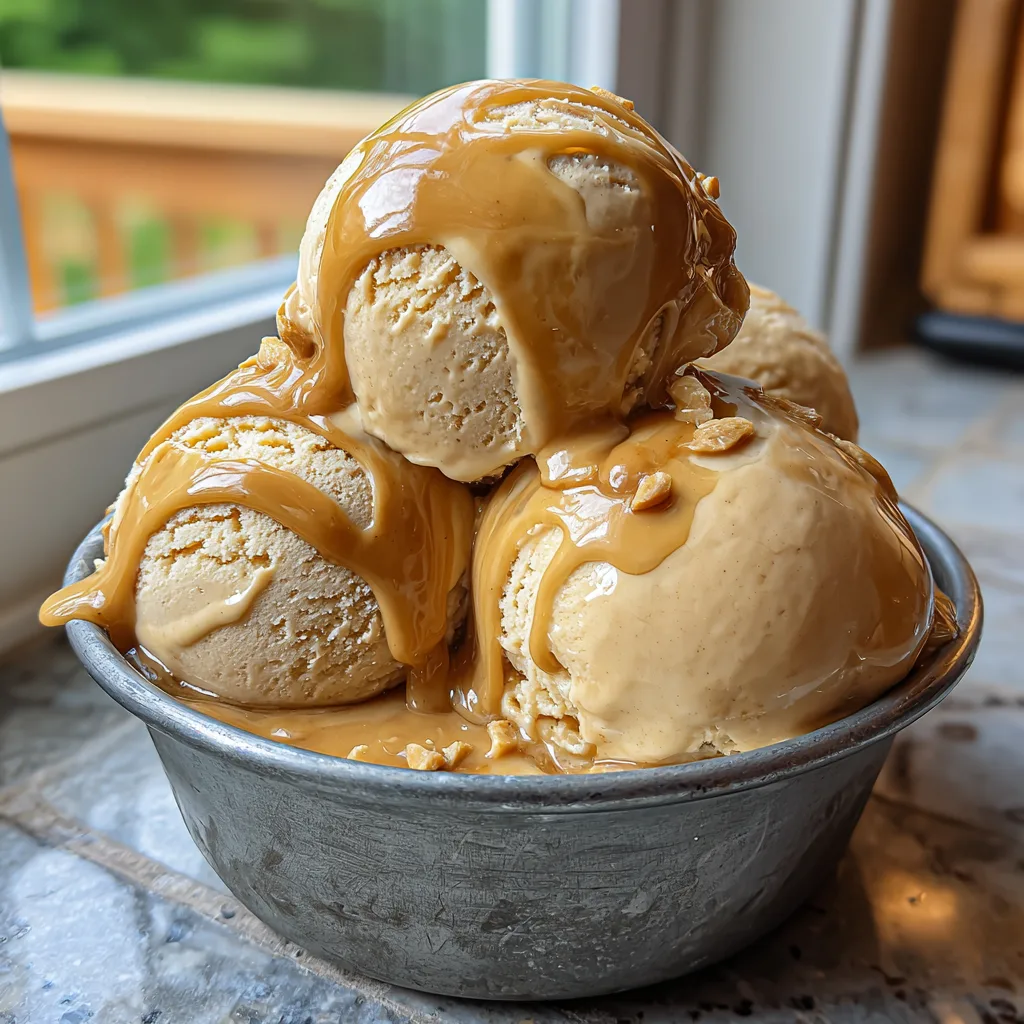
Salted Caramel Peanut Butter Ice Cream
There are few things in life as universally beloved as ice cream, but when you combine the rich, roasted profile of peanut butter with the sweet, buttery complexity of salted caramel, you elevate a simple dessert into a culinary masterpiece. If you have been searching for a frozen treat that checks every single box—creamy, sweet, salty, nutty, and unapologetically decadent—you have finally found it. This Ultimate Salted Caramel Peanut Butter Ice Cream is a revelation. Every spoonful delivers a luxuriously smooth base studded with the perfect crunch of roasted peanuts and dripping with a thick, glossy caramel sauce. This comprehensive guide will walk you through the art of making premium, scoop-shop quality ice cream right in your own kitchen.
✨ The Symphony of Salted Caramel and Peanut Butter
Flavor pairing is an art form, and the marriage of peanut butter and caramel is one of the food world’s greatest triumphs. Why does this combination work so incredibly well? It all comes down to the scientific balance of sweet, salty, and fat.
Peanut butter, especially the natural roasted variety, brings an earthy, slightly savory depth that grounds the dessert. It provides a dense, creamy mouthfeel thanks to its natural oils. On the other hand, caramel is pure, cooked sugar—sweet, slightly bitter from the caramelization process, and deeply rich. When you add a touch of sea salt to that caramel, it acts as a flavor enhancer, amplifying the roasted notes of the peanuts and cutting through the cloying sweetness of the sugar. This contrast keeps your palate engaged, ensuring that every bite tastes just as exciting and balanced as the first. Instead of overwhelming you with sugar, this ice cream invites you to savor the complex, nutty warmth woven throughout.
🧬 The Science Behind Creamy Homemade Ice Cream
Making ice cream at home is a fun science experiment. The goal of any great ice cream recipe is to manage water and fat to prevent large ice crystals from forming. Large ice crystals result in a gritty, icy texture, whereas tiny, microscopic crystals give you that luxuriously smooth, velvety mouthfeel.
To achieve this, we rely on a custard base. By slowly cooking heavy cream, whole milk, and egg yolks, we create a rich emulsion. The egg yolks provide lecithin, a natural emulsifier that binds the water in the milk to the fat in the cream and the peanut butter. Furthermore, the high fat content of the heavy cream and the peanut butter coats the water molecules, physically blocking them from forming large ice blocks as the mixture freezes. Churning the mixture introduces air (known as “overrun” in the industry), which lightens the texture and makes it easy to scoop. Understanding these basic principles allows you to appreciate why each ingredient is necessary for the perfect pint.
🛠️ Essential Tools for the Ultimate Scoop
While you don’t need a commercial kitchen to make incredible ice cream, having the right tools will make the process smoother and the results much more consistent. Here is what you need to succeed:
- Ice Cream Maker: Whether it is a classic freezer-bowl model or an advanced compressor machine, an ice cream maker is essential for churning the base and freezing it rapidly to prevent ice crystals.
- Heavy-Bottomed Saucepan: Crucial for cooking the custard base evenly without scorching the milk or scrambling the egg yolks.
- Digital Thermometer: An instant-read thermometer takes the guesswork out of making the custard. You want to cook the base to exactly 170°F (77°C) to ensure it is safe to eat and perfectly thickened.
- Fine Mesh Strainer: Passing your cooked custard through a sieve ensures that any accidental bits of cooked egg are removed, leaving you with a perfectly silky base.
- Sturdy Metal Bowls: You will need these for creating an ice bath to rapidly cool your custard base after cooking.
- Ice Cream Spade or Heavy Scoop: Because this ice cream is dense and rich, a heavy-duty scoop is necessary to serve it beautifully, just like the picture!
🥣 Ingredients
For the Peanut Butter Ice Cream Base:
- – 2 cups heavy whipping cream
- – 1 cup whole milk
- – 3/4 cup granulated sugar
- – 5 large egg yolks
- – 3/4 cup creamy peanut butter (conventional works best for texture)
- – 1 teaspoon vanilla extract
- – 1/2 teaspoon kosher salt
For the Salted Caramel Peanut Sauce:
- – 1/2 cup granulated sugar
- – 2 tablespoons water
- – 2 tablespoons unsalted butter
- – 1/4 cup heavy cream
- – 2 tablespoons creamy peanut butter
- – 1/2 teaspoon flaky sea salt
For the Garnish:
- – 1/2 cup roasted salted peanuts, roughly chopped
📝 Instructions
Salted Caramel Peanut Butter Ice Cream
Ingredients
Equipment
Method
- Prepare an ice bath with a metal bowl and strainer set over it.
- Warm the milk, 1 cup of heavy cream, and half the sugar in a saucepan until steaming.
- Whisk egg yolks and remaining sugar until pale.
- Slowly temper the hot milk mixture into the egg yolks, then return everything to the saucepan.
- Cook over medium-low heat, stirring constantly, until the custard coats the back of a spoon (170°F).
- Strain into the bowl over the ice bath. Stir in the remaining cream, peanut butter, vanilla, and salt until smooth.
- Cover and chill the base in the refrigerator for at least 4 hours.
- For the sauce: Cook sugar and water until amber. Off heat, whisk in butter, then cream, then peanut butter and salt. Let cool.
- Churn the chilled base in an ice cream maker according to manufacturer instructions.
- Layer the churned ice cream in a container with the caramel sauce and chopped peanuts. Freeze until firm.
Notes
- Prepare an ice bath: Fill a large bowl halfway with ice and cold water. Place a smaller, clean metal bowl inside the ice bath and set a fine-mesh strainer over the top. Leave this aside.
- Warm the dairy: In a heavy-bottomed saucepan, combine the whole milk, 1 cup of the heavy cream, and half of the granulated sugar. Heat over medium heat, stirring occasionally, until the mixture starts to steam and small bubbles form around the edges. Do not let it boil.
- Whisk the yolks: In a separate medium bowl, vigorously whisk the egg yolks with the remaining sugar until the mixture becomes pale yellow and thickens slightly.
- Temper the eggs: Slowly drizzle about 1/2 cup of the hot dairy mixture into the egg yolks while whisking constantly. This warms the eggs gently so they don’t scramble. Slowly pour the warmed egg mixture back into the saucepan with the rest of the dairy, whisking continuously.
- Cook the custard: Return the saucepan to medium-low heat. Stir constantly with a wooden spoon or heatproof spatula, scraping the bottom of the pan, until the mixture thickens enough to coat the back of the spoon (or reaches 170°F on a thermometer).
- Strain and add peanut butter: Immediately pour the custard through the fine-mesh strainer into the bowl set over the ice bath. Stir in the remaining 1 cup of heavy cream, the peanut butter, vanilla extract, and kosher salt. Whisk until the peanut butter is completely melted and incorporated.
- Chill the base: Let the mixture cool in the ice bath, stirring occasionally. Once cool to the touch, cover the bowl tightly with plastic wrap and refrigerate for at least 4 hours, or preferably overnight. A deeply chilled base churns better.
- Make the caramel sauce: While the base chills, make the sauce. In a small saucepan, combine the 1/2 cup sugar and water. Cook over medium-high heat without stirring (you can gently swirl the pan) until the sugar turns a deep amber color. Immediately remove from heat and carefully whisk in the butter, followed by the heavy cream (it will bubble up violently, so be careful!). Whisk until smooth, then stir in the peanut butter and flaky sea salt. Let it cool to room temperature.
- Churn the ice cream: Pour the chilled peanut butter custard base into your ice cream maker and churn according to the manufacturer’s instructions, usually about 20-25 minutes, until it reaches the consistency of soft serve.
- Layer and freeze: Transfer half of the churned ice cream into a freezer-safe container. Drizzle generously with half of the room-temperature caramel sauce and sprinkle with half of the chopped peanuts. Top with the remaining ice cream, then the remaining sauce and peanuts. Swirl gently with a butter knife.
- Final freeze: Cover the container tightly and freeze for at least 4 hours, or until firm enough to scoop.
- Serve: Scoop generously into rustic bowls, top with extra dripping caramel sauce and a few extra peanuts for that picture-perfect presentation!
💡 Troubleshooting Common Ice Cream Mistakes
Even the best home cooks can occasionally run into trouble with homemade ice cream. Here is how to avoid the most common pitfalls:
Scrambled Eggs in the Base: This happens when you add the hot milk to the yolks too quickly, or if you cook the custard over heat that is too high. Always temper the yolks slowly, and never let the custard boil. If you get a few small cooked bits, don’t panic—that is exactly why we pour the mixture through a fine-mesh strainer!
Greasy Texture: Sometimes, peanut butter ice cream can feel a bit greasy on the palate. This usually happens if the base was over-churned, causing the butterfat in the cream to separate and essentially turn into butter. Churn only until the mixture looks like thick soft serve, then let the freezer do the rest of the work.
Rock Hard Ice Cream: Homemade ice cream lacks the commercial stabilizers that keep store-bought tubs soft straight out of the freezer. If your ice cream is too hard to scoop, simply leave the container on the kitchen counter for 10 to 15 minutes before serving to let it soften naturally.
🍨 Decadent Serving Suggestions and Pairings
While a bowl of this Salted Caramel Peanut Butter Ice Cream is a monumental dessert on its own, it can be dressed up in numerous ways for entertaining or special occasions.
The Ultimate Brownie Sundae: Serve a massive scoop of this ice cream over a warm, fudgy, dark chocolate brownie. The heat from the brownie will slightly melt the ice cream, creating a rich sauce, while the bitter notes of dark chocolate perfectly complement the sweet caramel.
Waffle Cone Magic: Invest in a waffle cone maker and serve this ice cream in freshly made, warm vanilla waffle cones. The aroma of the baking cones paired with the nutty ice cream is reminiscent of an old-fashioned boardwalk scoop shop.
Adult Milkshakes: Blend a few scoops of this ice cream with a splash of whole milk and a shot of bourbon or dark rum for a sophisticated, boozy dessert beverage that is guaranteed to impress your dinner party guests.
🎉 The Grand Finale: A Frozen Masterpiece
Creating your own ice cream from scratch is a labor of love, but the results are exponentially better than anything you can buy in a cardboard tub. This Ultimate Salted Caramel Peanut Butter Ice Cream proves that with a little patience and the right ingredients, you can craft a gourmet dessert that balances sweetness, saltiness, and rich, nutty flavors perfectly. The luscious, dripping caramel and the crunch of roasted peanuts make every scoop an event to be celebrated. So gather your ingredients, prep your ice bath, and get ready to enjoy the most indulgent, satisfying ice cream you have ever tasted. Happy churning!