Chocolate Cherry Layer Cake
The Ultimate Decadent Chocolate Cherry Cake: A Masterpiece of Gloss and Flavor
There is something undeniably enchanting about the combination of rich, dark chocolate and vibrant, tart cherries. It is a flavor pairing that has stood the test of time, gracing bakery windows and holiday tables for generations. Today, we are diving deep into the ultimate recipe for a Decadent Chocolate Cherry Cake. This isn’t just any cake; it is a towering masterpiece featuring incredibly moist layers of dark chocolate sponge, generously filled with a thick, gooey, homemade cherry compote, and draped in an ultra-shiny chocolate ganache glaze that reflects light like liquid glass. Whether you are baking for a special birthday, an anniversary, or simply to satisfy a profound craving for something indulgent, this cake will undoubtedly steal the show.
The beauty of this recipe lies in its contrasting textures and perfectly balanced flavor profile. The slight bitterness of the dark cocoa powder is beautifully offset by the natural sweetness and bright acidity of the cherries. The soft, tender crumb of the cake absorbs just enough of the cherry juices to become impossibly moist, while the silky, wet ganache adds a luxurious mouthfeel that makes every single bite feel like a high-end restaurant experience. In this comprehensive guide, we will walk you through every single step, from selecting the finest ingredients to mastering the glossy finish that will make your cake look like it came straight out of a professional pastry kitchen.
The Magic of the Chocolate and Cherry Combination
To truly appreciate this cake, we must first understand why chocolate and cherries are considered one of the culinary world’s most perfect marriages. On a molecular level, chocolate—particularly dark chocolate with a high percentage of cacao—contains earthy, roasted, and slightly bitter notes. It is deep, heavy, and grounding. Cherries, on the other hand, provide a bright, fruity, and acidic counterpoint. When you combine the two, the acidity of the fruit cuts through the richness of the fat in the chocolate, preventing the dessert from becoming cloying or overwhelming.
This dynamic interplay ensures that you can enjoy a generous slice without feeling weighed down by sugar. The juicy, bursting texture of the cooked cherries also provides a wonderful textural contrast to the soft, velvet-like chocolate sponge. Furthermore, visually, the dramatic contrast between the midnight brown of the chocolate and the brilliant ruby red of the cherries creates a feast for the eyes long before the first bite is even taken. It is an aesthetic and gastronomic triumph.
Anatomy of the Perfect Chocolate Cherry Cake
Constructing a show-stopping dessert requires breaking it down into its core components. This magnificent cake consists of three distinct yet equally important parts, each demanding its own attention to detail:
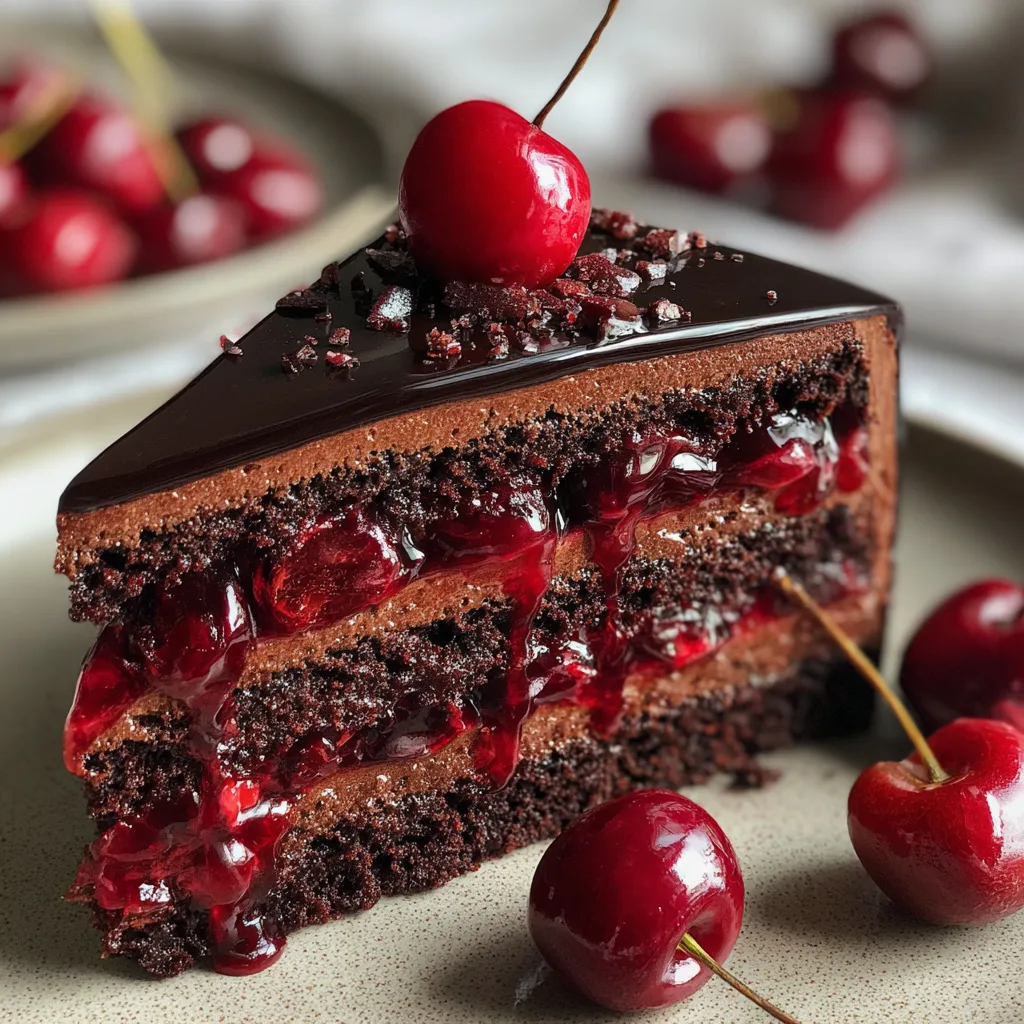
The Chocolate Sponge: The foundation of our dessert is a deeply chocolatey, incredibly moist cake. To achieve this, we use a combination of hot water (or hot coffee) to bloom the cocoa powder, which intensifies the chocolate flavor and creates a tender crumb. The addition of oil alongside butter ensures the cake remains soft even when chilled, as oil remains liquid at colder temperatures.
The Cherry Compote Filling: Forget store-bought pie fillings packed with artificial colors and preservatives. Our filling is made from scratch using whole cherries, sugar, a touch of lemon juice for brightness, and cornstarch to thicken it into a luscious, gooey consistency. It needs to be thick enough to hold its shape between the cake layers but saucy enough to drip seductively when cut.
The Glossy Ganache Glaze: The crowning glory of this cake is the ultra-shiny ganache. Unlike a stiff buttercream, this ganache is formulated to pour over the cake, coating it in a wet, mirror-like finish. A touch of corn syrup or a small pat of butter added at the end of the emulsification process is the secret to locking in that incredible, photogenic shine that makes the cake look irresistibly wet and glistening.
Sourcing the Best Ingredients for Baking
When making a dessert with such bold, distinct flavors, the quality of your ingredients will dictate the success of your final product. Here is what you need to know before heading to the grocery store:
Cocoa Powder: For the darkest color and richest flavor, look for Dutch-processed cocoa powder. Dutching is a process that neutralizes the natural acidity of the cocoa, resulting in a smoother, mellower flavor and a noticeably darker hue. This is what gives our cake that midnight, almost black appearance.
Cherries: While fresh cherries are wonderful during their peak summer season, high-quality frozen cherries are actually preferable for the filling. They are frozen at the peak of ripeness, ensuring consistent sweetness, and they release their juices beautifully when cooked down. If you use fresh, be prepared to pit them all and potentially adjust the sugar depending on their natural tartness. Avoid maraschino cherries for the filling, as they are far too sweet and lack the necessary depth of flavor. However, a single, perfect fresh cherry with the stem attached is mandatory for the garnish!
Chocolate for Ganache: Do not use chocolate chips for the glaze. Chocolate chips contain stabilizers designed to help them keep their shape when baked, which can prevent your ganache from achieving a perfectly smooth, fluid consistency. Instead, purchase high-quality baking bars (around 60-70% cacao) and chop them finely by hand.
Ingredients
For the Chocolate Sponge:
- – 2 cups all-purpose flour
- – 2 cups granulated sugar
- – 3/4 cup Dutch-processed cocoa powder
- – 2 teaspoons baking soda
- – 1 teaspoon baking powder
- – 1 teaspoon kosher salt
- – 1 cup buttermilk, room temperature
- – 1/2 cup vegetable oil
- – 2 large eggs, room temperature
- – 2 teaspoons pure vanilla extract
- – 1 cup hot freshly brewed coffee (or boiling water)
For the Cherry Compote Filling:
- – 4 cups sweet red cherries (pitted, fresh or frozen)
- – 1/2 cup granulated sugar
- – 1/4 cup water
- – 1 tablespoon lemon juice
- – 3 tablespoons cornstarch (mixed with 3 tablespoons cold water to create a slurry)
- – 1 teaspoon almond extract (optional, but enhances cherry flavor)
For the Glossy Chocolate Ganache:
- – 12 oz semi-sweet or dark chocolate baking bars, finely chopped
- – 1 cup heavy whipping cream
- – 1 tablespoon light corn syrup (for maximum gloss)
- – 1 tablespoon unsalted butter, softened
For Garnish:
- – Fresh cherries with stems
- – 1/4 cup dark chocolate shavings or crushed cocoa nibs
Instructions
Part 1: Baking the Chocolate Sponge
- Preparation: Preheat your oven to 350°F (175°C). Prepare three 8-inch round cake pans by greasing them thoroughly, lining the bottoms with parchment paper circles, and lightly dusting the sides with cocoa powder (this prevents white flour streaks on your dark cake).
- Dry Ingredients: In the bowl of a stand mixer fitted with a paddle attachment, or in a large mixing bowl, whisk together the all-purpose flour, granulated sugar, Dutch-processed cocoa powder, baking soda, baking powder, and kosher salt. Ensure there are no lumps of cocoa powder remaining.
- Wet Ingredients: In a separate medium bowl, whisk together the room temperature buttermilk, vegetable oil, room temperature eggs, and vanilla extract until well combined and smooth.
- Combine: Turn the mixer to low speed and slowly pour the wet ingredients into the dry ingredients. Mix just until combined, scraping down the sides and bottom of the bowl with a rubber spatula to ensure no dry pockets remain.
- Add the Heat: Carefully and slowly pour in the hot coffee (or boiling water) while the mixer is running on its lowest speed. The batter will become very thin and liquidy—this is exactly how it should look! The hot liquid blooms the cocoa powder, releasing its full flavor potential.
- Bake: Divide the thin batter evenly among the three prepared cake pans. Bake for 25 to 30 minutes, or until a wooden toothpick inserted into the center of the cakes comes out clean or with just a few moist crumbs attached.
- Cool: Allow the cakes to cool in their pans for 15 minutes before carefully turning them out onto wire cooling racks. They must be completely, 100% cool before you attempt to assemble the cake, otherwise, the filling will melt and slide right out.
Part 2: Making the Cherry Compote
- Simmer the Fruit: In a medium saucepan, combine the pitted cherries, granulated sugar, 1/4 cup of water, and lemon juice. Place over medium-high heat and bring the mixture to a gentle boil. Once boiling, reduce the heat to low and let it simmer for about 10 minutes, allowing the cherries to break down slightly and release their deep red juices.
- Thicken: In a small bowl, whisk together the cornstarch and 3 tablespoons of cold water until a smooth slurry forms. Slowly pour this slurry into the simmering cherries while stirring constantly.
- Cook to Perfection: Continue to cook and stir the mixture for another 2 to 3 minutes. You will see it quickly thicken into a glossy, gooey, jam-like consistency. It should coat the back of a spoon heavily.
- Cool and Flavor: Remove the saucepan from the heat and stir in the almond extract, if using. Transfer the cherry compote to a heat-proof bowl and place it in the refrigerator to cool completely. It will continue to thicken as it cools, creating the perfect structural filling for your cake layers.
Part 3: Creating the Glossy Ganache
- Chop the Chocolate: Finely chop your high-quality chocolate baking bars and place the pieces into a medium heat-proof glass or metal bowl. The finer the chop, the faster and smoother it will melt.
- Heat the Cream: In a small saucepan, heat the heavy whipping cream over medium heat just until it begins to simmer around the edges. Do not let it come to a rapid boil, as scorching the cream will ruin the flavor.
- Pour and Rest: Immediately pour the hot cream over the chopped chocolate. Do not touch it! Let the mixture sit undisturbed for exactly 5 minutes. This allows the heat of the cream to gently melt the chocolate without seizing it.
- Whisk to Gloss: After 5 minutes, add the light corn syrup and the softened butter. Starting in the center of the bowl, gently whisk the mixture in tight, small circles. As an emulsion forms in the center, slowly widen your whisking circles until all the cream is incorporated and you are left with a dark, smooth, incredibly glossy liquid glass ganache. Allow it to cool for about 15-20 minutes so it thickens slightly but remains pourable.
Part 4: Assembly and Plating
- Leveling: If your cake layers domed during baking, use a serrated knife to carefully trim the tops so they are perfectly flat.
- First Layer: Place one cake layer on your serving plate or cake stand. If your cherry compote has excess liquid, you can brush a little of that cherry syrup onto the sponge for extra moisture. Spoon half of the cooled, thickened cherry compote onto the cake, spreading it evenly but leaving a small half-inch border around the edge to prevent it from spilling out.
- Second Layer: Carefully place the second cake layer on top. Press down very gently to secure it. Repeat the filling process with the remaining cherry compote.
- Top Layer: Place the final cake layer on top. Make sure the cake is level and straight.
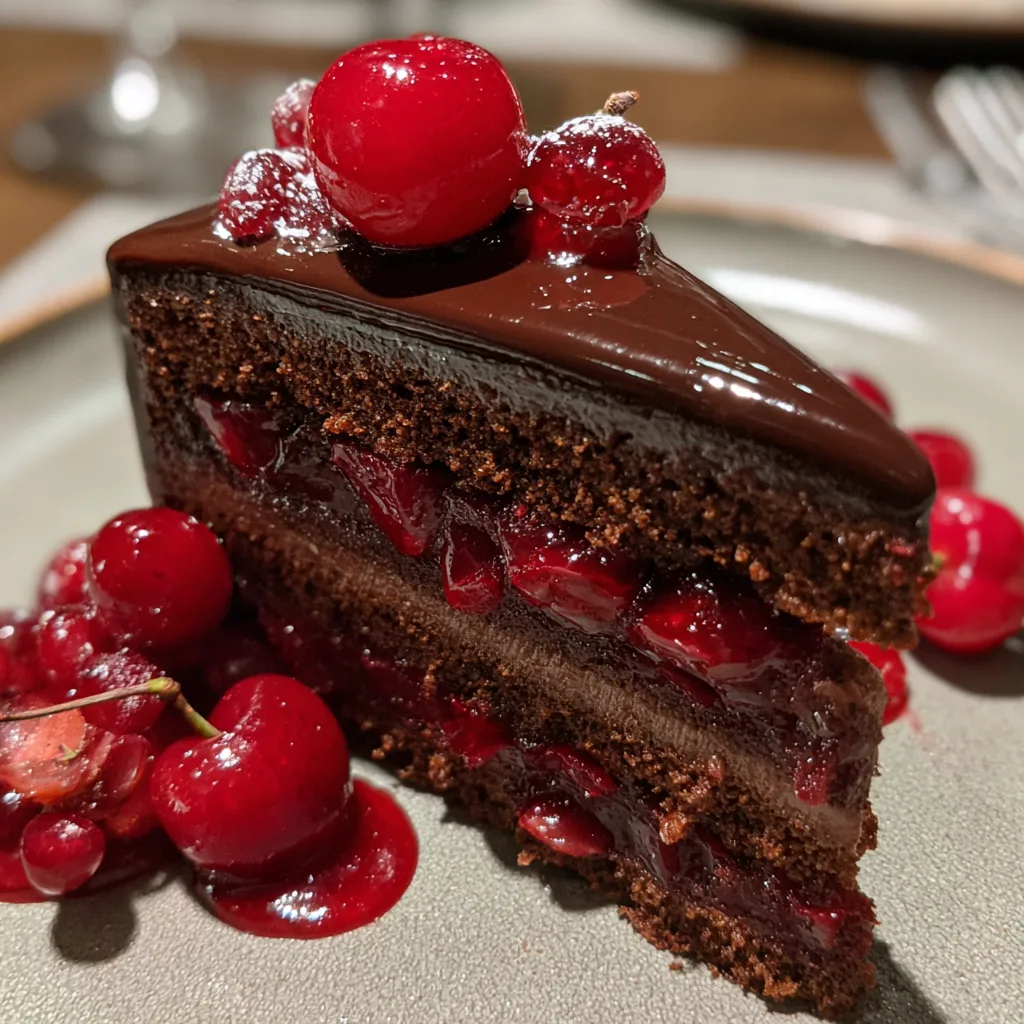
- The Glossy Pour: Take your slightly cooled but still fluid ganache and pour it generously over the top center of the cake. Use an offset spatula to gently coax the ganache over the edges, allowing it to cascade down the sides in thick, glossy ribbons. Ensure the top is completely coated and shines like a mirror.
- Garnish: While the ganache is still wet and sticky, scatter your dark chocolate shavings or crushed cocoa nibs around the outer top edge of the cake. Place a single, perfect, bright red cherry with its stem right in the center of the top layer. Scatter extra fresh cherries around the base of the cake on the plate for a beautiful, rustic presentation.
- Set: Allow the cake to sit at room temperature for about 30 minutes to let the ganache set slightly before slicing. Use a hot, clean knife to cut a thick wedge, revealing the stunning, gooey, vibrant red layers inside.
Pro-Tips for a Flawless Cake
Achieving bakery-level results at home comes down to a few professional secrets. First, always ensure your eggs and buttermilk are at room temperature. Cold ingredients will shock the melted fats (like the oil) and cause the batter to curdle, resulting in a dense, heavy cake rather than a light, fluffy sponge.
Second, if you are worried about the cherry filling leaking out between the layers, you can create a “dam.” Take a small amount of chocolate buttercream (if you have some on hand) or whip a tiny portion of the ganache until fluffy, put it in a piping bag, and pipe a ring around the perimeter of the cake layer before filling the center with the cherry compote. This locks the gooey filling safely inside.
Finally, for the ultimate clean slice, heat your knife under hot running water, wipe it completely dry with a towel, and then make your cut. Wipe the blade clean and re-heat between every single slice. This prevents the dark chocolate crumbs from dragging through the vibrant red cherry filling, keeping your layers looking sharp and distinct.
Variations to Try
While this recipe is phenomenal as written, it serves as a wonderful canvas for customization. If you want to lean into the traditional German roots of this flavor profile, transform it into a true Schwarzwälder Kirschtorte (Black Forest Cake). To do this, brush the baked cake layers generously with Kirschwasser (a clear cherry schnapps) before adding the filling. You would also typically substitute the glossy ganache for a thick coating of stabilized whipped cream.
For a sweeter, contrasting look, consider substituting half of the dark chocolate in the ganache with high-quality white chocolate, or use white chocolate shavings for the garnish. The bright white against the dark cake and red cherries makes for a visually stunning holiday centerpiece. You can also experiment with the fruit—if cherries aren’t your favorite, this exact same method works beautifully with fresh raspberries or blackberries, simply adjusting the sugar in the compote to taste.
Serving and Storing Suggestions
Because of the fresh fruit filling and the cream-based ganache, this cake is best stored in the refrigerator if you are keeping it for more than 24 hours. Place it in an airtight cake dome to prevent it from absorbing fridge odors. However—and this is crucial—chocolate cake always tastes best at room temperature. The fats in the cake and the ganache solidify in the cold, dulling the flavor and firming up the texture. Always pull the cake out of the refrigerator at least 90 minutes before serving to allow it to come to room temperature, restoring its ultra-soft crumb and gooey filling.
When serving, a slice of this rich cake pairs magnificently with a dollop of unsweetened whipped cream or a scoop of premium vanilla bean ice cream. The cold, creamy dairy provides a refreshing contrast to the intense, dark chocolate and tangy fruit. Accompany it with a cup of dark roast coffee or a shot of espresso to truly elevate the tasting experience.
Fun Facts and Cultural Context
The pairing of chocolate, cherries, and cream is inextricably linked to the Black Forest mountain range in southwestern Germany. Interestingly, the famous Schwarzwälder Kirschtorte wasn’t named after the Black Forest itself, but rather after the specialty liquor of the region, Schwarzwälder Kirsch(wasser), which is distilled from tart cherries. By German law, a cake cannot be legally sold under the name Schwarzwälder Kirschtorte unless it contains this specific cherry schnapps.
While our Decadent Chocolate Cherry Cake omits the alcohol to be family-friendly and focuses on an intensely glossy ganache rather than the traditional whipped cream frosting, it pays homage to this historic flavor profile. The vibrant red of the cherries against the dark chocolate evokes the traditional costumes of the Black Forest women, who wear dresses with striking black elements and hats adorned with large, bright red pom-poms (called Bollenhut), perfectly mirroring the aesthetic of a cherry perched atop a dark chocolate cake.
Conclusion
Baking this Decadent Chocolate Cherry Cake is an act of culinary love. It requires patience to build the layers, care to achieve the perfect glossy shine, and a true appreciation for the magic of contrasting flavors. The moment you cut into it, watching the crimson cherry filling slowly ooze out between the dark, moist layers of chocolate sponge, you will know the effort was entirely worth it. It is wet, glistening, thoroughly indulgent, and guaranteed to leave your family and guests absolutely speechless. Gather your ingredients, preheat your oven, and prepare to create a truly unforgettable dessert.
Decadent Chocolate Cherry Cake
Ingredients
Equipment
Method
- Preheat oven to 350°F (175°C). Grease and parchment-line three 8-inch round cake pans.
- Whisk together flour, sugar, cocoa powder, baking soda, baking powder, and salt in a large bowl.
- In a separate bowl, combine buttermilk, oil, eggs, and vanilla. Add wet ingredients to dry ingredients and mix on low speed.
- Carefully pour in hot coffee while mixing on low until a thin batter forms. Divide into pans.
- Bake 25-30 minutes. Cool in pans for 15 minutes, then turn out onto wire racks to cool completely.
- For the filling, simmer cherries, sugar, water, and lemon juice for 10 minutes. Stir in cornstarch slurry and cook until thick and glossy. Cool completely.
- For the ganache, heat cream until simmering. Pour over chopped chocolate, let sit 5 minutes, then gently whisk. Stir in corn syrup and butter until ultra-shiny.
- Assemble the cake by alternating cake layers and cherry compote. Pour the slightly cooled, liquid ganache over the top, letting it drip down the sides. Garnish with fresh cherries and chocolate shavings.