Avocado Truffle Cookies
The Ultimate Adorable Avocado Chocolate Truffle Cookies Recipe
Welcome to the most delightful, whimsical, and utterly delicious baking project you will take on this season. If you are looking for a show-stopping treat that will make everyone smile before they even take their first bite, these Adorable Avocado Chocolate Truffle Cookies are exactly what you need. Combining the buttery, melt-in-your-mouth texture of a classic sugar cookie with the rich, luxurious indulgence of a milk chocolate truffle, these cookies are a masterpiece of homemade baking.
Food trends come and go, but the combination of cute aesthetics and decadent flavors never goes out of style. The “kawaii” (cute) food movement has taken the internet by storm, and these avocado-shaped cookies with little smiley faces and giant chocolate “pits” are at the forefront of this trend. Whether you are baking for a birthday party, a fun weekend project with the kids, a themed celebration, or simply to bring a bit of joy into your kitchen, this comprehensive guide will walk you through every single step to achieve bakery-quality, picture-perfect results.
What Are Avocado Truffle Cookies?
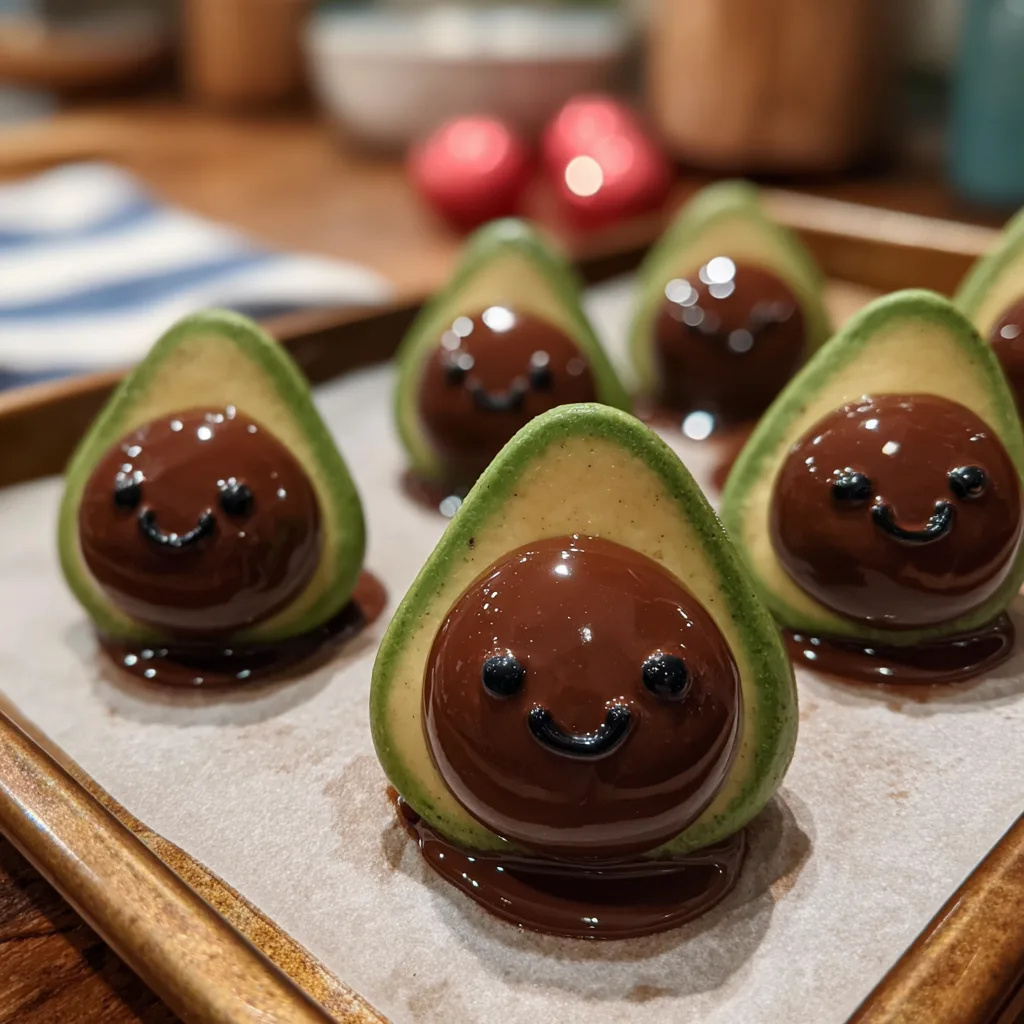
At their core, Avocado Truffle Cookies are a clever visual trick paired with an incredible flavor combination. The base is a tender, sweet vanilla cookie dough that has been tinted with vibrant green food coloring (or natural matcha powder, if you prefer). The dough is carefully shaped by hand into teardrops to mimic the iconic silhouette of a halved avocado.
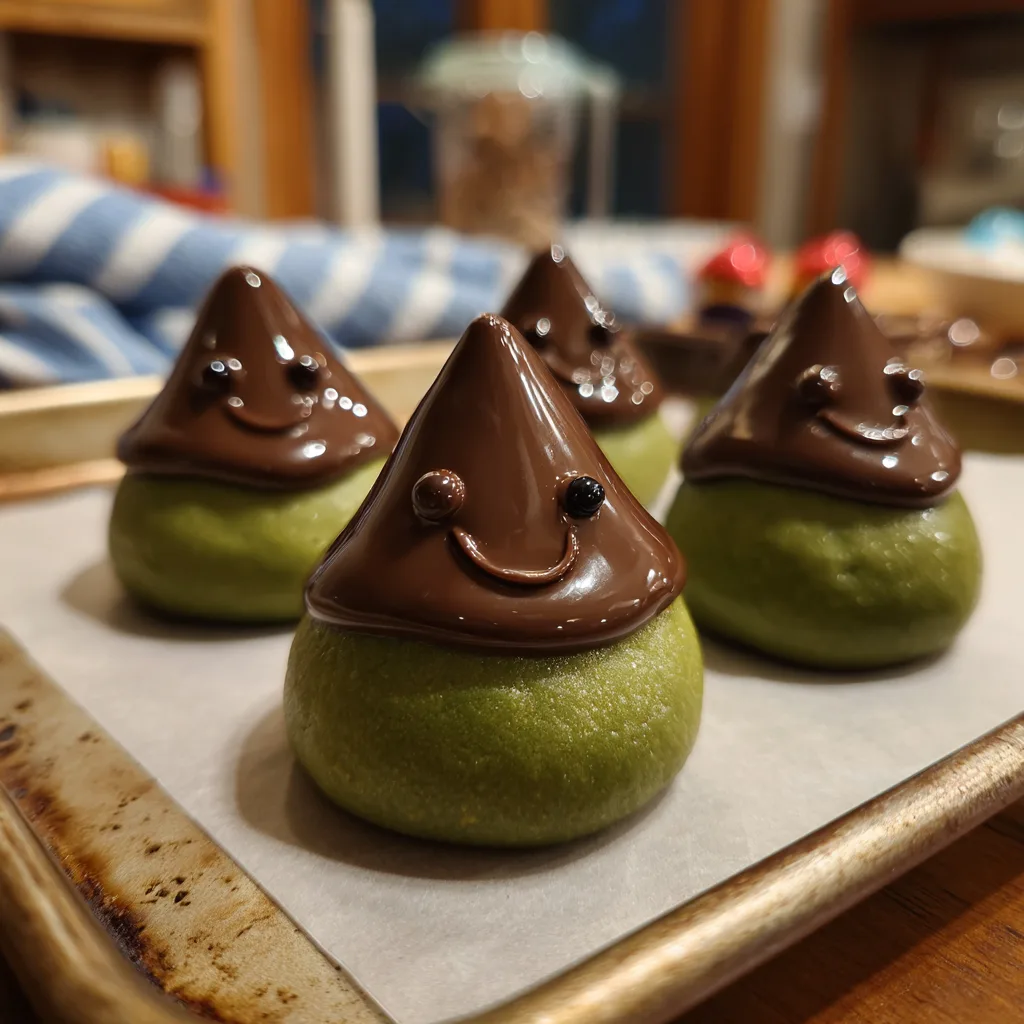
The magic happens right after the cookies come out of the oven. While the dough is still warm and soft, a completely unwrapped, perfectly round milk chocolate truffle—specifically, a Lindt Lindor truffle—is gently pressed into the wider bottom half of the cookie. This creates the illusion of the avocado’s pit. Because the cookie is warm, the bottom of the chocolate truffle melts just enough to adhere securely to the cookie without losing its beautiful spherical shape on top. Finally, once the cookie has cooled, melted dark chocolate is used to pipe on tiny, adorable eyes and a sweet little smile on the top half of the “avocado.”
Why You Will Fall in Love with This Recipe
There are countless reasons why these cookies will quickly become a staple in your baking repertoire. First and foremost is the undeniable visual appeal. In a world full of standard round drop cookies, pulling out a tray of smiling green avocados is guaranteed to elicit gasps of delight. They are highly photogenic and perfect for sharing on social media.
Secondly, the taste is phenomenal. The contrast between the soft, buttery, vanilla-scented green cookie and the rich, creamy, velvety chocolate truffle is a match made in heaven. When you bite into the cookie, the truffle provides a sudden burst of rich cocoa flavor that perfectly balances the sweetness of the dough.
Finally, they are surprisingly easy to make. While they look like they require the skills of a professional pastry chef, the actual process is incredibly straightforward. Shaping the dough is a fun, tactile activity that feels like playing with playdough, making it a fantastic recipe to involve children in. There are no complicated cookie cutters required—just your hands and a bit of imagination.
Detailed Breakdown of Ingredients Needed
To achieve the perfect texture, shape, and flavor, every ingredient in this recipe plays a crucial role. Here is a deep dive into what you will need and why:
- – 2 1/2 cups All-purpose flour: The structural foundation of our cookies. It provides the right amount of gluten to hold the avocado shape without becoming tough. Be sure to measure your flour by spooning it into the measuring cup and leveling it off, rather than scooping directly from the bag, which can pack the flour and lead to dry cookies.
- – 1/2 teaspoon Baking powder: This provides a tiny bit of lift to the cookies, making them tender rather than dense. We use a small amount because we do not want the cookies to puff up too much and lose their distinct avocado shape.
- – 1/4 teaspoon Salt: A crucial ingredient in any sweet recipe. Salt enhances the vanilla flavor and balances the overall sweetness of the sugar and the chocolate.
- – 1 cup Unsalted butter (softened): Butter is the heart of a good sugar cookie. Using unsalted butter allows you to control the exact sodium content. It must be softened to room temperature so it can properly cream with the sugar, creating air pockets that make the cookie light.
- – 1 cup Granulated sugar: Provides the perfect amount of sweetness and helps create crisp edges while maintaining a soft center.
- – 1 large Egg (room temperature): The egg acts as a binder, holding the dough together, while also providing moisture and richness. A room temperature egg incorporates much more smoothly into the butter and sugar mixture.
- – 1 1/2 teaspoons Pure vanilla extract: Flavor is key here. Since the dough is a basic sugar cookie, a high-quality vanilla extract will shine through and provide a warm, comforting aroma.
- – Green food coloring (gel preferred): To get that vibrant, recognizable avocado green. Gel food coloring is highly recommended over liquid drops because it provides intense color without adding excess moisture to the dough, which could alter the baking consistency. Alternatively, 1 to 2 tablespoons of high-quality culinary grade matcha powder can be used for a natural green color and an earthy flavor.
- – 24 Milk Chocolate Truffles (like Lindt Lindor): These are the “pits” of our avocados. Lindt truffles are perfect because of their exact spherical shape and their incredibly creamy centers. Ensure they are unwrapped and kept in the fridge until the very moment you need them so they don’t melt instantly upon contact with the warm cookie.
- – 1/4 cup Dark chocolate chips or candy melts: This will be melted down and used as the “ink” to pipe on the tiny kawaii eyes and smiles. Dark chocolate provides a great color contrast against the green dough.
Step-by-Step Instructions
Follow these numbered steps meticulously to ensure your avocado cookies turn out perfectly shaped and utterly adorable.
- Prepare the Dry Ingredients: In a medium-sized mixing bowl, whisk together the all-purpose flour, baking powder, and salt. Ensure they are well combined. Set this bowl aside.
- Cream the Butter and Sugar: In a large bowl, using a hand mixer or a stand mixer fitted with the paddle attachment, beat the softened unsalted butter and granulated sugar together on medium-high speed. Continue to beat for about 2 to 3 minutes until the mixture is visibly lighter in color, pale, and fluffy. This step is crucial for the texture of the cookie.
- Add the Wet Ingredients: Scrape down the sides and bottom of the bowl with a rubber spatula. Add the room temperature egg and the pure vanilla extract. Beat on medium speed until completely combined and smooth.
- Color the Dough: This is the fun part! Add your green gel food coloring to the wet mixture. Start with a few drops and mix. Continue adding coloring until you reach a vibrant, vivid avocado green. Remember that the color will dull very slightly as it bakes, so make it just a touch brighter than your desired end result. If using matcha powder instead of coloring, add it during step 1 with the dry ingredients.
- Incorporate Dry Ingredients: Turn your mixer down to the lowest speed setting. Gradually add the flour mixture into the wet ingredients in three separate batches. Mix just until the flour disappears. Do not overmix, or your cookies will become tough and bread-like. The dough should be soft but not overly sticky.
- Chill the Dough: Gather the dough into a ball, flatten it slightly into a thick disk, and wrap it tightly in plastic wrap. Refrigerate the dough for at least 1 hour, or up to overnight. Chilling rests the gluten and solidifies the butter, which prevents the cookies from spreading flat in the oven and losing their avocado shape.
- Preheat and Prepare: When you are ready to bake, preheat your oven to 350 degrees Fahrenheit (175 degrees Celsius). Line two large baking sheets with high-quality parchment paper or silicone baking mats.
- Shape the Avocados: Remove the dough from the refrigerator. Scoop out roughly 1.5 tablespoons of dough per cookie. Roll the dough into a smooth ball in the palms of your hands. Then, gently pinch and roll one side of the ball to elongate it, creating a pear or teardrop shape. Place them on the prepared baking sheet about 2 inches apart. Gently press down on the dough to flatten the top slightly—you want them to have a flat surface to hold the truffle later.
- Bake: Bake in the preheated oven for 10 to 12 minutes. The edges should be set, but the cookies should not turn brown, as that will ruin the green aesthetic. They will look slightly underbaked in the center, which is exactly what you want for a soft cookie.
- Plant the Truffle “Pit”: Remove the baking sheets from the oven. Allow the cookies to cool on the pan for exactly 1 minute. Do not wait too long, but do not do it the absolute second they come out. Take your chilled, unwrapped chocolate truffles and gently press one into the wider, bottom half of each warm cookie. The residual heat will melt the bottom of the truffle just enough to glue it in place.
- Cool Completely: Let the cookies remain on the baking sheet for another 5 minutes before carefully transferring them to a wire cooling rack to cool completely. The chocolate truffles will become soft from the heat, so do not touch them until they have fully cooled and re-solidified.
- Pipe the Faces: Once the cookies and truffles are 100% cool to the touch, melt your dark chocolate chips in a microwave-safe bowl in 15-second increments, stirring in between, until smooth. Transfer the melted chocolate to a small piping bag or a ziplock bag and snip off the absolute tiniest tip of the corner. Carefully pipe two small dots for eyes and a little curved line for a smile on the narrower top half of the green cookie. Let the chocolate set before serving.
Expert Tips for the Perfect Avocado Shape and Texture
Baking is a science, and when it comes to novelty shaped cookies, precision is key. Here are some expert tips to guarantee success:
The Importance of Chilled Truffles: The biggest risk in this recipe is the chocolate truffle melting completely into a puddle when placed on the hot cookie. To combat this, keep your unwrapped truffles in the refrigerator or even the freezer while the cookies bake. A cold truffle placed on a warm cookie will melt just at the contact point, acting as an edible adhesive, while the top of the truffle remains perfectly round.
Working with Gel Colors: Liquid food coloring from the grocery store adds too much liquid to the dough, which can cause the cookies to spread. Gel food coloring is highly concentrated. You only need a tiny amount to achieve a brilliant, saturated color. Use a toothpick to add the color a little bit at a time. If you want a more realistic avocado look, you can make the edges of the dough slightly darker green by rolling the finished teardrops in a tiny bit of darker green sanding sugar before baking, mimicking the avocado skin.
Do Not Overbake: Because these cookies are tinted green, any browning will make them look muddy and unappetizing. Bake them just until the surface loses its raw shine and the edges are set. They will continue to cook slightly on the hot baking sheet once removed from the oven.
Fun Variations and Customizations
While the classic vanilla sugar cookie is a crowd-pleaser, there are numerous ways to customize this recipe to suit your taste preferences or dietary needs.
The Matcha Avocado: For an earthy, sophisticated flavor and a completely natural green tint, skip the artificial food coloring and add 1.5 to 2 tablespoons of premium culinary-grade matcha green tea powder to your dry ingredients. Matcha pairs incredibly well with chocolate, making the flavor profile more complex and less overwhelmingly sweet.
Mint Chocolate Chip Avocados: Add 1/2 teaspoon of peppermint extract to the dough along with the vanilla. The cool mint flavor complements the green color and pairs perfectly with the chocolate truffle pit.
Alternative “Pits”: If you cannot find Lindt Lindor truffles, or prefer a different texture, you can substitute the truffle with a large chocolate-covered macadamia nut, a dark chocolate Hershey’s Kiss (with the tip pointing down into the cookie), or a large malted milk ball (like Whoppers). Each will give a slightly different look and flavor experience.
Serving and Storing Suggestions
These cookies are fantastic for parties. Serve them on a large wooden cutting board to play up the “fresh produce” avocado theme, perhaps alongside some standard chocolate chip cookies for variety.
To store them, wait until the melted chocolate faces and the truffle pits are completely set and firm. Place them in a single layer in an airtight container. If you must stack them, place a layer of wax paper or parchment paper between the layers, taking care not to crush the truffles or smear the piped faces. They will keep at room temperature for up to 5 days. For longer storage, you can freeze the baked green cookies (without the truffles or faces) for up to 3 months. Thaw at room temperature, then use a dab of melted chocolate to attach the truffles and pipe the faces.
Fun Facts and Cultural Context: The Rise of Kawaii Food
The aesthetic of “kawaii”—the Japanese culture of cuteness—has profoundly influenced modern baking. Giving inanimate objects, especially food, faces and personalities brings an element of playfulness and joy to culinary creations. Avocados, with their distinct shape and popularity as a “superfood,” naturally became a target for this trend.
Transforming a savory, trendy brunch staple like an avocado into a sweet, sugary, chocolatey dessert is a delightful subversion of expectations. It plays with the mind—your eyes see a healthy vegetable/fruit, but your mouth experiences a rich, buttery dessert. This playful contradiction is part of what makes these Adorable Avocado Chocolate Truffle Cookies so engaging and memorable for both the baker and the consumer.
Conclusion
Baking should be a joyful experience, and few recipes encapsulate joy quite like these Adorable Avocado Chocolate Truffle Cookies. By combining simple, accessible ingredients with a little bit of creative shaping and decorating, you can produce a bakery-worthy treat that is as fun to look at as it is delicious to eat. So gather your ingredients, tint that dough green, and get ready to bake up some smiles!
Adorable Avocado Chocolate Truffle Cookies
Ingredients
Equipment
Method
- In a medium bowl, whisk together the flour, baking powder, and salt. Set aside.
- In a large bowl, cream the softened butter and sugar together until light and fluffy (about 2-3 minutes).
- Add the egg and vanilla extract to the butter mixture, beating until well combined.
- Add the green gel food coloring until you reach a vibrant avocado green color.
- Gradually add the dry ingredients to the wet mixture, mixing on low speed just until combined. Do not overmix.
- Cover the dough and chill in the refrigerator for at least 1 hour.
- Preheat oven to 350°F (175°C). Line baking sheets with parchment paper.
- Scoop 1.5 tablespoons of dough, roll into a ball, then pinch one side to create a teardrop/avocado shape. Place on baking sheet and flatten slightly.
- Bake for 10-12 minutes until edges are set but not browned.
- Let cookies cool on the pan for exactly 1 minute, then gently press a cold, unwrapped chocolate truffle into the wide bottom half of each cookie.
- Transfer completely cooled cookies to a wire rack. Melt the dark chocolate chips, place in a piping bag with a tiny hole, and pipe on two eyes and a smile.