Cotton Candy Lemonade
The Ultimate Layered Cotton Candy Lemonade: A Taste of Summer Magic
There is something undeniably magical about the transition of seasons, especially when the warm breeze of summer begins to roll in, bringing with it the promise of long afternoons, backyard barbecues, and the nostalgic joy of local fairs and carnivals. If you were to bottle up that exact feeling of carefree summer joy, it would look and taste exactly like this vibrant, layered Cotton Candy Lemonade. This isn’t just a beverage; it is a sensory experience that instantly transports you back to childhood days spent wandering the midway, sticky fingers clutching a freshly spun cone of pink and blue sugar.
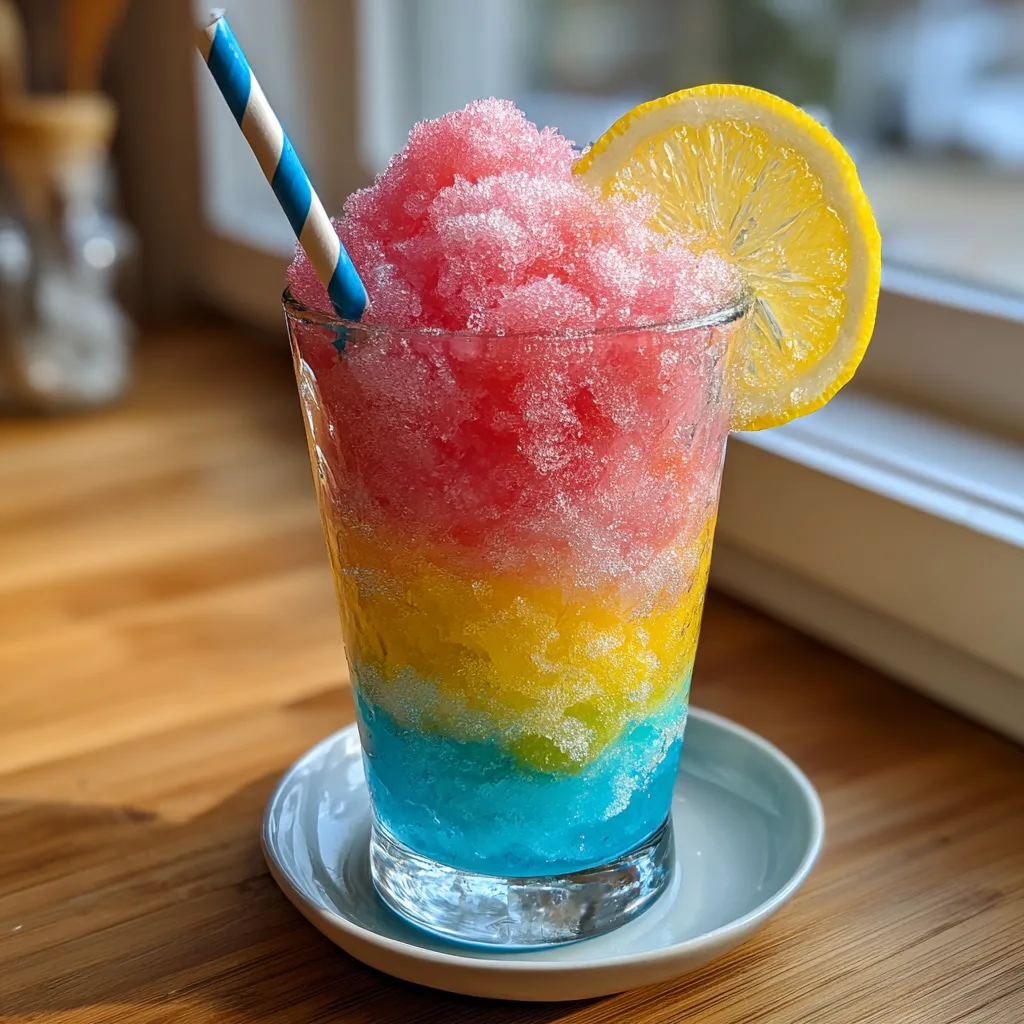
In recent years, the culinary world has seen a massive resurgence in nostalgic, carnival-inspired flavors. We are no longer satisfied with plain iced tea or standard lemonade. We want drinks that are visually stunning, delightfully interactive, and bursting with whimsical flavors. This layered frozen treat combines the tart, refreshing zing of classic homemade lemonade with the sweet, unmistakable flavor of cotton candy. Served in a tall glass showcasing distinct, bright layers of pink, yellow, and blue, it is guaranteed to be the showstopper at your next gathering, pool party, or simple weekend treat.

The Nostalgia of Carnival Flavors in Modern Mixology
To truly appreciate the brilliance of Cotton Candy Lemonade, we have to look at why these flavors resonate so deeply with us. Cotton candy, invented in the late 19th century by a dentist (ironically enough) and a confectioner, was originally called “Fairy Floss.” It made its grand debut at the 1904 St. Louis World’s Fair, captivating audiences with its seemingly magical transformation from solid sugar crystals into delicate, web-like clouds.
Today, that flavor profile—a specific blend of ethyl maltol and vanilla—triggers an almost immediate psychological response. It is sweet, airy, and deeply comforting. When you pair that unapologetic sweetness with the sharp, acidic bite of fresh lemon juice, you create a perfect balancing act. The lemonade cuts through the heavy sugar of the cotton candy syrup, preventing the drink from becoming cloying or overwhelming. Instead, you get a refreshing, frosty slush where every sip dances between tart and sweet.
The Science Behind Perfect Drink Layering
One of the most common questions people ask when they see a photograph of this drink is, “How do you keep the colors from mixing together into a muddy brown mess?” The secret lies in a combination of temperature, texture, and density. Because we are making a frozen, slushy-style lemonade, the ice acts as a structural barrier.
When you blend ice with liquid, you create a semi-solid suspension. By blending each color layer separately and keeping them thick and frosty, they can bear the weight of the next layer without instantly bleeding into one another. The cold temperature slows down the melting process, giving you plenty of time to assemble the drinks, serve them, and snap a few gorgeous photos before the colors begin to naturally swirl together into a beautiful tie-dye effect.
Ingredients You Will Need
To create this magical layered concoction, you will need a few standard kitchen staples along with some specific flavoring agents. Here is the breakdown:
- – 1 cup fresh lemon juice (about 6-8 large lemons)
- – 1 cup granulated sugar
- – 1 cup water (for simple syrup)
- – 3 tablespoons cotton candy flavored syrup (blue or pink)
- – 6 cups crushed ice
- – 1 cup cold filtered water (for blending)
- – 2 drops pink gel food coloring
- – 2 drops blue gel food coloring
- – 1 fresh lemon (sliced into wheels, for garnish)
Ingredient Notes: Fresh lemon juice is absolutely non-negotiable here. Bottled lemon juice contains preservatives that alter the flavor, giving it a flat, sometimes metallic taste. Taking the extra five minutes to squeeze fresh lemons provides the bright, aromatic acidity needed to balance the sweet cotton candy syrup. For the cotton candy syrup, you can find this in the coffee aisle of most major grocery stores or order it online. Gel food coloring is preferred over liquid drops because it is highly concentrated; you only need a tiny amount to achieve vibrant, neon colors without adding extra liquid that could water down your slush.
Essential Equipment
You don’t need a commercial kitchen to make this stunning drink, but a few key tools will make the process infinitely smoother. First and foremost, a high-powered blender is your best friend. A standard blender can work, but a high-speed model will pulverize the ice into a smooth, even snow-like consistency rather than leaving chunky, uneven pieces. You will also need a citrus juicer, a small saucepan for making the simple syrup, and tall, clear glasses (like Collins or highball glasses) to properly show off the distinct colorful layers.
Step-by-Step Instructions
- Prepare the Simple Syrup: In a small saucepan, combine the granulated sugar and 1 cup of water. Place over medium heat, stirring occasionally, until the sugar is completely dissolved and the liquid is clear. Do not let it boil. Remove from heat and let it cool completely to room temperature. This is your sweet base.
- Juice the Lemons: While the syrup is cooling, wash and roll your lemons firmly on the countertop. This bursts the internal cell walls and yields more juice. Cut them in half and extract 1 cup of fresh juice. Strain the juice through a fine-mesh sieve to remove any pulp or errant seeds.
- Mix the Lemonade Base: In a large pitcher, combine the cooled simple syrup, the freshly strained lemon juice, and the cotton candy syrup. Stir well to combine. This highly concentrated sweet-and-sour mixture will flavor all three layers of your slush.
- Blend the First Layer (Pink): Pour one-third of your lemonade base into the blender. Add 2 cups of crushed ice and a splash of cold water (about 2 tablespoons). Add 1-2 drops of pink gel food coloring. Blend on high until you achieve a thick, smooth, frozen consistency. If it is too watery, add a handful more ice. Spoon this pink slush evenly into the bottom of your serving glasses. Place the glasses in the freezer while you make the next layer.
- Rinse the Blender: Quickly rinse the blender pitcher to prevent color mixing.
- Blend the Second Layer (Yellow): Pour the next third of your lemonade base into the blender. Add 2 cups of ice and a splash of water. Do not add any food coloring to this batch; the natural lemon juice and syrup will give it a subtle, pale yellow hue. Blend until thick and smooth. Retrieve your glasses from the freezer and gently spoon this yellow layer directly on top of the pink layer. Return the glasses to the freezer.
- Rinse the Blender Again: Give the blender another quick rinse.
- Blend the Third Layer (Blue): Pour the final third of the lemonade base into the blender. Add the remaining 2 cups of ice, a splash of water, and 1-2 drops of blue gel food coloring. Blend on high until frosty and perfectly blue.
- Final Assembly: Take the glasses out of the freezer. Carefully spoon the blue slush on top of the yellow layer, creating a domed, bubbly effect at the top of the glass.
- Garnish and Serve: Immediately garnish each glass with a fresh lemon wheel placed on the rim and insert a colorful, striped paper straw. Serve right away while the slush is icy and the layers are clearly defined.
Pro Tips for the Best Slush Texture
Achieving that perfect, spoonable slush texture is the key to this recipe’s success. The ratio of sugar to water to ice is critical. Sugar acts as an antifreeze; if you use too much simple syrup, the mixture will never freeze properly and will remain a liquid. If you use too little, you will end up with a solid block of flavored ice. The recipe above provides the optimal balance. If you find your blender struggling to process the ice, use a tamper (if your blender has one) to push the ice down towards the blades, or stop the machine and stir the mixture manually before blending again.
Fun Variations and Customizations
The beauty of this recipe is its versatility. Once you master the basic layering technique, the possibilities are endless.
The Adult Version (Spiked Lemonade): For a grown-up summer party, you can easily turn this into a vibrant cocktail. Simply add 1 to 1.5 ounces of high-quality vodka or white rum to each layer during the blending process. Coconut rum is a particularly delicious addition that pairs beautifully with the cotton candy flavor, giving the drink a tropical twist. Note that alcohol lowers the freezing point, so you may need to add slightly more ice to maintain the thick slush consistency.
Sugar-Free Alternative: If you want to cut down on the sugar, you can swap the granulated sugar for a monk fruit or erythritol sweetener when making the simple syrup. Additionally, look for zero-calorie cotton candy syrups (often found in the diet section of coffee supply shops). The texture will be slightly icier without the traditional sugar, but it remains incredibly refreshing.
Different Flavor Profiles: Not a fan of cotton candy? You can use this exact layering method with other flavors. Try a tropical sunset version using strawberry syrup for the bottom, mango for the middle, and blue curaçao syrup for the top. Or create a “galaxy” lemonade using grape syrup, blueberry syrup, and blackberry puree.
Serving Suggestions and Party Themes
Presentation is everything when it comes to a drink this visually striking. Serve these in the tallest, clearest glasses you own to highlight the distinct layers. Highball glasses, Collins glasses, or even large mason jars work wonderfully. For garnishes, the classic lemon wheel is elegant, but you can lean into the whimsical theme by topping the drink with a tuft of actual, freshly spun cotton candy right before serving. Just be warned—as soon as the real cotton candy touches the wet slush, it will begin to melt and dissolve, which is a fun, interactive trick for kids to watch!
This drink is an absolute must-have for carnival-themed birthday parties, baby showers (the pink and blue are perfect for gender reveals!), or Fourth of July backyard cookouts. You can prepare the simple syrup and juice the lemons a day in advance, storing them in the refrigerator so that all you have to do when guests arrive is blend and assemble.
Storage and Make-Ahead Advice
Because this is a frozen, ice-based drink, it does not store well as a finished product. If you place the fully assembled layered drinks in the freezer for too long, they will freeze solid into an un-drinkable block. If you leave them in the fridge, they will melt into a single, muddy-colored liquid. This drink is truly best enjoyed immediately after blending.
However, you can prep almost everything else. The lemonade base (lemon juice, simple syrup, cotton candy flavoring) can be mixed together and stored in an airtight jar in the refrigerator for up to a week. When a craving strikes, simply measure out a portion, add ice and food coloring, and blend.
Frequently Asked Questions
Can I use store-bought lemonade instead of making my own?
Yes, you certainly can. If you are short on time, you can substitute the lemon juice, sugar, and water with 3 cups of high-quality store-bought lemonade. Simply mix the cotton candy syrup directly into the store-bought lemonade and proceed with the blending instructions. However, the fresh tartness of homemade lemonade does provide a much better flavor contrast.
Why did my colors mix together immediately?
This usually happens if your slush is too thin or watery. The layers must be thick enough to stack on top of one another. Ensure you are using enough ice. Also, pouring too aggressively can force the top layer down into the bottom layer. Always spoon the slush gently into the glass.
Is there a natural way to dye the layers without artificial food coloring?
Absolutely! If you prefer to avoid artificial dyes, you can use natural alternatives. For the pink layer, blend in a small handful of freeze-dried strawberries or raspberries, or a splash of beet juice. For the blue layer, a tiny pinch of blue spirulina powder works miracles and won’t noticeably alter the flavor of the lemonade.
Conclusion
Creating this Layered Cotton Candy Lemonade is more than just following a recipe; it is an exercise in joy. It brings bright colors, nostalgic flavors, and icy refreshment together in a single, towering glass. Whether you are treating your family on a hot Tuesday afternoon or serving a crowd at a festive summer gathering, this drink promises to deliver smiles, stunning aesthetics, and a truly delicious, sweet-tart flavor profile. Gather your ingredients, fire up the blender, and get ready to pour a little bit of summer magic into your glass.
Cotton Candy Lemonade
Ingredients
Equipment
Method
- In a small saucepan, simmer sugar and 1 cup water until dissolved to make simple syrup. Let cool completely.
- Combine cooled simple syrup, fresh lemon juice, and cotton candy syrup in a pitcher to create the lemonade base.
- Pour 1/3 of the lemonade base into a blender. Add 2 cups ice, a splash of water, and pink food coloring. Blend until slushy. Spoon into the bottom of 3 tall glasses and place in freezer.
- Rinse blender. Blend another 1/3 of the lemonade base with 2 cups ice and a splash of water (no food coloring). Gently spoon this yellow layer over the pink layer in the glasses. Return to freezer.
- Rinse blender. Blend the remaining lemonade base with 2 cups ice, a splash of water, and blue food coloring. Spoon over the yellow layer.
- Garnish with a fresh lemon wheel and a colorful straw. Serve immediately.