Cheesy Beef Mini Taco Cups
Welcome to your new favorite way to celebrate taco night! If you are looking for a fun, creative, and incredibly delicious twist on a classic family dinner, you have found it. Cheesy Beef Mini Taco Cups are taking the culinary world by storm, and it is easy to see why. These delightful, bite-sized wonders combine everything you love about a traditional beef taco—the savory spiced meat, the gooey melted cheese, and the fresh, zesty toppings—and pack it all into a convenient, edible, golden-brown crust.
In this comprehensive guide, we are going to explore every single facet of making the perfect taco cup. We will dive deep into the best ingredients to use, the techniques for getting a perfectly crispy base without a soggy bottom, and how to customize these little flavor bombs to suit any palate. Whether you are hosting a lively Super Bowl party, looking for an engaging appetizer for a holiday gathering, or just trying to get your kids excited about dinner on a busy Tuesday night, these mini taco bowls are guaranteed to be a massive hit.
🏆 Why Mini Taco Cups are the Perfect Party Food
When it comes to entertaining, finger foods reign supreme. However, traditional tacos can be notoriously messy. Hard shells crack and shatter on the first bite, sending your precious toppings tumbling onto your plate (or your lap). Soft tortillas can become soggy and fall apart if they are overstuffed or left sitting out for too long. This is where the sheer genius of the taco cup comes into play.
By using a muffin tin to bake a sturdy dough base, you create a self-contained vessel that holds all the delicious fillings securely in place. This means your guests can easily mingle, hold a drink in one hand, and enjoy a satisfying, savory treat in the other without fear of a culinary disaster. Furthermore, the portion control is naturally built-in. Guests can grab one or two as a light appetizer, or eat four or five for a full meal. They are visually stunning, looking like little gourmet savory pastries, but they require a fraction of the effort to put together.
🥩 Choosing and Preparing the Best Ground Beef
The heart and soul of any good beef taco is, unsurprisingly, the beef. For these taco cups, choosing the right fat-to-lean ratio is crucial. We highly recommend using an 80/20 or 85/15 ground beef blend. The fat content is essential for keeping the meat juicy and flavorful during the double-cooking process (browning in the skillet and then baking in the oven). If you use a very lean beef, such as a 93/7 blend, you risk the filling becoming dry and crumbly once it is baked.
When browning your meat, patience is a virtue. You want to achieve the Maillard reaction—that beautiful, savory browning that develops complex flavors in the meat. Do not just stir it constantly; let it sit in the hot pan for a minute or two to develop a good crust before breaking it apart. Once browned, draining the excess grease is absolutely mandatory for taco cups. If you skip this step, the grease will pool at the bottom of your dough cups, resulting in a dreaded “soggy bottom.”
As for the seasoning, while store-bought taco seasoning packets are incredibly convenient, making your own homemade blend elevates the dish to a whole new level. A robust mix of chili powder, ground cumin, garlic powder, onion powder, smoked paprika, dried oregano, and a pinch of cayenne pepper allows you to control the sodium levels and tailor the heat exactly to your liking.
🧀 The Secret to the Perfect Cheese Pull
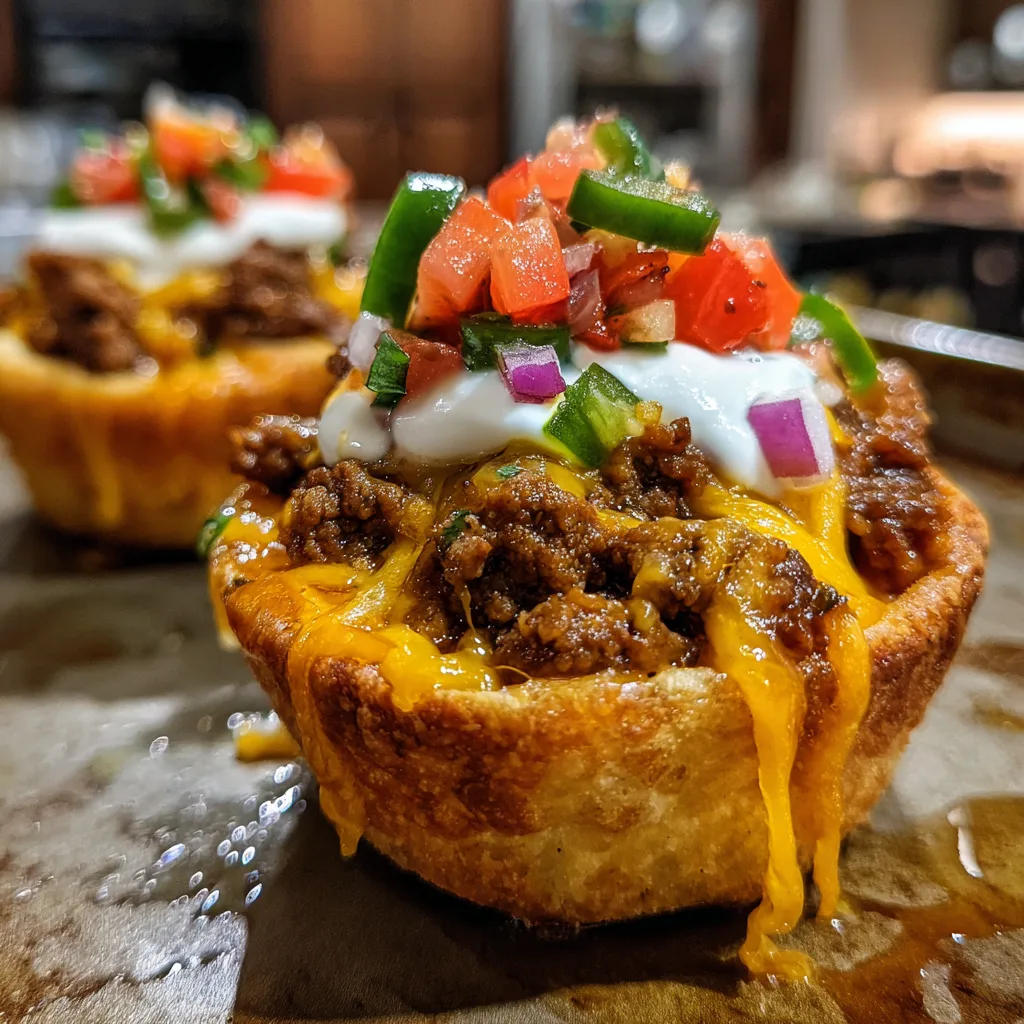
Look at the glorious, melted orange cheese cascading down the side of the taco cup in our featured image. That is the hallmark of a great appetizer. To achieve this, you need to be strategic about your cheese selection.
Sharp cheddar is the classic, undisputed champion of the taco world. It provides a tangy, bold flavor that stands up perfectly to the heavily spiced beef. However, the most important rule of cheese club is this: always shred your own cheese from a block. Pre-shredded bagged cheeses are coated in anti-caking agents like potato starch or cellulose. While this keeps the shreds from clumping in the bag, it also prevents them from melting smoothly, often resulting in a grainy, greasy texture. Taking an extra 60 seconds to run a block of cheddar along a box grater will reward you with a luxurious, gooey, picture-perfect melt.
🌶️ Fresh Toppings: Elevating Your Taco Game
The baking process takes care of the warm, savory elements, but a truly outstanding taco cup requires contrast. You need the bright, acidic, and cool flavors of fresh garnishes to cut through the richness of the beef and cheese. The toppings are where you can really let your creativity shine.
A cool, creamy dollop of sour cream or plain Greek yogurt is the perfect foundation. It immediately soothes the palate from the spicy taco seasoning. Next, you need a vibrant pico de gallo or simply fresh diced tomatoes and red onions, as seen in our recipe. The tomatoes provide a burst of juicy sweetness, while the raw red onion offers a sharp, peppery bite. Finally, the jalapeños. Fresh green jalapeños bring a beautiful color contrast and a crisp, grassy heat. If you are sensitive to spice, make sure to remove the seeds and ribs from the jalapeños, or substitute them with milder green bell peppers.
🥣 Ingredients
Gather these fresh, simple ingredients to build your ultimate taco cups:
For the Base and Filling:
– 1 can (16.3 oz) refrigerated flaky biscuit dough (or seamless crescent roll dough)
– 1 lb ground beef (80/20 or 85/15 blend preferred)
– 1 packet (1 oz) taco seasoning (or 3 tablespoons of homemade taco seasoning)
– 1/3 cup water (for the taco meat simmer)
– 1.5 cups sharp cheddar cheese, freshly grated from a block
– Non-stick cooking spray for the muffin tin
For the Fresh Garnish:
– 1/2 cup sour cream (or full-fat Greek yogurt)
– 1 large Roma tomato, finely diced
– 1/4 cup red onion, finely chopped
– 1 fresh green jalapeño pepper, seeds removed and finely diced
– Fresh cilantro leaves (optional, for an extra pop of green)
👩🍳 Instructions
Follow these step-by-step instructions to ensure your taco cups come out crispy, cheesy, and absolutely perfect:
Cheesy Beef Mini Taco Cups
Ingredients
Equipment
Method
- Preheat oven to 375°F (190°C) and grease a 12-cup muffin tin.
- In a skillet over medium-high heat, brown the ground beef until cooked through. Drain excess grease.
- Add taco seasoning and water to the beef. Simmer for 3-4 minutes until thickened. Set aside.
- Press each biscuit flat and push into the cups of the muffin tin to form a bowl shape.
- Fill each dough cup with the seasoned beef mixture.
- Top generously with freshly grated cheddar cheese.
- Bake for 12-15 minutes until the crust is golden and cheese is melted and bubbly.
- Let cool in the pan for 5 minutes before removing.
- Garnish with sour cream, diced tomatoes, red onions, and jalapeños. Serve immediately.
Notes
- Prep the Oven and Tin: Preheat your oven to 375°F (190°C). Generously spray a standard 12-cup muffin tin with non-stick cooking spray. This is essential to ensure the dough does not stick.
- Brown the Beef: Place a large skillet over medium-high heat. Add the ground beef, breaking it apart with a wooden spoon or meat chopper. Cook for 5 to 7 minutes until the beef is fully browned and no pink remains.
- Drain and Season: Carefully drain the excess grease from the skillet. Return the skillet to the stove, reduce the heat to medium-low, and sprinkle the taco seasoning evenly over the beef. Pour in the water, stir well to combine, and let the mixture simmer for 3-4 minutes until the liquid has thickened and coated the meat beautifully. Remove from heat and set aside.
- Prepare the Dough Cups: Open the can of refrigerated dough. If using biscuits, separate them into individual rounds. Press each biscuit flat, then gently press them into the bottom and up the sides of the prepared muffin tin cups to form a bowl shape. If the dough shrinks back, let it rest for a minute and press again.
- Fill the Cups: Spoon a generous amount of the seasoned ground beef mixture into each dough cup, filling them almost to the top. Press the meat down slightly to ensure it is packed in.
- Add the Cheese: Top each cup generously with the freshly grated sharp cheddar cheese. Don’t be afraid to let a little cheese touch the edges of the tin; those crispy cheese edges are delicious!
- Bake to Perfection: Place the muffin tin in the preheated oven and bake for 12 to 15 minutes. You are looking for the edges of the dough to turn a deep golden brown and the cheese to be completely melted, bubbly, and slightly toasted.
- Cool and Remove: Remove the tin from the oven and let the taco cups rest in the pan for 5 minutes. This resting period allows the dough to set up, making them easier to remove without breaking. Gently run a butter knife around the edges and lift the cups out onto a serving platter.
- Garnish and Serve: Just before serving, top each warm cheesy cup with a dollop of sour cream. Sprinkle with the freshly diced tomatoes, chopped red onions, and jalapeños. Serve immediately and watch them disappear!
💡 Pro Tips for Meal Prep and Storage
While these are fantastic fresh out of the oven, they also make excellent leftovers and can even be frozen for future quick meals.
If you want to make these ahead of time for a party, you can cook the taco meat a day in advance and store it in the fridge. Assembly will then only take minutes before you pop them in the oven. If you have leftovers (which is rare!), store the baked cups in an airtight container in the refrigerator for up to 3 days. Do not add the fresh toppings until you are ready to eat them, as the sour cream and tomatoes will make the crust soggy.
To reheat, the best method is the air fryer or oven. Microwave reheating will result in a soft, chewy crust, whereas 5 minutes in a 350°F air fryer will bring back that glorious buttery crunch to the biscuit base.
🎉 Conclusion: A Bite-Sized Fiesta in Your Mouth
There you have it—the ultimate blueprint for creating the most crave-worthy Cheesy Beef Mini Taco Cups. By paying attention to the details, like draining your beef properly, grating your own cheese, and using the freshest, brightest garnishes, you elevate a simple appetizer into a memorable culinary experience.
These cups are versatile, fun to eat, and pack all the punch of a traditional taco into a neat, tidy, and beautiful little package. The next time you are tasked with bringing a dish to a potluck, or you simply want to shake up your weeknight dinner routine, grab a muffin tin and give this recipe a try. It is a guaranteed crowd-pleaser that will have everyone asking for the recipe. Enjoy your bite-sized fiesta!