Cartoon Puppy Ice Cream
How to Make Adorable Cartoon Puppy Vanilla Ice Cream Cones at Home
There is a special kind of magic that happens when food transcends its basic purpose and becomes a piece of edible art. For decades, theme parks, boardwalks, and specialty dessert shops have captivated audiences—especially children—with novelty treats shaped like beloved characters. Among the most iconic of these are intricately shaped ice cream cones that bring famous animated faces to life. Today, we are bringing that theme park magic straight into your own kitchen with this comprehensive guide to creating Adorable Cartoon Puppy Vanilla Ice Cream Cones. Inspired by classic beagle characters, this whimsical treat combines the timeless appeal of creamy vanilla ice cream and crispy waffle cones with the fun of edible chocolate crafts.
Making shaped ice cream at home might seem like a daunting task reserved for professional pastry chefs with blast chillers and specialized silicone molds. However, with a little bit of patience, the right temperature control, and a few simple pantry ingredients, you can easily sculpt these delightful puppy faces. This recipe is less about complex cooking techniques and more about culinary arts and crafts, making it an incredibly fun weekend project to tackle with family or a show-stopping dessert for a child’s birthday party. In this expansive guide, we will cover everything from choosing the perfect ice cream base to the precise methods for molding, decorating, and serving these delightful frozen treats without them melting into a puddle before you can take a picture.
The Magic Behind Novelty Ice Cream
Why do we love food shaped like animals and characters? The psychology behind cute food, often referred to in Japanese culture as “kawaii” food, suggests that playful presentation enhances our overall eating experience. It taps into a sense of nostalgia, reminding adults of the carefree joy of chasing the ice cream truck down the street for a character pop with gumball eyes. For children, it transforms a simple dessert into an interactive story. A vanilla ice cream cone is delicious on its own, but a vanilla ice cream cone that smiles back at you is an unforgettable memory.
Creating these puppy cones requires a shift in how you handle ice cream. Instead of simply scooping and serving, you are treating the ice cream like a sculpting medium, much like clay or fondant. This means understanding its melting point, knowing when to work quickly, and utilizing your freezer as your most important tool. The process involves building the shape in stages—creating the base head, adding the prominent snout, and finally affixing the delicate chocolate features that bring the character to life.
Choosing the Right Ingredients for the Perfect Sculpt
Because the ingredient list for this recipe is incredibly short, the quality and type of each component matter immensely. You cannot hide behind complex marinades or heavy sauces here; the vanilla ice cream and the chocolate must stand on their own.
The Ice Cream: You need a premium vanilla ice cream. Avoid “light” or airy ice creams (often labeled as frozen dairy desserts) because they contain too much overrun (whipped air). When you try to mold airy ice cream, it collapses and melts far too quickly. Look for a dense, premium vanilla bean or French vanilla ice cream with a high butterfat content. The density will give you a sturdy canvas for sculpting the puppy’s head and will hold its shape much better as you work. If you are feeling adventurous, you can certainly make a homemade vanilla custard-style ice cream, ensuring it is churned to a firm, dense consistency.
The Waffle Cone: A standard cake cone or sugar cone will not provide the right aesthetic or structural support for the large volume of ice cream required for the character’s head. You need a large, sturdy waffle cone with a wide mouth. The crosshatched texture of the waffle cone also adds a beautiful visual contrast to the smooth, pale ice cream.
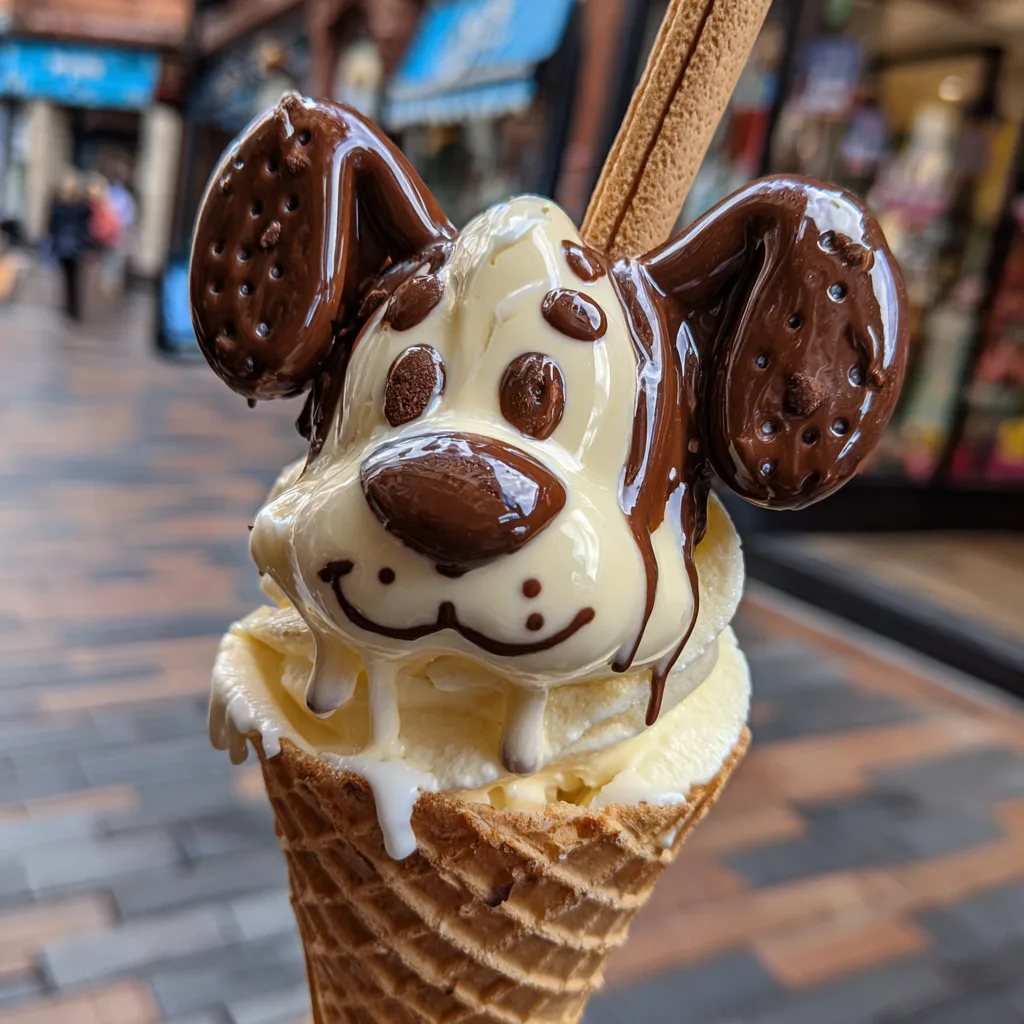
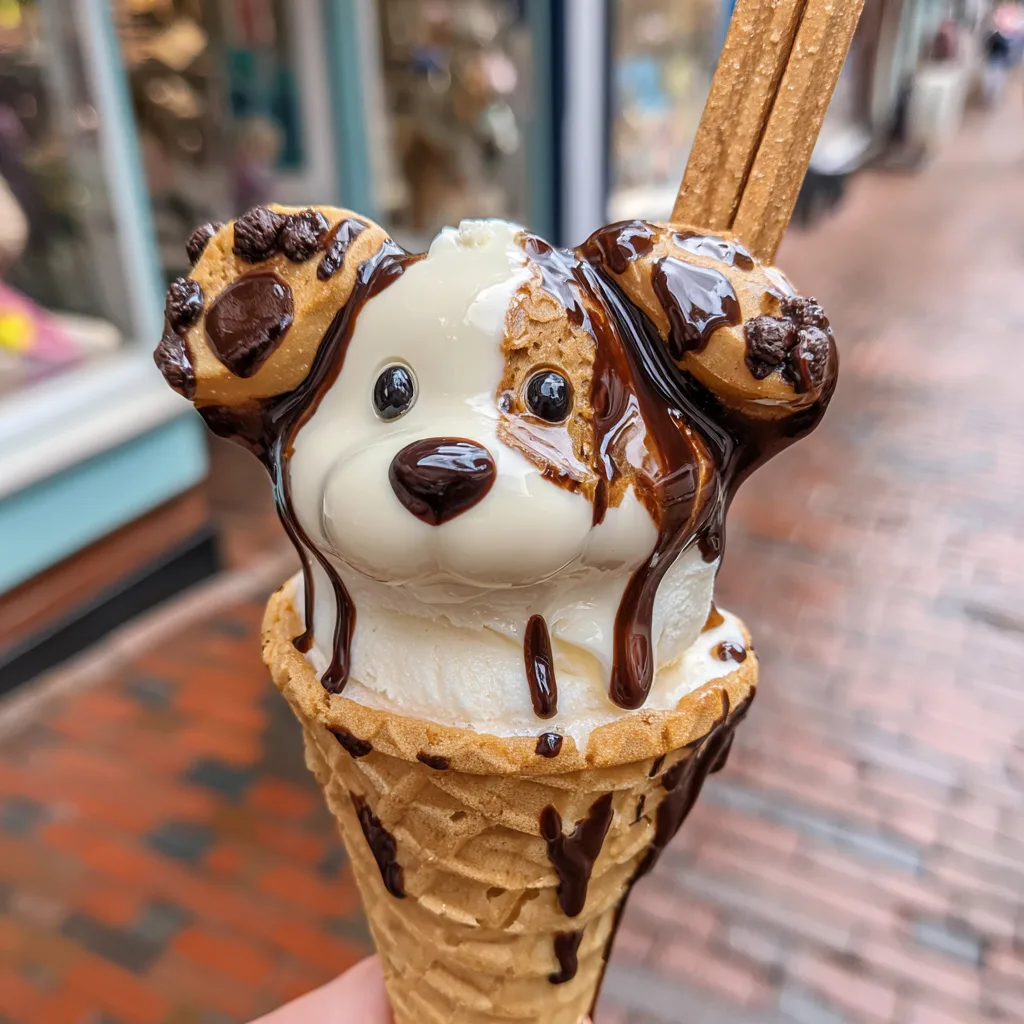
The Chocolate Details: To bring the puppy to life, you need various chocolate components:
– The Ears: Dark chocolate melting wafers or flat, dark chocolate cookies (like the chocolate wafers used for icebox cakes) cut into oblong shapes work perfectly for the floppy ears.
– The Nose and Eyes: Standard semi-sweet chocolate chips can work for the eyes, but larger chocolate melting wafers or chocolate-covered candies (like Milk Duds or Junior Mints) are ideal for the prominent, bulbous nose.
– The Smile: A small amount of melted dark chocolate, placed in a piping bag with a tiny round tip, is necessary to draw the signature curved smile.
– The Extra Flair: A chocolate biscuit stick (such as Pocky) stuck into the back adds a playful, architectural element to the treat.
Essential Tools for Ice Cream Sculpting
Before you begin, you must prepare your workspace. Melted ice cream is the enemy of this project. Having the right tools chilled and ready will make the process infinitely smoother.
- – Parchment Paper: Absolutely essential. You will build and freeze the ice cream components on parchment-lined baking sheets so they don’t stick.
- – Baking Sheet: Must be able to fit flat inside your freezer.
- – Ice Cream Scoops: You will need a large scoop (for the main head) and a smaller scoop or melon baller (for the snout).
- – Small Offset Spatula or Butter Knife: For smoothing the seams between the scoops of ice cream.
- – Piping Bag or Ziploc Bag: For piping the melted chocolate smile.
- – Food-Safe Tweezers (Optional but helpful): For precisely placing the chocolate chip eyes without smudging the surrounding ice cream.
Step-by-Step Instructions for Sculpting
Step 1: Prep Your Station
Clear a significant amount of space in your freezer so a baking sheet can sit perfectly flat. Line the baking sheet with parchment paper and place it in the freezer for at least 30 minutes before you begin. Place your ice cream scoops and offset spatula in the freezer as well. Working with cold tools prevents the ice cream from melting on contact.
Step 2: Form the Base Head
Take your premium vanilla ice cream out of the freezer and let it sit on the counter for just 3-5 minutes so it is scoopable but still very firm. Using your large, chilled ice cream scoop, portion out firm, round balls of ice cream onto the cold, parchment-lined baking sheet. These will form the main part of the puppy’s head. You will need one large scoop per cone. Immediately return the baking sheet to the freezer for at least 30 minutes to allow these base spheres to harden completely.
Step 3: Add the Snout
Once the large spheres are rock solid, remove the baking sheet from the freezer. Using your smaller scoop or melon baller, scoop a smaller mound of ice cream and press it firmly against the lower half of the large sphere to create the protruding snout. Use your chilled offset spatula or the back of a cold spoon to smooth the seam where the two scoops meet, blending them into a single, cohesive dog-head shape. Work very quickly. If the ice cream starts to get soft or glossy, immediately return the tray to the freezer. Once all snouts are attached and smoothed, freeze the tray again for at least 1 hour. The shapes must be completely solid before decorating.
Step 4: Prepare the Chocolate Decorations
While the ice cream heads are hardening, prepare your features. Melt a small amount of dark chocolate (about 1/4 cup) in the microwave in 15-second intervals, stirring until smooth. Let it cool slightly, then transfer it to a small piping bag. Cut your chocolate cookies into floppy ear shapes if you aren’t using pre-shaped chocolate melts. Sort out your chocolate chips for the eyes and the larger chocolate candies for the noses.
Step 5: Decorate the Faces
Remove the hardened ice cream shapes from the freezer. Working one at a time, press a large chocolate candy onto the tip of the snout for the nose. Press two smaller chocolate chips into the upper part of the head for the eyes. Gently press the chocolate cookie “ears” into the sides of the head. Finally, use your piping bag to draw a thin, curved smile starting just under the nose and sweeping up the side of the face. The cold temperature of the ice cream will cause the piped chocolate to harden almost instantly. If the heads start to melt during decoration, put them back in the freezer for 10 minutes before continuing. Once decorated, freeze the completed heads for a final 30 minutes.
Step 6: Assemble and Serve
When you are ready to serve, fill the bottom of your waffle cones with a little bit of extra ice cream or a surprise filling (like fudge or mini marshmallows) to give the heavy head a stable base to sit on. Carefully peel the decorated puppy heads off the parchment paper and place them securely onto the waffle cones. Insert a chocolate biscuit stick into the back or side for a fun, whimsical touch. Serve immediately and watch the smiles light up the room!
Pro-Tips for Ice Cream Artistry
Temperature Control is Everything: The biggest mistake people make is trying to do all the steps at once. If your kitchen is warm, your ice cream will become soup before you finish shaping the snout. The rule of thumb is: if it looks shiny, put it back in the freezer. Do not rush the freezing stages.
The Warm Spoon Trick: If you are having trouble smoothing the seams between the head and the snout, dip your offset spatula or spoon in a glass of warm water, wipe it completely dry with a paper towel, and gently run it over the ice cream. The residual heat will melt just the very top layer, allowing you to smooth it perfectly. Freeze immediately afterward.
Pre-Portioning: If you are making these for a large party, you can do Steps 1 through 5 several days in advance. Keep the decorated heads on the parchment-lined tray, wrap the whole tray tightly in two layers of plastic wrap to prevent freezer burn, and keep them frozen. When it’s party time, simply pop them onto the cones.
Fun Variations and Customizations
Once you master this basic technique, the possibilities for customization are endless. You are not limited to just vanilla puppies!
Chocolate Labradors: Swap the vanilla ice cream for a dense, dark chocolate or chocolate fudge brownie ice cream. Use white chocolate chips for the eyes and a dark chocolate cookie for the ears to create a chocolate puppy.
Strawberry Poodles: Use a smooth strawberry ice cream. Instead of flat cookie ears, you can pipe small rosettes of whipped cream (frozen beforehand) onto the top of the head and ears to mimic fluffy poodle fur.
Dairy-Free Options: This recipe works wonderfully with high-quality, dense dairy-free ice creams made from coconut milk or cashew cream. Just ensure that your chocolate decorations and waffle cones are also certified vegan/dairy-free.
Hosting an Ice Cream Decorating Party
These puppy cones make for a fantastic interactive birthday party activity. Instead of assembling the final faces yourself, you can prepare the blank ice cream heads (the main scoop and the snout) in advance and keep them deep-frozen. Set up a “decoration station” with bowls of different chocolate chips, shaped cookies, sprinkles, and mini M&Ms.
Give each child a waffle cone with a pre-shaped blank head on it, and let them use the candies to create their own unique puppy face. You can use a dab of marshmallow fluff or a tiny bit of softened ice cream on a toothpick as “glue” if they have trouble getting the candies to stick to the frozen surface. It is messy, creative, and incredibly fun.
The Fascinating History of Molded Ice Cream
The practice of shaping ice cream into intricate forms is not a new internet trend; it is a culinary art that dates back centuries. In the late 18th and 19th centuries, molded ice creams were the centerpiece of elaborate Victorian banquets. Wealthy households employed skilled confectioners who used heavy, hinged pewter or lead molds to shape ice cream into fruits, flowers, animals, and even architectural structures.
These early molds required immense skill to use, relying on rock salt and ice mixtures to freeze the cream solid enough to hold the intricate details. When the molds were opened, the resulting ice cream sculptures were often hand-painted with edible food colorings, creating astonishingly realistic centerpieces.
While we trade the antique pewter molds for a simple ice cream scoop and some parchment paper in this recipe, the spirit remains the same: transforming a simple frozen dessert into a delightful, unexpected visual treat that sparks joy and conversation.
Conclusion
Creating Adorable Cartoon Puppy Vanilla Ice Cream Cones at home is a rewarding culinary project that brings out the inner child in everyone. While it requires a bit of patience and strategic use of your freezer, the actual techniques are simple enough for anyone to master. By starting with high-quality ice cream, working in chilled stages, and using fun, accessible chocolate decorations, you can easily replicate the joy of a theme park treat right in your own kitchen.
Whether you are surprising a loved one on a hot summer afternoon, looking for a unique birthday party dessert, or simply wanting to challenge your dessert presentation skills, these puppy cones are guaranteed to be a massive hit. So clear out some freezer space, grab your favorite vanilla bean ice cream, and get ready to sculpt the cutest, most delicious dessert you will make all year. Happy sculpting!
Adorable Cartoon Puppy Vanilla Ice Cream Cones
Ingredients
Equipment
Method
- Line a baking sheet with parchment paper and place in the freezer for 30 minutes. Chill your ice cream scoops.
- Scoop 4 large, firm balls of vanilla ice cream onto the cold baking sheet. Freeze for 30 minutes until solid.
- Use a small scoop to add a mound of ice cream to the lower half of each large ball to create the snout. Smooth the seams with a chilled offset spatula.
- Return the tray to the freezer and freeze for at least 1 hour until the heads are completely rock solid.
- Press large chocolate candies for the nose, chocolate chips for the eyes, and cookie pieces for the ears into the frozen heads.
- Pipe a thin chocolate smile using melted dark chocolate. Freeze for a final 30 minutes.
- Carefully transfer the decorated ice cream heads onto the waffle cones, insert a chocolate stick, and serve immediately.