BBQ Grill Cupcakes
The Ultimate BBQ Grill Cupcakes Recipe: A Fun Summer Party Dessert
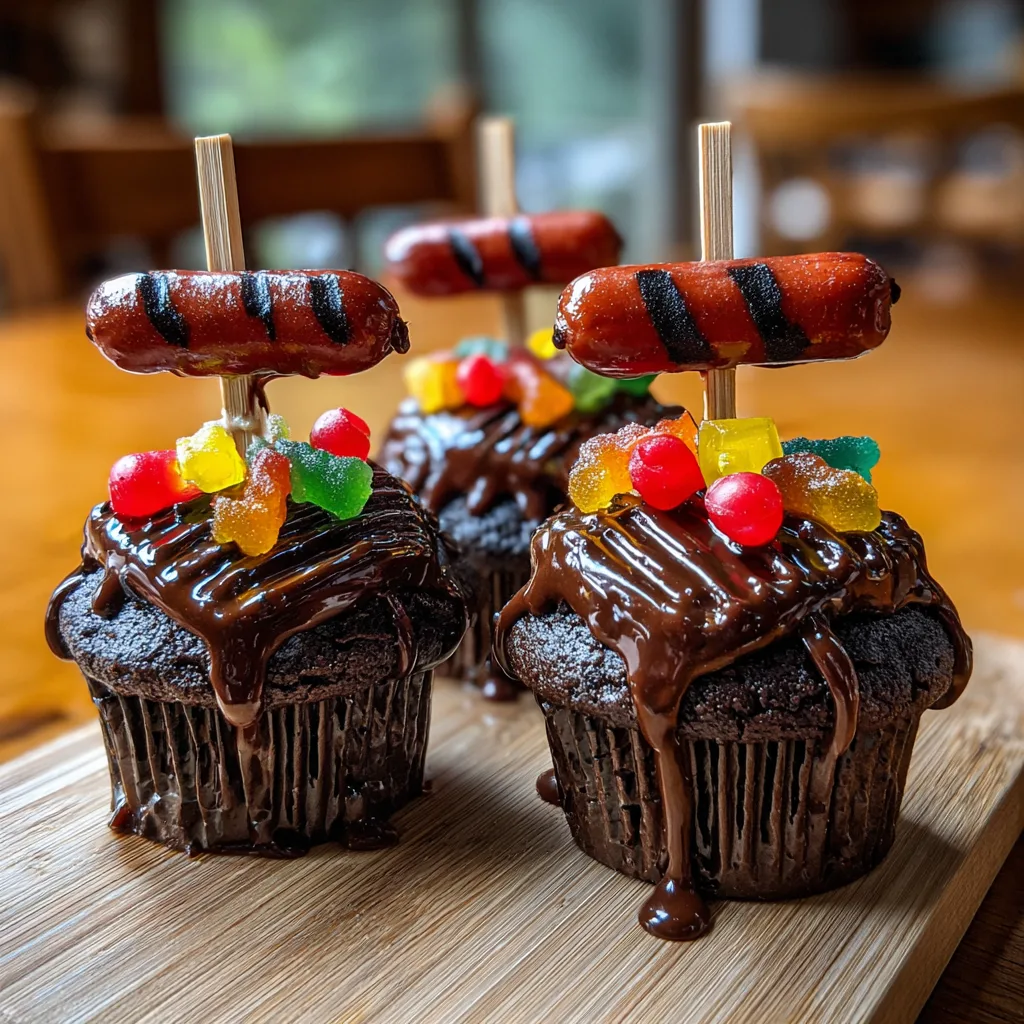
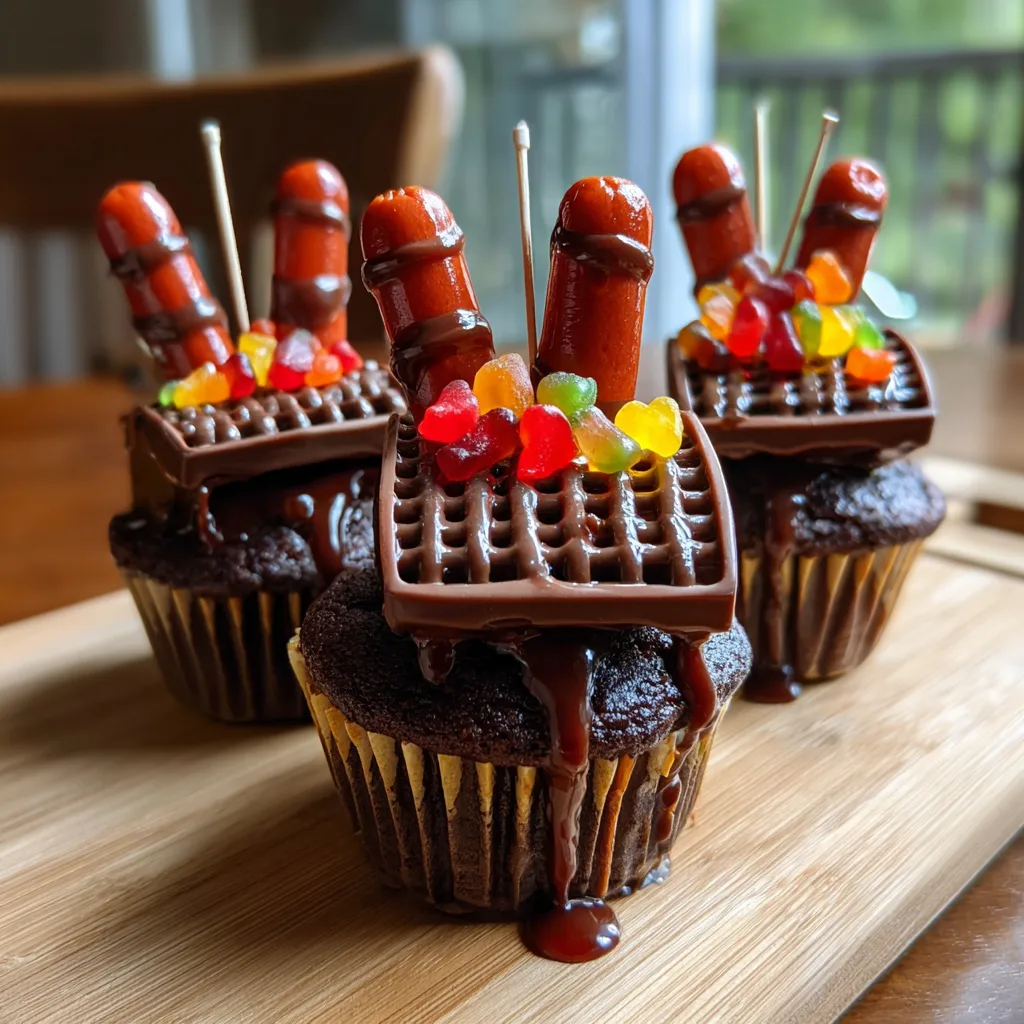
When the weather warms up and the days get longer, there is nothing quite like gathering friends and family for a classic backyard cookout. The smell of charcoal, the sound of sizzling hot dogs, and the laughter of children playing in the yard all combine to create the perfect summer atmosphere. But what happens when you want to bring that same festive, outdoor energy to your dessert table? Enter the ultimate summer treat: BBQ Grill Cupcakes. These incredibly cute, novelty chocolate cupcakes are designed to look exactly like miniature Weber-style barbecue grills, complete with tiny candy hot dogs, sweet gummy skewers, and little legs to stand on. They are the ultimate showstopper for any summer party, Father’s Day celebration, or backyard barbecue.
In this comprehensive guide, we will walk you through everything you need to know to create these adorable, Instagram-worthy treats. From baking the moistest, most decadent chocolate cupcake base to mastering the intricate (but surprisingly easy!) candy decorations, this article is your one-stop resource for perfecting the BBQ grill cupcake. Whether you are an experienced baker or a beginner looking for a fun weekend project with the kids, this recipe is guaranteed to bring smiles to everyone’s faces.
Why You Will Love These BBQ Grill Cupcakes
Novelty desserts have a special way of capturing our imagination, and miniature food is universally loved. These BBQ grill cupcakes take a classic favorite—the humble chocolate cupcake—and elevate it into a work of edible art. But their appeal goes far beyond just their looks. Here is why you will fall in love with this recipe:
- They are incredibly photogenic: In the age of social media, having a dessert that looks as good as it tastes is a huge bonus. These cupcakes are guaranteed to get oohs and aahs from your guests and rack up the likes on your feed.
- They are surprisingly simple to make: While they look like they belong in a professional bakery window, the components are actually very accessible. You are simply baking a standard cupcake, frosting it smoothly, and attaching everyday candies. No advanced pastry degrees are required!
- Perfect for getting kids involved: If you have little ones running around the house, this is the perfect recipe to let them help with. Threading gummy candies onto toothpicks, drawing grill marks on hot tamales, and sticking the little legs into the cupcakes are all highly engaging, kid-friendly tasks.
- They are entirely customizable: Don’t like chocolate frosting? Use vanilla dyed black or grey! Can’t find red hot tamales? Use red jelly beans or mold some red fondant. The “food” on your tiny grill is entirely up to your imagination.
- The ultimate thematic dessert: Whether it is Memorial Day, the Fourth of July, Labor Day, or a summer birthday pool party, these cupcakes fit the theme flawlessly. They act as both a dessert and a centerpiece for your table setting.
The Psychology Behind Miniature Food
Before we dive into the recipe, it is worth exploring why these BBQ grill cupcakes are so universally appealing. Human beings have a documented psychological fascination with miniature things. Psychologists suggest that miniaturized versions of everyday objects give us a sense of control and whimsy. When you take something associated with hot, sweaty labor—like grilling over an open flame—and reduce it to a sweet, bite-sized morsel, it creates a delightful cognitive dissonance. It is unexpected, it is playful, and it immediately puts people in a good mood. When you serve these cupcakes, you aren’t just serving cake; you are serving a tiny, edible experience.
Essential Ingredients for the Perfect BBQ Grill Cupcakes
To build a great house, you need a strong foundation. To build a great novelty cupcake, you need a structurally sound and delicious cake base. Here is a breakdown of the key ingredients you will need to bring these mini grills to life.
The Chocolate Cupcake Base
While you can absolutely use a boxed cake mix if you are short on time, making the chocolate cupcakes from scratch ensures a richer flavor and a denser crumb, which is helpful when you are inserting sticks into the bottom for the grill legs. For the best scratch-made chocolate base, you will need:
- All-Purpose Flour: Provides the necessary structure. Do not use cake flour here, as it might be too delicate to hold the sticks.
- Unsweetened Cocoa Powder: A high-quality Dutch-processed cocoa powder will give your cupcakes that dark, rich, almost black color that mimics a real cast-iron grill.
- Baking Powder and Baking Soda: The leavening agents that give the cupcakes their rise.
- Salt: Essential for balancing the sweetness and enhancing the chocolate flavor.
- Granulated Sugar and Brown Sugar: A mix of both provides sweetness and moisture.
- Vegetable Oil: Oil-based cakes stay moister longer than butter-based cakes, which is ideal if you are making these a day ahead of your party.
- Eggs: Act as the binder holding the batter together.
- Vanilla Extract: Enhances all the other flavors in the batter.
- Hot Water or Hot Coffee: Adding a hot liquid at the end of the batter-mixing process “blooms” the cocoa powder, releasing its full, intense flavor profile.
The “Charcoal” and “Grates” (Frosting)
The top of your cupcake needs to look like the inside of a grill. You have a few options here, but the easiest and most delicious is a simple dark chocolate buttercream or a rich chocolate ganache.
- Dark Chocolate Frosting: You will need enough to smoothly coat the top of each cupcake. You will also need a little extra in a piping bag to draw the grill grates across the top.
- Optional: Crushed Oreos or Black Sprinkles: If you want to add the look of real charcoal briquettes beneath the grates, you can sprinkle crushed chocolate cookies or black sanding sugar on the base layer of frosting before piping the lines.
The Grill Legs and Wheels
To make the cupcakes stand up like a real kettle grill, you need sturdy legs.
- White Lollipop Sticks: These can be found in the baking aisle of most craft stores. You will need three for each cupcake. You can also use thin pretzel sticks if you prefer an entirely edible option, though they are more fragile.
- Brown M&Ms or Junior Mints: These act as the little wheels at the base of the grill legs. You attach them using a tiny dab of leftover frosting or melted chocolate.
The Miniature BBQ Food (Decorations)
This is where the magic really happens!
- Red Oblong Candies: Hot Tamales, Mike and Ikes (the red ones), or even red Jelly Belly jelly beans work perfectly as the miniature hot dogs.
- Edible Black Food Marker: You will use this to draw the little black char/grill marks on your candy hot dogs. This detail is crucial for selling the illusion!
- Assorted Gummy Candies: Look for small gummy bears, gumdrops, or gummy worms that you can cut into small squares. These will represent the chunks of meat, peppers, and onions on your skewers.
- Toothpicks: To thread the gummy candies onto, creating realistic little shish kebabs.
Step-by-Step Instructions for BBQ Grill Cupcakes
Now that we have all our supplies ready, let us walk through the process of creating these masterpieces. The process is broken down into three phases: Baking, Prepping the Decorations, and Assembly.
Phase 1: Baking the Chocolate Cupcakes
- Preparation: Preheat your oven to 350°F (175°C). Line a standard 12-cup muffin tin with dark-colored or black paper liners. Dark liners help maintain the illusion of a black grill casing.
- Whisk Dry Ingredients: In a large mixing bowl, whisk together 1 ½ cups of all-purpose flour, 1 cup of granulated sugar, ½ cup of packed brown sugar, ½ cup of unsweetened cocoa powder, 1 teaspoon of baking soda, ½ teaspoon of baking powder, and ½ teaspoon of salt. Ensure there are no lumps of cocoa.
- Add Wet Ingredients: Add ½ cup of vegetable oil, 2 large room-temperature eggs, and 2 teaspoons of vanilla extract to the dry ingredients. Mix on low speed until just combined. The batter will be thick.
- Bloom the Cocoa: Carefully pour in ½ cup of hot water (or hot brewed coffee for a richer flavor). Mix on low speed until the batter is smooth and relatively thin. Do not overmix.
- Bake: Fill the cupcake liners about ⅔ full. Bake for 18-22 minutes, or until a toothpick inserted into the center of a cupcake comes out clean.
- Cool Completely: Remove the cupcakes from the tin and let them cool completely on a wire rack. Crucial tip: Do not attempt to decorate warm cupcakes, or your frosting grates will melt!
Phase 2: Prepping the “Food” Decorations
While the cupcakes are cooling, you can set up your miniature assembly line for the grill food.
- Make the Hot Dogs: Take your red oblong candies (Hot Tamales). Using your edible black food marker, draw 3 or 4 slanted lines across the top of each candy to mimic grill marks. Set them aside on a plate to let the edible ink dry.
- Build the Skewers: Take a standard wooden toothpick and use scissors to snip off the sharp ends for safety, especially if serving to children. Take your assorted soft gummy candies (cut them into smaller cubes if necessary) and thread 3 or 4 pieces onto each toothpick. Try to alternate colors so they look like different vegetables and meats.
- Prepare the Legs: Cut your white lollipop sticks in half. You will need three half-sticks per cupcake. Using a tiny dab of melted chocolate or thick frosting, glue a brown M&M or Junior Mint to the bottom of two of the sticks (leaving one stick bare to represent the non-wheeled leg of a traditional grill). Let the chocolate set so the wheels are secure.
Phase 3: Assembly and Frosting
- The Base Frosting: Once the cupcakes are completely cool, spread a thin, smooth layer of dark chocolate frosting over the top of each one. You want this as flat as possible. If you are using crushed Oreos for “coals,” sprinkle them on now and gently press them into the frosting.
- Piping the Grates: Put the remaining chocolate frosting into a piping bag fitted with a very small round tip (like a Wilton #2 or #3). Pipe parallel lines straight across the top of the cupcake, spaced about ¼ inch apart. Then, pipe another set of lines perpendicular to the first set to create a grid or “grate” pattern.
- Attaching the Legs: Carefully turn the cupcake upside down (or hold it gently in your hand). Push the three prepared lollipop sticks into the bottom of the cupcake, spacing them out in a triangle formation so the cupcake can stand up like a tripod. Ensure the two sticks with the “wheels” are positioned nicely. Note: Depending on how heavy your cupcakes are, they might be top-heavy. If you are transporting them, wait to put the legs in until you arrive at your destination.
- Grilling Time: Stand the cupcake right-side up on its new legs. Now, gently place 1 or 2 candy hot dogs and a gummy skewer on top of the freshly piped frosting grates. The frosting will act as glue to hold the candy in place.
Creative Variations and Customizations
The beauty of this recipe is that it is essentially a blank canvas for your creativity. Here are some fun ways to mix things up:
- The “Glowing Coals” Effect: Before piping your chocolate grates, spread a thin layer of vibrant red and orange buttercream in the center of the cupcake. Cover the edges with dark chocolate frosting. When you pipe the grates over the top, the red and orange will peek through, making it look like the charcoal is burning hot!
- Fondant Food: If you are skilled with fondant or marzipan, skip the store-bought candies and sculpt your own tiny steaks, hamburgers, corn on the cob, or chicken drumsticks. You can use food coloring to paint them with stunning realism.
- Silver Grills: Want a stainless steel grill look? Bake the cupcakes in silver foil liners instead of black paper liners.
- Vegetarian/Vegan Options: You can easily make the cake base vegan using a plant-based recipe, and swap out gelatin-based gummies for vegan fruit snacks and candies to ensure everyone at the party can enjoy the fun.
Serving Suggestions for Your Summer Cookout
Presentation is everything when it comes to novelty treats. To really sell the BBQ theme, consider how you display these cupcakes at your party.
Instead of a standard cake stand, try serving them on a wooden cutting board to mimic a prep station. You could also buy a cheap, clean piece of artificial turf or a green gingham picnic blanket to use as a table runner, placing the little grills directly on the “grass.” For a truly immersive experience, scatter some extra gummy skewers and candy hot dogs around the base of the cupcakes.
Pair these cupcakes with other summer-themed treats like watermelon slices, lemonade in mason jars, and perhaps some cookies decorated to look like hamburgers for a complete cookout dessert spread.
Fun Facts About Themed Desserts
Did you know that the concept of “trompe l’oeil” (fool the eye) food dates back to medieval times? Medieval banquet hosts would often have their chefs create elaborate dishes that looked like one thing but tasted like another, simply to entertain and surprise their guests. For example, they might serve a dish that looked like a roasted swan, but it was actually made of pastry and filled with spiced fruits. Our modern BBQ grill cupcakes are carrying on a centuries-old culinary tradition of playing with our visual expectations of food!
How to Store and Transport BBQ Cupcakes
Because of their unique construction, these cupcakes require a little bit of special handling.
Storage: If you need to make them ahead of time, it is highly recommended to bake the cupcakes, frost the base layer, and prepare all the candies and legs, but wait to assemble them until the day of the party. The moisture from the cake can sometimes cause the candy hot dogs to become sticky or the colors of the gummies to bleed into the frosting. Store the unfrosted cupcakes in an airtight container at room temperature for up to 3 days.
Transportation: Transporting a fully assembled BBQ grill cupcake (with the legs attached) in a car is risky, as they are prone to tipping over. The best method is to transport the cupcakes in a standard cupcake carrier, and bring the prepared legs and candy toppings in separate Tupperware containers. Once you arrive at the party venue, you can quickly insert the legs and pop the food on the grill. It only takes a few minutes and ensures perfect presentation.
Frequently Asked Questions (FAQs)
Q: My cupcakes keep falling over when I put the legs in. What am I doing wrong?
A: First, make sure you are inserting the sticks deep enough into the cupcake—they should go at least halfway up into the cake. Second, check your angle. The sticks need to be splayed outward slightly, like a real tripod, to provide a wide base of support. Finally, if your cake recipe is too fluffy and light, it won’t grip the sticks. A denser, oil-based chocolate cake works best.
Q: Where can I find an edible black food marker?
A: Edible ink markers are widely available in the cake decorating aisle of craft stores (like Michaels or Joann Fabrics), big-box retailers like Walmart, or online on Amazon. Brands like Wilton and FoodDoodler are very reliable.
Q: I don’t want to use toothpicks for the skewers because I have toddlers. What can I use instead?
A: Safety first! You can use raw spaghetti noodles to thread the gummies onto. The moisture from the gummies will soften the pasta slightly over time, but it will hold up long enough for the party and is completely edible and safe for little mouths. Alternatively, you can just lay the gummies directly on the “grill” without a skewer at all.
Q: Can I use store-bought frosting?
A: Absolutely! Store-bought chocolate frosting works perfectly fine. If it is too soft to pipe distinct grill grate lines, try popping the tub of frosting in the refrigerator for 15-20 minutes to firm it up before transferring it to your piping bag.
Conclusion
Bringing a batch of these BBQ Grill Cupcakes to your next summer gathering is a guaranteed way to make the event memorable. They perfectly encapsulate the joy, creativity, and fun of summer cookouts. While they might look like they require hours of painstaking work, you now know the secret: with a few clever candies, some simple piping, and a batch of rich chocolate cake, you can create a culinary masterpiece that will delight both kids and adults alike. So fire up the oven, grab your candy hot dogs, and get ready to be the star of the dessert table this summer!
BBQ Grill Cupcakes
Ingredients
Equipment
Method
- Preheat oven to 350°F (175°C). Line a 12-cup muffin tin with dark-colored paper liners.
- In a large bowl, whisk together flour, granulated sugar, brown sugar, cocoa powder, baking soda, baking powder, and salt.
- Add vegetable oil, eggs, and vanilla extract. Mix on low speed until combined.
- Carefully pour in hot water and mix until the batter is smooth. Do not overmix.
- Fill cupcake liners 2/3 full. Bake for 18-22 minutes until a toothpick inserted comes out clean. Cool completely on a wire rack.
- Draw slanted grill marks on the red candies using the edible black food marker.
- Thread 3-4 pieces of assorted gummy candies onto the safe toothpicks to create skewers.
- Using a dab of frosting, glue an M&M wheel to the bottom of two-thirds of your cut lollipop sticks. Let set.
- Spread a smooth, flat layer of dark chocolate frosting on top of each cooled cupcake.
- Using a piping bag with a small round tip, pipe frosting lines across the top in a grid pattern to resemble grill grates.
- Carefully insert three prepared lollipop sticks into the bottom of each cupcake to form tripod legs.
- Place the candy hot dogs and gummy skewers on top of the piped frosting grates. Serve and enjoy!