Fluffy Soufflé Pancakes
The Fluffiest Japanese Soufflé Pancakes with Honey Butter Glaze
If you have ever scrolled through social media and stopped dead in your tracks at the sight of jiggly, sky-high pancakes that look more like clouds than breakfast, you have met the famous Japanese Soufflé Pancake. Unlike the traditional flat, dense flapjacks most of us grew up with, these architectural marvels are impossibly tall, incredibly airy, and melt in your mouth the moment they hit your tongue. Drenched in a glossy, rich honey butter syrup, they are not just a meal; they are an experience.
The secret to their towering height and delicate texture lies in the physics of cooking. It is essentially a hybrid between a pancake and a soufflé. By separating the eggs and whipping the whites into a sturdy, glossy meringue, you introduce thousands of tiny air bubbles into the batter. When cooked low and slow with a touch of steam, these bubbles expand, lifting the batter to impressive heights. The result? A breakfast that feels luxurious, professional, and utterly indulgent.
In this guide, we are going to demystify the process. Many home cooks are intimidated by the word “soufflé,” fearing a deflated mess. But with a few simple tricks regarding temperature control and meringue stiffness, you can recreate these café-style hotcakes right in your own kitchen. We will top them off with a homemade amber syrup that coats every inch in liquid gold.
Why You Need This Recipe in Your Life
- Unmatched Texture: There is simply no other breakfast food that offers this specific “cloud-like” consistency. It is soft, moist, and airy all at once.
- Visual Stopper: Let’s be honest—these pancakes are beautiful. They plate up elegantly and look impressive for guests or a special weekend brunch.
- Pantry Staples: Despite looking fancy, the ingredients list is shockingly basic. You likely have everything you need (eggs, flour, milk, sugar) in your kitchen right now.
- The Sauce Factor: This recipe includes a method for a rich, glossy syrup that clings to the pancakes rather than soaking in immediately, ensuring every bite is sweet and moist.
Ingredients
Precision is key here. Because we are relying on egg whites for lift, ensure your ingredients are fresh.
- Eggs (2 large): You will need to separate the yolks from the whites. Cold eggs are easier to separate, but room temperature whites whip up to a higher volume.
- All-Purpose Flour (1/3 cup): Provides just enough structure to hold the air bubbles without weighing the pancake down.
- Milk (2 tbsp): Whole milk is best for richness, but almond or oat milk works too.
- Baking Powder (1/2 tsp): acts as a backup lifting agent to ensure they rise.
- Vanilla Extract (1/2 tsp): Essential for masking any “eggy” flavor.
- Granulated Sugar (2 tbsp): Added gradually to the egg whites to stabilize the meringue.
- Cream of Tartar (1/4 tsp) or Lemon Juice: An acid helps stabilize the egg whites so they don’t collapse.
- Oil or Butter: For greasing the pan.
For the Glossy Amber Syrup
- Maple Syrup (1/2 cup): Use pure maple syrup for the best flavor.
- Butter (2 tbsp): Melted into the syrup for a rich, glossy finish.
- Honey (1 tbsp): Adds viscosity and shine.
Step-by-Step Instructions
Follow these steps closely. The technique is the most important ingredient in this recipe.
1. Separate the Eggs
Crack your eggs and carefully separate the yolks into a medium bowl and the whites into a large, clean, grease-free bowl. Even a drop of yolk in the whites can prevent them from whipping up properly. Place the bowl of whites in the fridge for a moment while you prep the yolk base.
2. Make the Yolk Batter
To the bowl with the yolks, add the milk and vanilla extract. Whisk until smooth. Sift the flour and baking powder directly into this mixture. Whisk until just combined—do not overmix, or the pancakes will be tough. The batter will be thick.
3. Whip the Meringue
Take the egg whites out of the fridge. Add the cream of tartar (or lemon juice). Using an electric hand mixer, beat on medium speed until frothy. Gradually add the sugar, one teaspoon at a time, while continuing to beat. Increase speed to high and whip until stiff, glossy peaks form. When you lift the beaters, the peak should stand straight up without drooping.
4. The Fold
Take one scoop of the meringue and whisk it into the yolk batter to lighten it up. Then, gently fold the remaining meringue into the batter using a spatula. Use a “cut and fold” motion: cut down the middle, scrape the bottom, and fold over. Do not stir! You want to keep those air bubbles intact.
5. The Cooking Method
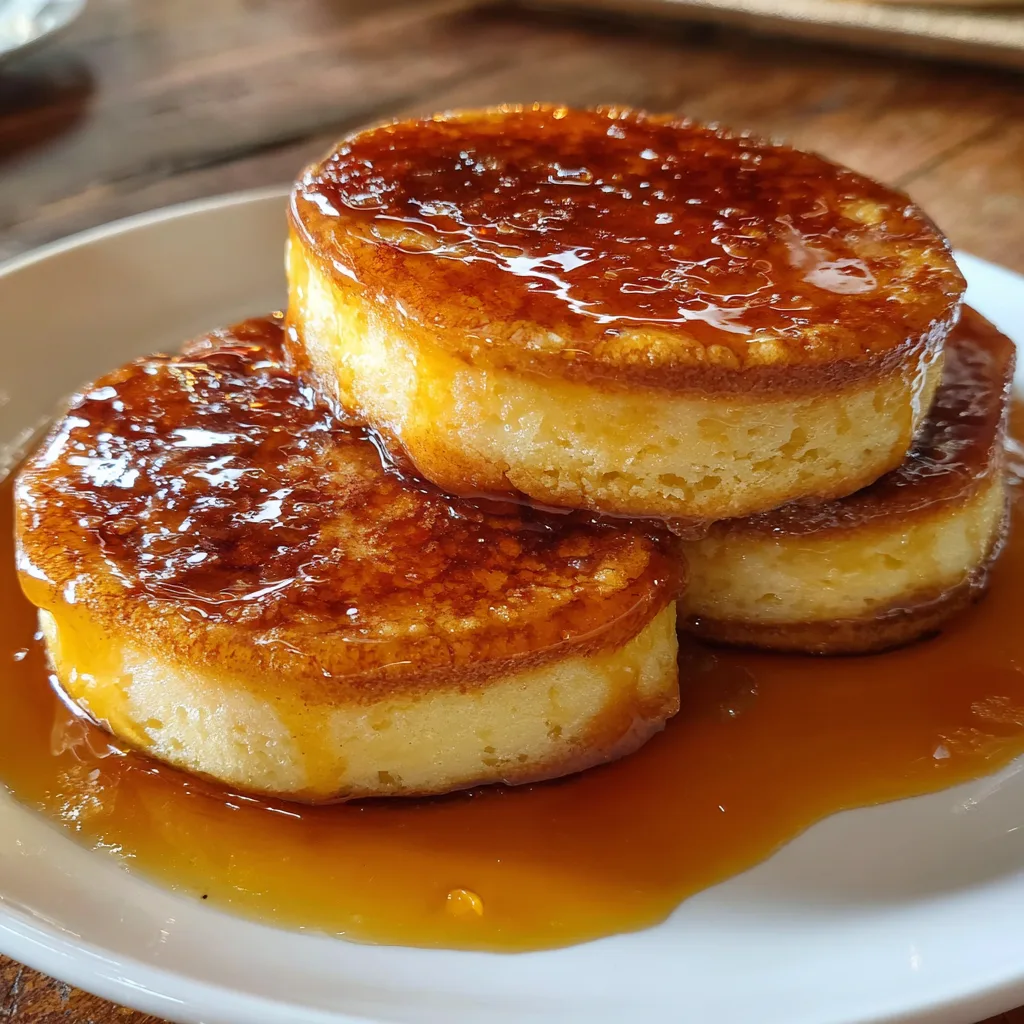
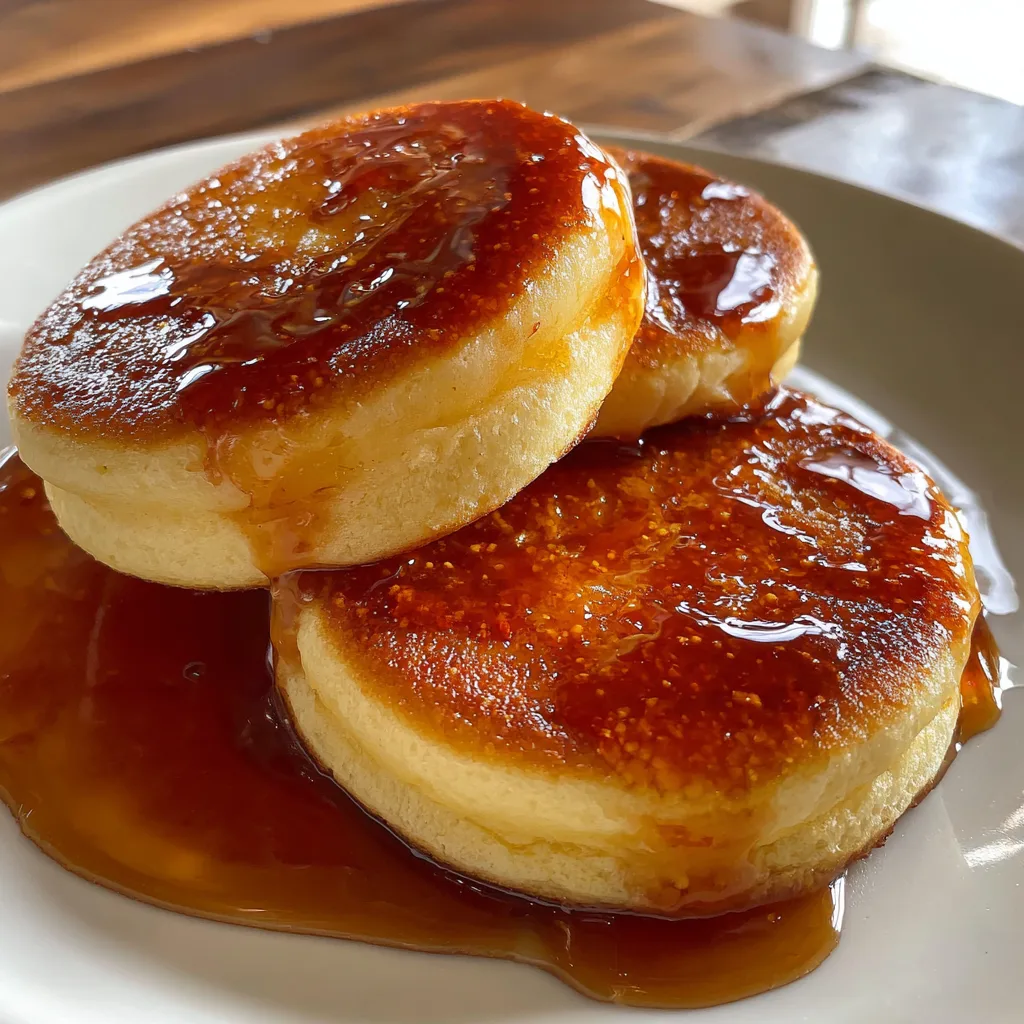
Heat a non-stick pan over very low heat. Lightly grease it with oil and wipe out excess with a paper towel. You can use ring molds for perfect circles (as seen in the photo) or free-hand it. Scoop the batter into the pan (or molds), piling it high. Add 1 teaspoon of water to the empty spaces in the pan (not touching the batter) and cover with a lid immediately. This steam helps them cook through without burning.
6. Flip and Finish
Cook for about 4-5 minutes. The bottoms should be golden, and the tops should look slightly set but still jiggly. Very gently flip them over. Add another teaspoon of water to the pan, cover, and cook for another 3-4 minutes.
7. Make the Glaze
While pancakes are cooking, microwave the butter, honey, and maple syrup together until melted and warm. Whisk to combine into a thick, glossy sauce.
8. Serve
Stack the pancakes gently. Pour the warm, glossy syrup generously over the top, letting it pool on the plate. Serve immediately—soufflé pancakes deflate slightly as they cool!
Tips for Sky-High Success
Low and Slow: If your heat is too high, the outside will burn before the inside is cooked. The inside will be raw and runny. Patience is everything. Keep the flame on the lowest setting.
The Meringue Test: If your meringue isn’t stiff enough, the pancakes will spread flat. You should be able to flip the bowl upside down without the whites moving.
Do Not Peek: Keeping the lid on traps the steam, which is crucial for cooking the center of these thick cakes. Only lift the lid when it is time to flip.
Variations to Try
Once you master the base, try these fun twists:
- Matcha Soufflé: Add 1 teaspoon of high-quality matcha powder to the flour mixture. Serve with sweet red bean paste.
- Chocolate Lover’s: Sift 1 tablespoon of cocoa powder with the flour and top with chocolate ganache instead of syrup.
- Berry Bliss: Fold a few freeze-dried raspberries into the batter gently before cooking for bursts of tartness without adding moisture that would deflate the batter.
Nutritional Benefits
While this is an indulgent breakfast, it does offer some benefits:
- High Protein: Due to the high egg-to-flour ratio, these pack more protein than standard flour-heavy pancakes.
- Portion Control: Because they are so rich and airy, you feel satisfied with fewer pancakes compared to a short stack of diner hotcakes.
- Lower Gluten: The recipe uses very little flour, making it lighter on the digestive system for those sensitive to heavy gluten loads (though it is not gluten-free).
Serving Suggestions
These pancakes are the star of the show, but they pair beautifully with sides that cut through the sweetness. Serve with crispy bacon or savory breakfast sausage to balance the sugar. A side of fresh, tart berries (like blackberries or raspberries) also provides a nice contrast to the rich honey butter glaze. And of course, a hot cup of black coffee is the perfect companion.
Frequently Asked Questions
Why did my pancakes deflate?
Deflation is natural as they cool, but if they collapse immediately, it usually means the meringue was under-whipped or the pancakes were undercooked in the center.
Can I make the batter ahead of time?
No. The air bubbles in the meringue begin to pop as soon as they are mixed. You must cook the batter immediately after folding.
Do I need ring molds?
Not necessarily. The pancakes in the photo are very uniform, which suggests ring molds were used. However, you can achieve a similar height by spooning the batter, waiting a minute for it to set slightly, and then spooning more batter on top of the first mound.
Conclusion
Making Japanese Soufflé Pancakes is a culinary adventure that rewards you with the most delightful breakfast texture imaginable. It turns a standard Sunday morning into a special occasion. With this recipe, you are ready to master the meringue, control the heat, and plate up a stack of golden, glistening, wobbly perfection. Enjoy the fluff!
Japanese Soufflé Pancakes with Honey Glaze
Ingredients
Equipment
Method
- Separate egg yolks and whites into two different bowls. Chill whites until needed.
- Whisk yolks with milk and vanilla. Sift in flour and baking powder, mixing until just combined.
- Beat egg whites with cream of tartar. Gradually add sugar while beating until stiff, glossy peaks form.
- Gently fold the meringue into the yolk mixture in three batches, being careful not to deflate the air.
- Heat a non-stick pan on low heat. Grease lightly. Scoop batter into tall mounds (or use ring molds).
- Add 1 tsp water to the pan (not on pancakes), cover, and steam for 4-5 minutes.
- Gently flip, add more water, cover, and cook for another 3-4 minutes until golden and cooked through.
- Mix warm syrup ingredients and pour generously over the stack. Serve immediately.